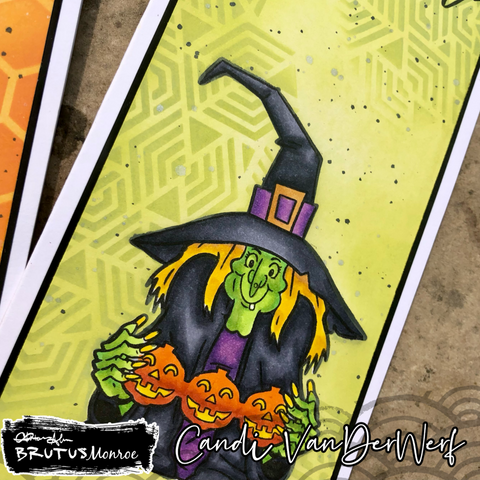
Today is the day for the Limited Edition Brutus Monroe #Stamptember set with Simon Says Stamp. This set is only availble in September and while supplies lasts over at Simon Says Stamp.
Apple Card:
I started by stamping out the apple and sticking with Raven Detail ink on Brutus Monroe Perfect Blend Alcohol Paper. Next, I colored them in with Copic Markers. Then, using my Scan and cut to Cut the images out and attach the stick to the back of my apple with a piece of washi tape. For my card panel, I took a piece of Brutus Monroe Scarlet Cardstock and cut it down to 4.25" x 5.5." Using my Misti, I stamped the caramel apple image all over the paper with Brutus Monroe Embossing Ink. Then I covered the entire panel with Pearl Embossing Powder from Brutus Monroe and heat set it. I cut down the panel to about 4" x 5.25" and attached it the front of my top folding A2 white card base. To attach my colored image, I used some of Brutus Monroe's Easy Foam Tabs. I stamped the sentiment with Simon Hurley Creates Bee Sting ink and used a sentiment strip die to cut it out. Finally, I attached the sentiment to the front of my card and trimmed off any overhang.
Snowman Card:
Using an older Darice Embossing folder, I ran my white card panel through my Big Shot and trimmed it down to about 4" x 5.25." I chose a piece of paper from the Brutus Monroe Playful Plaid pack and cut it down to A2 card front size. Using a small piece of the same paper, I cut an rectangle to mat behind my Snowman piece and attached it to my embossed white panel. I stamped the sentiment from the set with Raven Detail ink in the top left corner above my image and then matted the panel to the plaid mat. After I attached the matted panel to my A2 Card base, I used some glossy accents on the eyes, mouth and hat brim of my image for some shine.
Halloween Card:
I stated with a Precut Slim line panel from Brutus Monroe and placed it in my splat box. I used some Cobweb Limited edition to spray the front of my panel. Then I used Tangerine Orange Chroma Mist, (removing the nozzle and using the tube) to splatter over the background. Next, I used some Creamy Green and Pearl Aqua Pigments which I mixed with some water on an acrylic block, and splattered this over the entire panel with a paint brush. I repeated this with Hunter mixed with Pearl Aqua Pigments. To speed the drying, I heated the panel with my heat tool. Then I used the Spooky Eyes Slim Line Stencil and spread the Glow in the Dark Chroma glaze over the panel. After removing and cleaning my tools, I set the panel aside to dry. While the panel dried, I stamped my images with Raven Detail ink on Perfect Blend Alcohol paper and colored them in with Copic Markers. Once my panel was dry, I cut it down to 3" x 8.25" and matted it on a piece of Raven Cardstock that measured 3.5" x 8.5." I arranged the panel in my Misti and stamped the Spooky sentiment in Raven Detail Ink, using the mummy apples for placement. I attached the Mummy Apples with liquid glue. Then I adhered the entire panel to my Precut Slim line card base from Brutus Monroe. Finally, I added some Glow in the Dark Chroma Glaze to the eyes of my images with a fine tip paint brush. Here is a close up of the Pearl Embossing Powder on my apple card:
If you have not tried the Glow in the Dark Chroma Glaze, you should get some right away, its amazing. Here is a picture of the Back ground. I did not charge the "glow" for long:
I included my affliated (with no cost to you) to all the products available in the Brutus Monroe store above.
However to purchase the STAMPtember stamp and die set for a limited time, while supplies last. Here is a link to the set at Simon Says Stamp: https://www.simonsaysstamp.com/product/brutus-monroe-stamptember-exclusive-stamp-and-die-set-sssd112486c?c=2553
Customers can also purchase the stamp set for a limited time, while supplies last. https://www.simonsaysstamp.com/product/waffle-flower-stamptember-exclusive-stamp-set-sss202410c?c=2553


