Monday, October 26, 2020

Coffee Helps! Stamp of the Month- Interactive Card


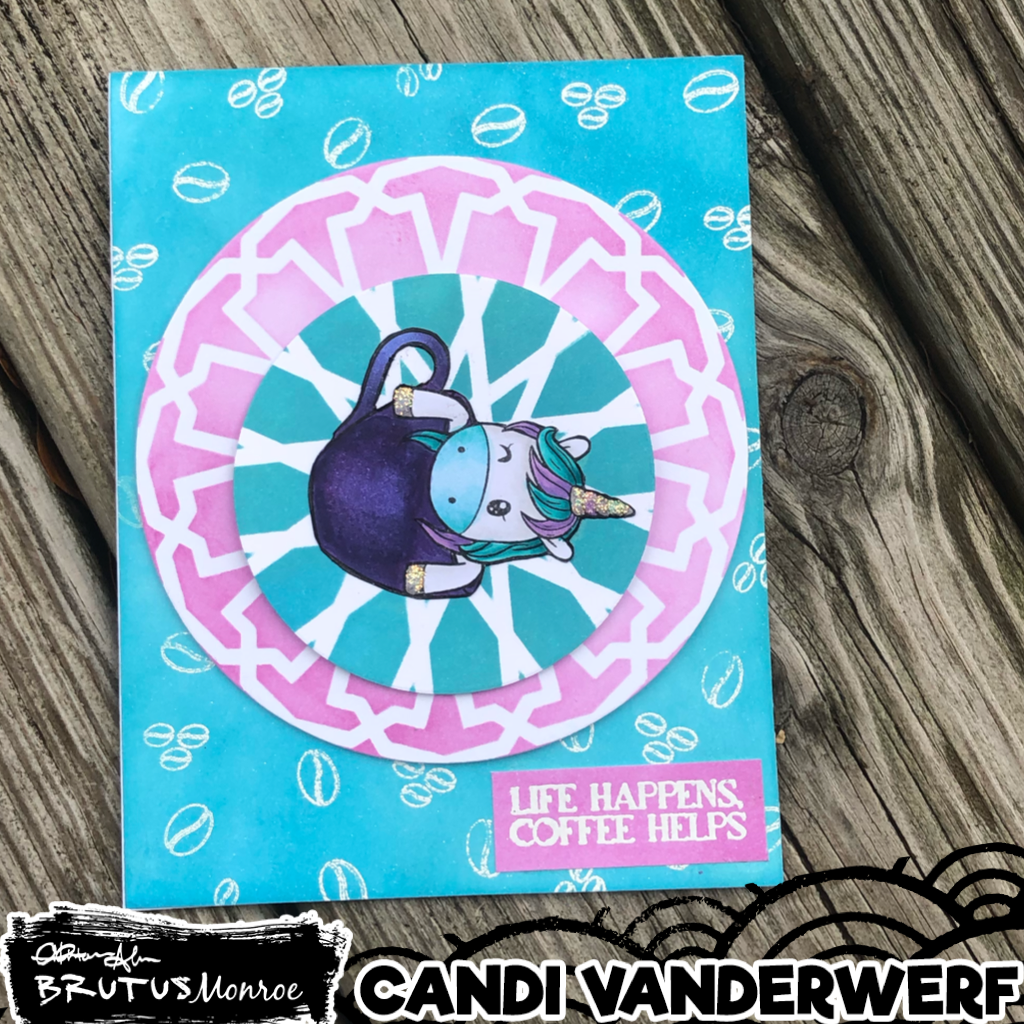
 Today's card is a fun one I think.  It features the stamp of the month from Brutus Monroe and it is this adorable Unicorn in a coffee cup.  I thought it would be fun to make a card that is represented by how I feel both when I do not start my day with Coffee and when I have had too much coffee.

This is a spinner card.  The Unicorn is affixed to the blue circle but that is loose and can wiggle and rotate/spin in a circle.  Here is a quick video of the card in action (its a little wonky since I was filming one handed).


I started by stamping the Unicorn stamp on some Perfect Blend paper with Raven Detail ink and coloring it in with Copic Markers and then fussy cut it out, including carefully in the handle of the cup.  I used a black marker to "edge" the cut out so to mask any imperfections in my cutting.

Next I took the Mixed Media Stencil - Gill and temporarily affixed it to my white card stock with Pixie Spray and using blender brushes and Simon Hurley's Triple Berry ink.  I then used the 2nd largest of the Circle Foundation Dies to cut out the inked background.   I cleaned off my stencil and then attached it to another white piece and used some blue ink from my stash to ink it up again and then used the 2.75" circle from same dies and cut out this panel.  I wanted the panels to "match" but when spins it gets all messed up like the circles had too much caffeine or needs some coffee to function.   

I used liquid glue to attached the Unicorn to the front of the blue circle.  I decided before I would play with the mechanism to make it spin, I would create my background. I took the coffee beans from the stamp set and after using my embossing bag over the entire white A2 panel, I stamped them in random spots with the Brutus Monroe Embossing Ink and covered them with Alabaster Embossing Powder.  After I heat set the powder, I used the same blue ink from before to ink my panel concentrating on the areas that will show.  Then I wiped off the excess ink that was on top of my embossed coffee beans, with a soft cloth.

The spinning mechanism is a little hard to explain.  Basically, I attached a foam square to both sides of a plastic bingo piece and then attached one side to the back of my blue circle (with the unicorn-the item I want to spin).  I then used .75" circle to cut the center out of my pink stenciled background.  I placed the bingo chip in the cutout and attached it to another circle (this time cut out of the 1.75" die).  This attaches my two circles together and my front one can wiggle and spin freely.  I used foam dots around the back of the pink stenciled circle, being careful to keep them away from the white circle that is attached to bingo piece.  I then affixed the whole thing to the front of my coffee bean panel.  I used liquid glue to attach the whole thing to my A2 card base.  Lastly, I ink blended a small white piece of scrap card stock with the same Triple Berry Ink and let it dry for a bit.  Once the ink was set I stamped the sentiment with the same Embossing Ink and Powder.  I heat set it and cut it down to attach to the bottom corner of my card.

Thank you for stopping by and have a great week.


Products used are listed below (affiliated links -no cost to you but they help support my page.) are from Brutus Monroe unless otherwise listed:

Sunday, October 25, 2020

Last Brutus Monroe/Thermoweb Collaboration Card - Joy Blue Wave Foil

I want to apologize for my post is going up so late today.  I have been tired and slept most of the day.  For my last card for the Brutus Monroe and Thermoweb Collaboration week, I featured the Blue Wave Foil.  This foil is stunning and once again the photos do not do it justice.  

Here is a close. up showing the fun pattern in the foil.

I started by spreading the Deco Foil Duo Transfer Gel across the Beautiful Bauble 6x9 Stencil with my Stencil Pal and set it aside until it is tacky. (It takes about an hour depending on how thick I put on the gel.). While drying a dug around in my scrap bin and found a dark blue piece of paper and cut it down to A2 card size.  I put it in my splat box and used some shimmer spray from my stash.  I chose some letter dies and cut out the word Joy from the center of card panel.  

I warmed up my laminator for about 20 mins and then I ran my Bauble pan through.  Remember when using foil the pretty side (the foil you want to see) should be faced up and away from the transfer gel. I cut the panel down to about 4" x 5.25" and lightly ink blended some blue ink to soften the stark white of the background.  I used liquid glue to attach the JOY to the front.  Finally, I attached some of the Silver Glitter Sequins for some added sparkle.


I hope you find some Joy this last week of October and have enjoyed the Collaboration week.  Do you have a favorite card from any of the Design Team from either company?  Thank you for stopping by.

Here is a list of the products used (affiliated links, which are at no additional cost to you, but help support my page); 

Saturday, October 24, 2020

Brutus Monroe/Thermoweb Collaboration Unconventional Christmas Color


One quick card today that I forgot to share yesterday for the Brutus Monroe and Thermoweb Collaboration this week.  I made an unconventional Christmas color using Blue and Yellow.
I started off using Pixie Spray to temporarily attached the Beautiful Baubles 6x9 stencil to my Precut Slim Line Card Panel.  Then I used my Stencil Pal and some of Brutus Monroe's Chromo Glaze-Teal.  While I let my panel dry, I prepared the rest of my card.

I took some Yellow Flock and cut it down to fit my Precut Slim Line Card Base and then I used one of the Circle Foundation dies on the middle of my flock for my sentiment.  (I like to cut matching pieces out of the pieces that are matted behind my panel as no one will ever see it.)

I stamped the Merry & Bright Sentiment from the stamp set of the same name with Raven detail ink on the Yellow Flocked Circle, using my Misti.  I used my Misti so I could stamp it a few times, as sometimes you need multiple times to get a clean stamped image on flock.  

Once my panel was dry, I used liquid glue to attach it to my Yellow Flock mat and then attached both pieces to my card base.  I also used liquid glue to attach my sentiment and for a final touch some Flat Black Pearls.

Thank you for stopping by and check back tomorrow as I will have one more card for our Collaboration week.  Have a great and safe weekend.

List of products and affiliated links when possible (which are at no additional cost to you, they just help to support my creative journey).


Wednesday, October 21, 2020

Brutus Monroe and Thermoweb Collaboration Day 3 (RAINGLOW FOIL!)

Happy Wednesday!  The week is half over already and the month has flown by.  How is it Halloween next week?  Today's card is a simple layout because I wanted to showcase the BEAUTIFUL FOIL from Brutus Monroe/Deco Foil on this card.  It is called Rainglow and you can purchase it here.  The photo does not do the foil justice.  It is Gorgeous!  The rainbow has a "billion" stars in it. 

I started the same as I did with Monday's card.  This time I used the Deco Foil Transfer Gel Duo with the Falling Leaves 6x9 Stencil on a Slim Line Precut Card Panel.  I let it dry and then I ran it through my laminator with the Rainglow foil.  I did trim my foiled panel down slightly and matted it on a piece of blue paper from my scrap bin.  After attaching the whole thing to my Slim Line Precut Card Base, (which I scored and folded at 3.5"), I used a matching blue scrap to stamp my sentiment.  I treated the scrap with my embossing bag and then stamped the Hello (from Super Sentimental) with the Brutus Monroe Embossing ink and covered it with my favorite white Embossing Powder - Alabaster.  After I heat set the sentiment and attached it to my card front.  I added some white flat back pearls next to my sentiment.

 I hope you have been enjoying the collaborations this week.  I have a couple more posts this week.  Come back tomorrow for another Christmas A2 card featuring more foil!


List of products and affiliated links when possible (which are at no additional cost to you, they just help to support my creative journey.)

Tuesday, October 20, 2020

Brutus Monroe/Thermoweb Collaboration day 2


My day 2 collaboration project is my other 2 for one card.  I used the "leftover" flock pieces and I used an eraser and my craft pick to scrap/erase away the indentations left from peeling apart the flock from my panel from yesterdays card.  I was inspired by a recent Jennifer McGuire video to make a top gatefold card in the Slim Line size.  Her video is here.

Using the measurements from Jennifer's video I created my card and attached my two flocked panels to the front of my top and bottom panels.  I used some Gold Glitterstock and cut it down to about 1.5 inches and attached that to the top half of my card covering the opening.  Using one of the large circle foundation dies cut out of white cardstock, I stamped the sentiment from the Merry and Bright Stamp set using the Brutus Monroe Embossing ink.  I chose the Gilded Embossing Powder to cover my sentiment and heat set it.  I used a couple of dies from my stash to cut some "ornaments" from scrap pieces of Emerald Flock and Glitterstock.

Finally I stamped another holiday from my stash with the same embossing ink on a 1/2 inch piece of Emerald flock and heat set the same Gilded embossing powder.  This sentiment I attached to the inside of my card.


Thank you for stopping by today.  Have you started making any holiday cards?

Here is a List of Products that I used, including links to the items in the Brutus Monroe store where available (*affiliate links used at no additional cost to you...a small portion goes to my account to help continue bring you inspiration.  Thank you for supporting me.)


Here is are the two cards using the flock pieces:

Card 1 Using Duo and Flock
Card 2 Using the Negative Piece of Flock

Monday, October 19, 2020

Brutus Monroe and Thermoweb Collaboration--Merry Christmas Card with Flock

 This week I will feature a variety of cards for a collaboration using products from Brutus Monroe and Thermoweb. 

My first card is a two for one.  I will share the first card today and the second one tomorrow.


Above is a look at my Slim Line Card and matching envelope. First thing I did was apply Pixie Spray to the Background Baubles 6x9 stencil to temporarily affix it to my Slimline Precut Card Panel.  I used a Stencil Pal and some Deco Foil Transfer Gel Duo to apply a thin layer of gel over my stencil.  I carefully removed the stencil, set my card panel aside to dry and washed my stencil and pallet knife right away in some warm soapy water.  *Crafty Tip:  Sometime when I am using stencils and a medium like Transfer Gel or Glazes, I keep a clean ice cream bucket of warm soapy water on the floor next to my work area and just put the stencils in the bucket until I am finished.  Then I clean up all of the stencils in the sink, using a nail brush to gently clean off any "hard" to remove areas-like in the instance of glitter.


                                                            While I waited for my card panel to dry (about an hour depending on the thickness of the gel, it dries clear and gets sticky when ready), I scored and folded my Slimline Pre Cut Card Base in half and reinforced the fold with my bone folder.  I used my paper trimmer to cut down my Glitterstock to 8.5" x 3" and used the Merry Christmas word dies from my stash to cut the words out of the center of my glitterstock panel.  *Crafty Tip:  I do that with my mat layers because no one will ever know a cut is in them, it saves on paper, and I have a matching piece for my card.


Once my panel was ready, I turned on my laminator to warm up and placed my Emerald Flock face down on the panel (I used two pieces as they are 6x6 panels and carefully lined them up to cover my whole panel without any seams.  Then I placed the cardbase and the flock inside a folded piece of parchment and ran it through my laminator, twice.  This is something I forget.  With flock you need to run it through the laminator TWICE!


I let the panel cool slightly, then peeled off the flock and tada!  Green fuzzy ornaments.  I glued my panel to the Glitterstock mat and then to my card base.  Using my T-ruler, I lined up my sentiment in the middle and added some confetti circles (from my stash) for some added bling.


Here is a close up of the Glitterstock sentiment and the flock.


I decided I wanted to make a matching envelope, so I used one of the SlimLine Envelopes (Alabaster) from Brutus Monroe.  I lined up my stencil carefully on the left half and used Simon Hurley Creates Later Gator ink with a blender brush.  I then transferred the stencil to the right side of the envelope and recreated the same look.  I kept the darker blend on the ornaments to the outside, where I would not be writing any address and lighter in the middle.


Here is a List of Products that I used.  I have included links to the items in the Brutus Monroe store where available (*affiliate links used at no additional cost to you...a small portion goes to my account to help continue bring you inspiration.  Thank you for supporting me)
I hope you like this card, please stop by tomorrow for another card, this time using the leftover flock from this card to create another Slim Line Christmas Card.

Please let me know what you think.  Have you used flock yet?


Brutus Monroe October 2020 Stencil of the Month Gatefold Card


This week I made a gatefold card using the Stencil of the Month from Brutus Monroe.  Using Pixie Spray from Thermoweb, I temporarily attached half my stencil on a piece of white card stock and using some blender brushes with Bee Sting and Triple Berry Ink from Simon Hurley Creates, to create a beautiful blend.  I used the Bee Sting over the entire panel and concentrated with the Triple Berry in the center.  I repeated this with a second piece of card stock.  I made an A2 card base with 110 lb. white card stock, scoring at 2.5 on both ends to create the gatefold card style.  Next I used liquid glue to attach my two stencil/blended card pieces to each half of my card front.  I carefully lined up the image of the stencil to mirror each other and used my scissors to trim off any extra.


I found a scrap piece of vellum that I cut down to 1.75 inches and folded it around my card base to form my belly band.  Using my foundation square dies, I chose the square that was slightly larger than the band and cut it out of a scrap piece of red glitter cardstock and also from a piece of white.  Using liquid glue to attach the red glitter piece to the front of my belly band and then attaching the white piece to the back of the red glitter piece to give a smooth look and create some stability to my band.  Next I stamped my Jolly Snowman on some Perfect blend paper with Raven Detail ink and colored it in with a few Copic markers.  Then I fussy cut it out, used my memento black marker on the edges and some liquid glue to attach to the red glitter square.   I stamped the Merry Christmas from the same stamp set with Bee Sting ink on the right of the vellum band and added some clear stickles to the snowman to add some sparkle.


Finally, I pulled another sentiment from my stash and stamped it inside the card with Bee Sting ink and the sparkle stamps (also from my stash) in Triple Berry.


Thanks for stopping by I hope you enjoyed my card.  Have a great week and stop by tomorrow for a Christmas Card I made using a collaboration between Brutus Monroe and Deco Foil (Thermoweb).

Links below are affiliated that help support me with no additional cost to you.

Monday, October 12, 2020

Brutus Monroe October Die of the Month


 My card today is a simple holiday card that features the Brutus Monroe Beautiful Bauble die of the month which I cut from a piece of Candy Stripe patterned paper.  I ran it through my laminator with the Sliver Transfer Sheets from Deco Foil (by Thermoweb).  I used some liquid glue to attach the paper to some black flock also by Thermoweb.  I finished off my card by using some of the flat back pearls in red and green.  I also stamped the word Joy with some red ink from the Merry and Bright stamp set by Brutus Monroe on the inside of my A2 white card base.

I decided to not add a sentiment to the front of my card this time, so the Die and foil take the focus of this card.  What do you think?  Did you know you can foil the Brutus Monroe Patterned Paper?  Have you used flock?

Thank you for stopping by and have a great week.


List of *Products used:


*affliated links where available do not have any added cost to you, they just help me to provide content on my blog/channel

Monday, October 5, 2020

Peek A Boo Card using Brutus Monroe Products

 Happy Monday!  This week the Brutus Monroe Design Team focused on making a Child Friendly project.  Today I made a peek a boo card using Jennifer McGuire's method.  You can watch how she assembled it here.  I am excited to send this card to my niece, and now I need to make a fun card for her brother too.

I used a variety of Brutus Monroe products and a couple of items from my stash to make this card.  The first thing I did was to stamp out a bunch of the pumpkins from Pumpkin Faces stamp set  (with Raven Detail Ink and my Misti) on alcohol marker friendly paper, Brutus Monroe's Perfect Blend Cardstock.  It blends Copic and inks beautifully.  Next, I cut all three of the card bases while following Jennifer's instructions.  The front piece is 4-1/4" x 8-1/4" scored at 2-3/4." The back piece is 4-1/4" x 5-3/4" scored at 5-1/2." The inside piece is 4-1/4" x 8-1/2" scored at 4-1/4." I then folded and re enforced each score line with a bone folder.

Next, I used fourth smallest Circle Foundation Die to cut out my circles in the front and folded inside piece making sure they would line up properly when assembled.  I cut out two pieces of patterned paper from the Pumpkin Spice Collection Paper Pad.  The polkadot piece covered the inside of my card and I had to cut out the circle to match as well.  The zigzag "stripe" piece is 2" wide and since it is on the front of my card and it overlapped my opening, I needed to cut a small piece out it to fit over the opening with the same circle die.

I used several Copic markers to color all of my pumpkins in a orange, white and green, fussy cut them out with my Brutus Monroe Scissors and used my memento marker to go over the edges of all my cut out images.  I also had stamped out one pumpkin separately and used the next size up of the Circle Foundation Dies to cut it out.  I also used that same die to cut a piece of orange paper (from my scrap paper bin).  For my card front I chose a brown piece of paper (also from my scrap bin) and ran it through my big shot with a leaf embossing folder.  Then, I cut out the portion that would cover my circle cut out and used liquid glue to attach it and my 2" patterned paper piece to my card base, lining up my circle openings. 

I lined up my stamped and colored pumpkins on the front of my card and once they were where I liked them, I glued them down with liquid glue.  Next, I chose the pumpkin I wanted to show on the peek a boo element, and using the Brutus Monroe Embossing Ink, I stamped a jack o lantern face on the pumpkin, sprinkled it with Raven Sparkle Embossing Powder and melted it with my heat tool.  I also colored the pumpkin (that I left on the die cut circle) with Copics and chose a green to color around the pumpkin.

I assembled the card via Jennifer's Instructions, (please click here if you want to see how). Her video also shows how to attached the pumpkin in the circle which is the image you see when you have the card closed.  I attached the smiling jack o lantern to the peek a boo piece.  Finally, I stamped my sentiment on a matching piece of brown card stock.  The sentiment came from Whistling Windmills and says "You make me smile" and attached it to the inside of my card.


Here is the inside peek a boo card with the Jack O Lantern face showing.


Here is a quick clip of how the card looks when closed and open.


Saturday, October 3, 2020

Happy World Cardmaking Day!


Today's card features several products from Brutus Monroe.  I LOVE HALLOWEEN.  My eldest was born in October and she could celebrate Halloween EVERY day.  Fall is one of my favorite time of year and one of the reason I feel blessed to grow up and live in the Midwest.  I mean:  colorful leaves, pumpkins, sweaters and jeans, coffee on a crispy or cool evening.  What is not to love and once it freezes....NO BUGS.  😂

Anyhoo back to my card.  I made a slim line card.  I used the Trick or Treat stamp set and stamped out my images on alcohol friendly paper with Raven Detail Ink.  Then I used quite a few colors in the Aqua pigment line to paint my images.  (I'm sorry but I forgot to keep track which specific colors I used).  After they dried, I fussy cut them out (thank you very much Cassie for turning me into a fussy cutter - 😅)

I used some heavy weight black cardstock cut down to about 3.25" x 8.25", the Brutus Monroe embossing powder and a sponge dauber, I inked all over the Spooky Eyes slim line stencil.  I wanted some extra sparkle to my card, so I used the Raven Sparkle Embossing Powder and my heat tool to give my background a spooky look.  

Next using a rectangle die from my stash I cut down three pieces of patterned paper.  The bats and tombstones are from the 6X6 Haunted Mansion paper collection and the pumpkin paper is from the Pumpkin Spice 6x6 collection.  I spaced the three rectangles evenly across my Spooky Eyes background and then attached my images on top of each coordinating paper with liquid glue. (I only added glue to back of the bat's body so the wings are free and slightly curved up.) I scattered some black sequins across the front of my panels before attaching the whole thing to a heavyweight gray card base. I decided not to put a sentiment on the outside but only on the inside of my card (stamped with embossing ink for a watermark look).  I chose the Trick or Treat and has the witch hat, both from the same stamp set.


Here is a close up of the sparkle from the Raven Sparkle Embossing Powder and a little that is on the images from the Pearl Aqua pigment that I lightly covered all my images with.

Thanks for stopping by and Happy October!

Here is some direct links to the products I used on this card all from Brutus Monroe.  (These are affiliated links that do not have any extra cost to you.)


Hugs and Kisses Challenge Card (Brutus Monroe)

 This month's CYOEchallenge on the Brutus Monore Fan Club Page is: Break out your sparkles and lets make some fun cards.  I started off...