Showing posts with label Chroma Mist. Show all posts

Sunday, September 12, 2021

Trio of Halloween Slimline Cards with Brutus Monroe


Today I am up on the Brutus Monroe Blog.  Fall is tied as my favorite season along with winter (shocking I know).  However I love Halloween, my daughter was born in October and fittingly could celebrate Halloween all year round.  I always tried to make Halloween special for her and I love making her Halloween cards.

Today I have three cards for you featuring the witches from the Crafty Witch and Witches Brew Stamp sets.  All three cards were made the same but with different stamps, inks and stencils.

To start, I cut down three heavy white cardstock to 8.5" x 7" panels, scored each at 3.5" to create my card bases.  Each 8.5" x 11" cardstock gives me one card base and a card panel.  The card panels measure 8.5" x 4" which I cut down to 8.5" x 3."  First I used Raven Detail ink to stamp the three witches on the bottom half of the card panels.  Then, I used Copic markers to color them.  

Before I inkblended my backgrounds, I created masks for each witch with Masking Paper (or you could use Post-it note paper).  I trimmed each mask down the middle of the outside edge of each stamp.  This gives me masks that are slightly smaller than my image, but yet still cover up the image completely.

Once I covered each colored image with their coordinating masks, I used Distressed inks to lightly ink each background.  Then I used the same ink and a stencil to heavily apply the pattern to a few areas around the panel.
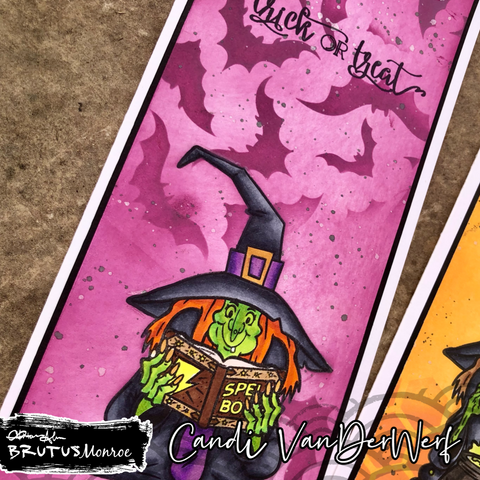
For the Spell Book witch, I used Seedless Preserves and the Batty Stencil.
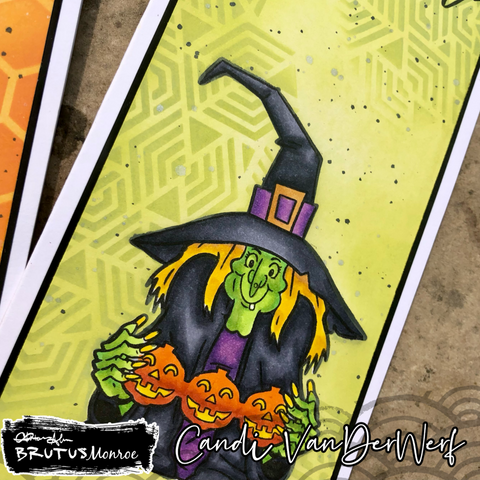
For the Pumpkin witch, I used Twisted Citron and the Hidden Temple Stencil.
For the Cauldron witch, I used Carved Pumpkin and the Honeycomb Stencil.

Next, keeping the masks in place, I place the three panels in my splat box so I could add some splatter.  For the Black Splatter, I used Raven detail reinker and a tiny bit of water to thin it out on an acrylic block and a paint brush to flick it over the card panels.  For the Shimmer splatter, I removed the pump/sprayer from the Pearl Shimmer Mist and used the plastic tube and lightly shook it over the card panels.

Once the panels dried, (it took about 15 mins) I placed each panel in my Original Misti and stamped the sentiments from Crafty Witch with Raven Detail ink towards the top of each panel.  Then I matted each panel on some Raven Cardstock that measured about 3.25" x 8.5" and then finally glued the panels to my white card bases.

Which card is your favorite?  Do you decorate for fall or  Halloween? Thank you for stopping by and have a great day.

Sunday, July 25, 2021

Full Panel Shaker using Chroma Mists and Preprinted Watercolor Panels from Brutus Monroe


Lightly spray out a small amount of Chroma Mists in Bumblebee Yellow, Tangerine Orange, and Candy Apple Red on a Glass Mat or Pallet.  Then take the leaf panel from the Preprinted Watercolor Panel - Fall.  Using a waterbrush, paint each of the leaves with water.  Pick up a Chroma Mist color of choice and drop the color on each leaf.  I chose to let some of the colors mix.  Then either let the panel dry or use a heat tool to dry.  

Repeat with the background, painting on water and dropping in Chroma Mist colors.  Drying between layers, repeat until the colors are what you want.  Using a Rectangle foundation die, cut the panel down to desired size.  

Next, cut down recycled stamp (or other) packaging to 1/2" bigger than your panel.  Then, using Double Sided Tissue Tape - 3/8" on all sides on the back of your dry water colored panel.  Remove three sides of the backing from the Tissue tape and fold over the packaging, wrapping it snuggly against the sides of the panel.  Fill the front panel through the fourth side with desired, sequins, glitter, or shaker fillings.  Remove tape from the fourth side and fold over packaging.  You can carefully trim the corners that overlap to remove extra bulk.

Using more Tissue Tape, over the edges of the packaging and back of the panel and remove release paper.  Attach to a red panel, leaving a 1/4" border.  Adhere matted panel to the front of a Kraft A2 Card base.

For a sentiment,  take some Aqua pigment paper and lightly spray some Tangerine Orange and Bumblebee Yellow Chroma Mist.  Let dry and use the Thanks script from Christopher's Sentiments Cutting die and a die cut machine.  Cut the Shadow layer from some Kraft cardstock and adhere the sentiment together.  Use Liquid Glue to attach the sentiment to the front of the shaker pouch.

Friday, July 16, 2021

Oh My Gourd! I miss you, New Release from Brutus Monore

 Today, I am sharing a quick card using one of the newest Brutus Monroe stamps released yesterday called Oh My Gourd!  Fall is just around the corner, and this release is perfect for all your fall need. This sets features two sentiments and a fantastic pumpkin image that can fill up your A2 card front, however it also fits wonderfully on a slim line card.  You can also get the coordinating die to cut out the pumpkin!

I started with an 8.5" x 3" white card panel and lined it and the pumpkin stamp in my Misti.  Using Raven detail ink, I stamped the image a couple of times (which I always do with new stamps) to get a clean, dark, crisp image.  Next, I started coloring my image with Copic Markers.  Here is a list of the markers I used:

  • Pumpkin body: YR12, YR16, YR18
  • Leaves:  G46, G24, YG63,
  • Stem:     G46, G24, YG63, E33
  • Vines:    G46
  • Flowers: YR21, YR23, Y08

Once I was happy with my coloring, I decided I wanted more color on my panel.  I used a blending tool and some yellow ink from my stash to blend from the sides of my card panel.  I kept the blending heavier on the edges and just light color to white in the middle. For some interest, I splattered on some Bumbleebee Chroma Mist.  To do this, I took the nozzle out of the bottle and just lightly shook it to drip all over the front of the panel, being extra careful around my colored image.

While the Chroma Mist dried, I cut the I miss you sentiment from some dark green cardstock (from my scrapbin) and attached that the the panel with liquid glue. The miss you is from the Dotted Heart Cutting Die set.  I trimmed the missing down to miss and used the extra "i" to complete my sentiment.  Then I lined up the panel in my Misti again, and stamped the Oh My Gourd! sentiment in Raven Detail Ink about the die cut words.

Finally, I trimmed down my panel slightly on the top and bottom and attached it to my card base.  For my card base, I trimmed an 8.5" x 11" card base to 8.5" x 7," scored and folded at the 3.5".

Pop over to the Brutus Monroe Store and get your Fall stamps now!  For more of my creations, you can find me on Instagram here.

Hugs and Kisses Challenge Card (Brutus Monroe)

 This month's CYOEchallenge on the Brutus Monore Fan Club Page is: Break out your sparkles and lets make some fun cards.  I started off...