Showing posts with label Thank You Cards. Show all posts

Friday, May 26, 2023

GIU Day 5--Last Day

 It's my last day for the Growing in Unity Week.  This week just flew by.  I hope you have enjoyed my cards as much as I did making them.  

Today I have another Slim line card.  It was inspired by my guy.  He is the best and he is my biggest fan and supporter (maybe even more than my mom! ) 😲  Shh don't tell her!


I did another watercolor card as I am having fun practicing my skills.  This time, I made my background with the Hit the Bricks background stamp.  Heat embossing clear embossing powder over Black Pigment ink.  I only stamped it part at the top and bottom as I knew the middle would be covered.

To color it, I sprayed the whole thing with a ton of water.  Then I added liquid water color to the top in random areas.  I used a red and brown color.  I sprayed it again with water to get the pigments moving and then twisted and turned it.  Then I smooshed it on my glass mat.  I used the left over to smoosh color on the bottom section.  After drying it with my heat tool, I did a bit more smooshing and then set it aside to dry completely.
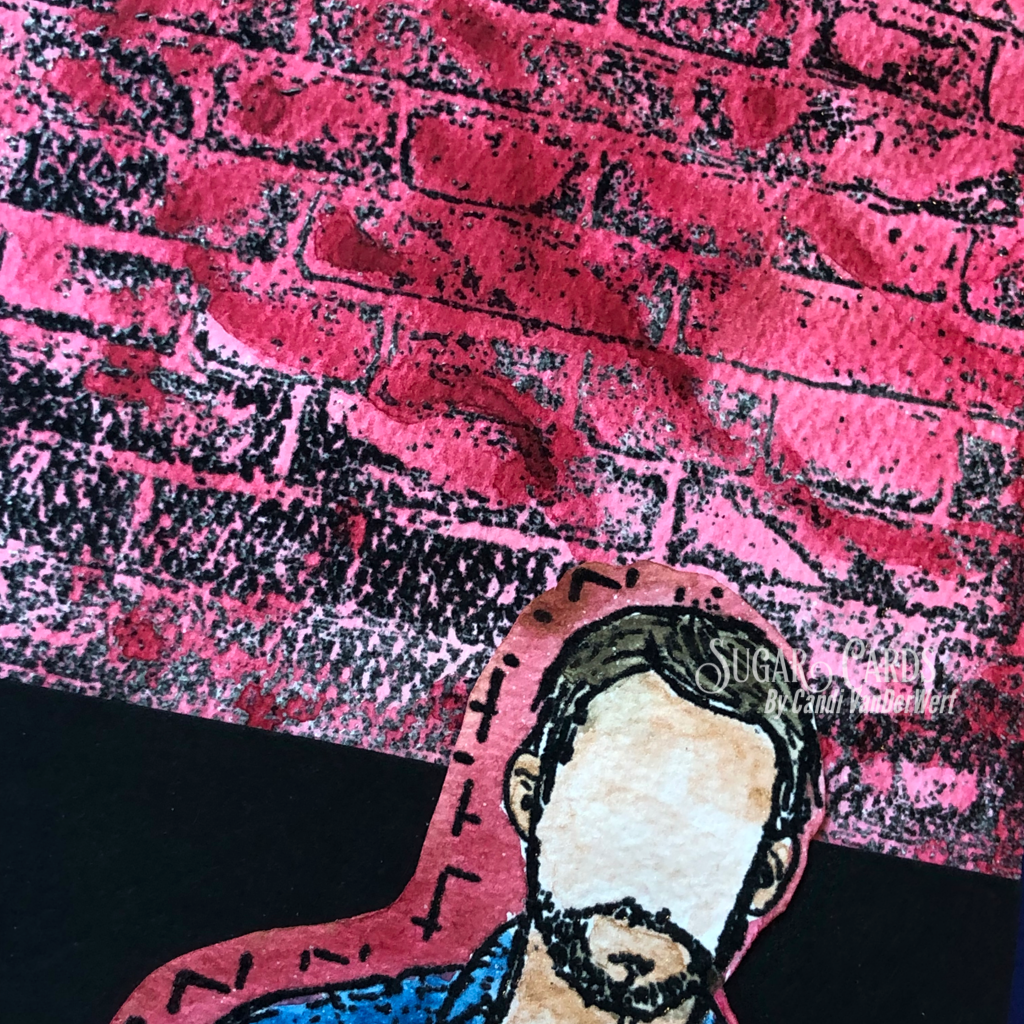


For my image, I used Forrest Guy and after heat setting the same ink and embossing powder, I painted him in with Aqua Pigments.  Then I fussy cut him out.  Added a bit of the same red and brown to the edges.
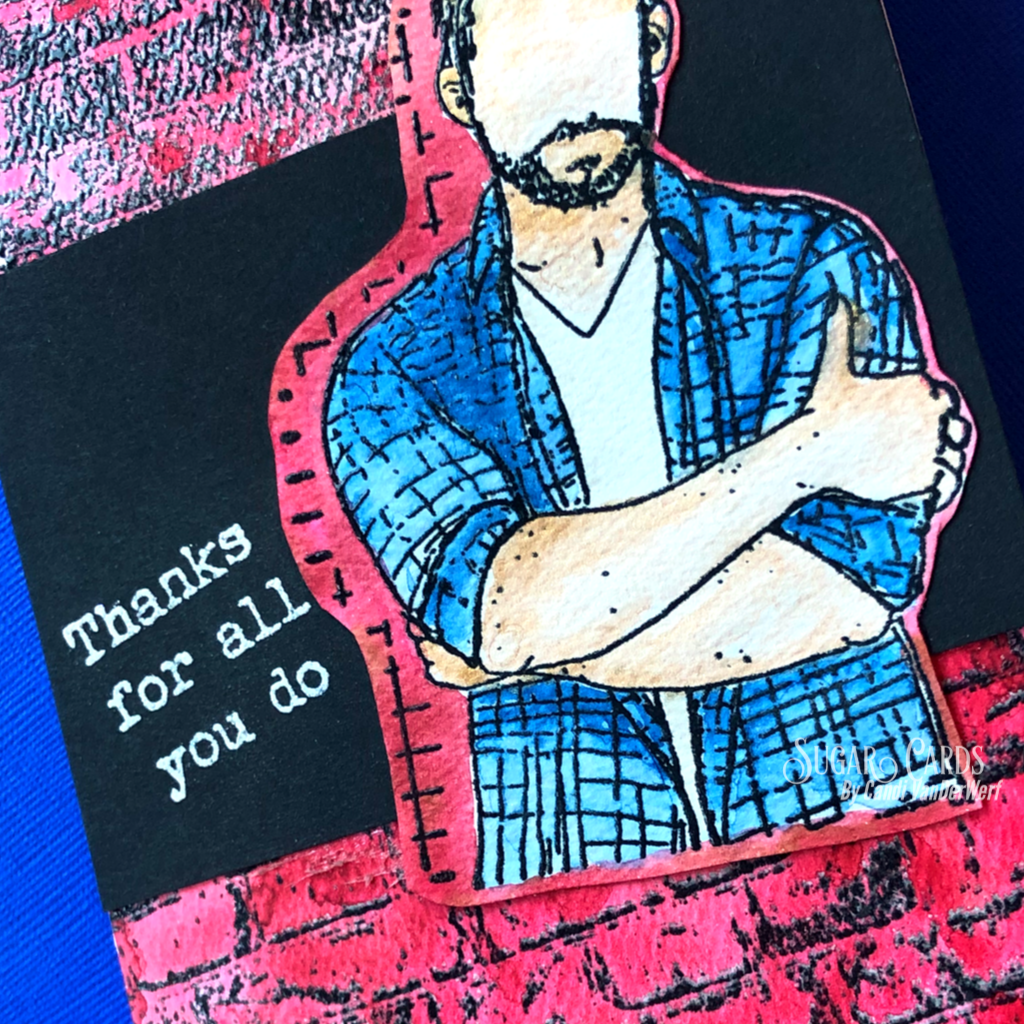


I stamped my sentiment with White Pigment ink and covered with white embossing powder on a scrap of black paper. (I find I get a cleaner and bright white look using White ink with white embossing powder.)  Then once everything was dry I attached it all together.

Thanks for stopping buy everyday.  Please remember to leave a comment here so I can enter you in the giveaway.  As usual you can find my supply list (with affiliate links noted) below.  If you would like to see more content from me you can find me on Social media as Sugar Cards.  Links to all are on the right of page.  Have a great and safe Memorial Day weekend!


Supplies Used:

Monday, August 8, 2022

GIU Week Thanks rainbow card


For my first card this week showcasing Unity Stamp Company products, I wanted to go with an almost one layer and a more simpler card.

I started by placing the Allure border background in my Misti and inked up parts of the stamp with Simon Hurley Creates Shooting Star and stamping it down on my white A2 card panel.  Next, I inked up the image with Bee Sting (also by SHC), overlapping some of the yellow areas.  I repeated this with the SHC Clear Skies ink.  By using these three inks, I can create a rainbow on my background.  I like to use Simon Hurley Inks because the blend well and they also stay "wet" long enough for me to cover the entire image with Embossing Powder.  Here, I used Icicle Embossing Powder from Brutus Monroe and heat set it to give my background a shiny finish.


Next, I used some Deco Foil-Unity Adhesive Transfers for my sentiment.  I cut the Thanks from Sentiments 1 and following the packaging instructions adhered that to the center of my panel.  I covered the transfer with some rainbow foil from my stash (a left over piece from another project).  For the sub sentiment, I stamped For All You Do (from my stash) with Raven Detail Ink from Brutus Monroe.

After I cut down my panel to 4" x 5.25," I adhere it to the front of my Black A2 Card base, including a white blank panel on the inside for my message when sending.  To finish off my card, I used some liquid glue to attached a few iridescent gems around my sentiment.


Thanks for stopping by and I hope you like my projects this week.  Make sure to head over to the Unity {show & tell} Facebook page to leave a comment for a chance to win some Unity products! 


Here are some affiliated links for other products I used, which is no extra cost to you but helps me bring content to you if you would like to purchase some of these items.  (Links above are just direct links to the products and not affiliated).

Wednesday, October 20, 2021

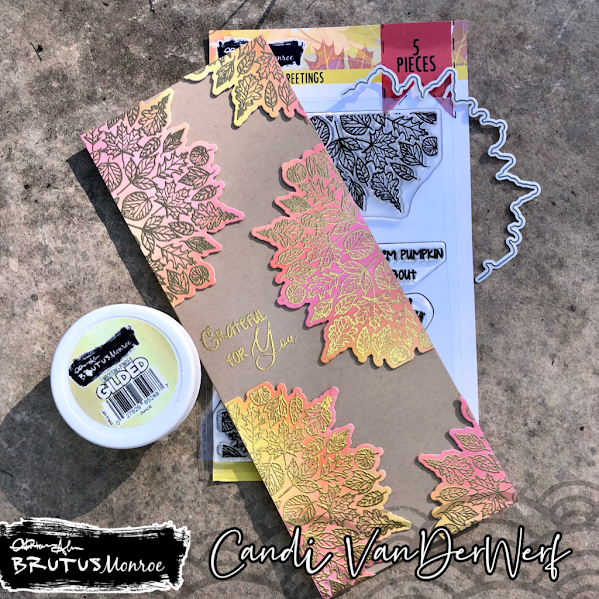
Brutus Monroe Grateful For You Slim Line Card


I started by taking Bee Sting, Sike! and Slippery When Wet inks from Simon Hurley Creates and blended up a couple of white card panels.  Then I used my antistatic bag to treat the front of the panels, lined them up (individually) in my Original Misti and stamped both of the leaf images from Grateful Greetings with Brutus Monroe Embossing Ink.  I covered the ink with Gilded Embossing Powder and heat set it.  (I repeated this until I had 6 embossed images--I only needed 5).


Next I cut out each of the Embossed panels with the coordinating die, and trimmed the end off with my paper trimmer.  I also cut out 10 pieces of the die cut with Kraft paper.  I stacked two of each die cut together with liquid glue and attached one of my Inkblended/Embossed images on top.  This creates dimension for the front of my card.  I created my card base from some Kraft Colored cardstock.  I cut the 8.5" x 11" cardstock down to 8.5" x 7" and scored at 3.."  This creates a slim line card base that measures 8.5" x 3."


I chose my sentiment from the stamp set and used my die cuts for placement and then stamped it in Embossing Ink.  I also covered it with Gilded Embossing Powder and heat set it.  Then I used liquid glue to attach one of my Embossed Die cuts opposite of my sentiment.  Then I placed two of the Embossed Die cuts to the left side of my card base.  For my last two pieces, I attached them at an angle on the right side of my cardbase in each corner.  Finally, I used my paper trimmer to cut off an overhanging piece of die cuts.

Here are (affliated) links to the products used in the Brutus Monroe Store-as always affilated links do not cost you anything extra, they just help me bring you new content.)


Sunday, July 25, 2021

Full Panel Shaker using Chroma Mists and Preprinted Watercolor Panels from Brutus Monroe


Lightly spray out a small amount of Chroma Mists in Bumblebee Yellow, Tangerine Orange, and Candy Apple Red on a Glass Mat or Pallet.  Then take the leaf panel from the Preprinted Watercolor Panel - Fall.  Using a waterbrush, paint each of the leaves with water.  Pick up a Chroma Mist color of choice and drop the color on each leaf.  I chose to let some of the colors mix.  Then either let the panel dry or use a heat tool to dry.  

Repeat with the background, painting on water and dropping in Chroma Mist colors.  Drying between layers, repeat until the colors are what you want.  Using a Rectangle foundation die, cut the panel down to desired size.  

Next, cut down recycled stamp (or other) packaging to 1/2" bigger than your panel.  Then, using Double Sided Tissue Tape - 3/8" on all sides on the back of your dry water colored panel.  Remove three sides of the backing from the Tissue tape and fold over the packaging, wrapping it snuggly against the sides of the panel.  Fill the front panel through the fourth side with desired, sequins, glitter, or shaker fillings.  Remove tape from the fourth side and fold over packaging.  You can carefully trim the corners that overlap to remove extra bulk.

Using more Tissue Tape, over the edges of the packaging and back of the panel and remove release paper.  Attach to a red panel, leaving a 1/4" border.  Adhere matted panel to the front of a Kraft A2 Card base.

For a sentiment,  take some Aqua pigment paper and lightly spray some Tangerine Orange and Bumblebee Yellow Chroma Mist.  Let dry and use the Thanks script from Christopher's Sentiments Cutting die and a die cut machine.  Cut the Shadow layer from some Kraft cardstock and adhere the sentiment together.  Use Liquid Glue to attach the sentiment to the front of the shaker pouch.

Sunday, June 6, 2021

Stencils two ways using inks and chroma glaze


Both of my cards using similar supplies.

First, I started by taking a pre-cut slim line card base and used some washi tape to hold the Slimline Umbrella Stencil in place. I used a blending brush with Marsala Surface Ink,  I repeated this with the 6x6 Umbrella Stencil and an white card panel measuring 4.5" x 5.5."  Before I removed my stencil, I used a palette knife to spread some Pearl Chroma Glaze over the top of both blended panels and stencils.  I used a small layer, spreading in only one direction and not worrying if it covered the entire blended area.  I carefully removed the stencils, set the panels aside to dry and took the stencils to the sink to wash.


Next, I stamped two of the images from the Mother's Day stamp set with Raven detail ink on Perfect Blend Alcohol Paper. I smooshed some Marsala, Grass Stain, and Maple Surface Ink on my glass mat.  Using a water brush, I picked up the ink and painted the flowers with Marsala, the Grass Stain in the leaves and stems, and the Maple for the center of the big flower and the branch. Then I used my Brutus Monroe scissors, to fussy cut out both flowered images.  \

Once my card panels were dry (I usually leave them overnight), I used the Slim line and 2nd largest Rectangle foundation dies to cut them down slightly.  Then, I decided I wanted to mat my panels before I put them on my card base. I cut down some Marsala Card stock.  For my slim line card, I cut the card stock to slightly smaller than 3.5" x 8.5" and for my A2 panel to 4.25" x 5.25."


I used a piece of scrap Marsala cut to 9/16" x 8-7/8," and stamped the Thinking of You sentiment from the stamp set with Brutus Monroe Embossing Ink. I covered it with Alabaster Embossing Powder and heat set it.  I did the same thing for the Thank you sentiment and cut it out with Circle Foundation die.


Next, I attached my panels to my mats and my white card bases.  For my slim line card, I attached the sentiment strip to the panel first and then my image, using liquid glue.  For the A2 Card I attached the image first and then my sentiment also using liquid glue.  For a finishing touch, I used some clear glaze from my stash to add drops to the center of the flowers on my slim line card.
Here is a close up of the shine from the Chroma glaze and the liquid pearls I added to the center of the flowers.


Here is a list of product used with affliate links to the Brutus Monroe Store:


rectangle Foundation dies: BRU1203
Circle Foundation Dies:  BRU1197
Marsala Cardstock: BRU5308
Perfect Blend Alcohol Paper: BRU4013
Precut Slim Line Panel: BRU5164
Mothers Day Stamp Set: Available in Kit
Pearl Chroma Glaze: BRU0114
Alabaster Embossing Powder: BRU2470
Raven Detail Ink:  BRU2543
Embossing Ink: BRU2081
Umbrella Stencil Slim Line: BRU5090
Umbrella Stencil 6x6: BRU5083


Monday, December 28, 2020

2020 Growing in Unity Post #1


Happy Monday!  We have made it to the last week of the year.  I was lucky enough to be chosen to be the Growing in Unity Girl of the week.  I will be posting a project every day this week (M-F) using different Unity Stamp Company products.  Make sure to stop back every day and comment for a chance to win one of two prizes from Unity Stamp Co

I first heard of Unity during one of Angela and Whitney's lives on Facebook.  I thought they were so fun and engaging.  I then met them when I took a class at Junkiefest in 2019 not knowing that they were a company located in my home state of Minnesota.  I fell in love with their Angie Girl stamps and the obsession began.  Over the past two years, I have grown my Unity stamp collection which is primarily made up of  the faceless girls and background stamps.

Today's card is a very simple one that was inspired by my daughter, who lives over 1,000 miles away from me. The stamp I featured is the Wear Confidence stamp set by Angie Blom.  I started by stamping out our girl on some white cardstock with a Copic friendly ink and then colored her in with some teal as that is my daughters favorite color.  She has beautiful long brown hair that I also included in my coloring.  I fussy cut her out and then started on the rest of my card.

Close up to show the shimmer on the corset, which of course is super sparkly in person.


I decided to make a mini slim card.  I took a Neenah Classic Crest Solar White 110 lb cardstock, cut down to  7x6 inches and scored at 3.5 inches to make a 3.5x6" card Portrait card base.  I cut another piece of white cardstock down to 3.5x6" and used an oval die from my stash to cut out a window in the panel.  Then I ran the panel through my Big Shot using the Swiss Dots embossing folder.  (The panel is a little long, so I flipped it around and ran it partially through my machine again to finish the pattern, keeping just a very small space that did not emboss all the way.)

I used some Guppy Ink from Simon Hurley Creates and a blending brush to ink my card base just were it would show through the window.  I used a thank you sentiment (with a teal ink) from Brian guy in the small unembossed area on my Swiss Dot panel. If any dots where there, I used my bone folder to press them down and make the area smooth.  Next I glued the panel to my card base.  I used liquid glue to the back of my Copic colored girl and used my tweezers to slip it behind my embossed panel.  I stamped the sentiment from the stamp set inside my card in the same teal ink I used on the front of the card.

Finally, I added some clear wink of stella to the corset top and center of the yellow flowers of my colored image to give a little sparkle. This card fits in a standard letter envelope, which is one of the reasons I really like the mini slim size.

I love this card and it just reminds me so much of my girl.  I love how she is not afraid to wear what she wants and do her makeup as her mood fits her.  She has a saying she used in high school show choir and dance; "fake it to you make it!" and I think this saying just fits so well with that.  Be confident. no matter what you are wearing.  If you like it, then go for it.  I wish all of our young ladies and little girls could just have that embedded in their heads.  

What do you think of my project?  Do you have a favorite Angie Girl? If so, which one? (I have used one on 4 of my 5 projects this week)  

Thanks for stopping by and don't forget to come by tomorrow where I will share a fun birthday card I made for my honey's upcoming birthday!


Supplies Used:


Monday, November 23, 2020

November 2020 Die of the Month from Brutus Monroe. (2 cards)

 Be Happy Be Bright Be You Card


For my first card using some of the dies from the Brutus Monroe November Die of the Month, I cut out the two large flower dies five (5) times from some scrap white cardstock.  Using pixie spray to temporarily affix them to my white card panel (which measures 8.5" x 3.5").  I chose Worn Lipstick and Squeezed Lemonade from the Distress Oxide Inks and blended them over the top of my cardpanel and flower die cuts, blending the two colors wherever they met.  Before, removing the flowers, I used some shimmer spray from my stash to give some shine to my card.  I carefully peeled off the die cut flowers and saved them from my second card.  I used liquid glue to attach the card panel to my White Slim Line Card Base.  I took a small scrap of white cardstock and stamped the Be Happy, Be Bright, Be You Card from the Floral Frame Stamp set with the same pink oxide ink.  Finally to finish off my card I used some yellow flat back pearls to my sentiment strip.


Thanks Card
This next card was very quick and easy.  I used liquid glue to attach all the die cut flowers used from my Slim Line Card project (Be Happy Be Bright Be You Card) and arranged them around my white A2 Card base.  I flipped the cardbase over and cut off any overhanging pieces, filling in small holes if needed to my card front.  I looked through my scrap bin for some matching pink and yellow cardstock.  I cut down a 4.25" x .5"(about) piece of yellow cardstock and attached that to the top half of my card.  I used a Thanks die from my stash and cut it out of both the pink and a white scrap of cardstock. I sprayed the Thanks with the same shimmer spritz from my stash to have the pink sparkle like the flowers. Next, I glued the pink Thanks to the white, offsetting them slightly to leave a small shadow of white showing.  I attached this to the yellow strip to finish my card.


If you would like to buy this fantastic set of Dies this month, here is my affiliated link to the November 2020 product. (Affiliated link is at no additional cost to you, however I receive a small percentage to help fund my crafting.)


Tuesday, September 29, 2020

Brutus Monroe Stamp of the Month


I started by making my background using the Brutus Monroe Mixed Media Stencil - Joel and some pixie spray to temporalily attached it to my white A2 card panel.  I used Simon Hurley Creates Bee Sting and Slippery When Wet Inks along with some blender brushes to make a tricolor background.  I placed the background with the stencil still attached into a splat box, using a paint brush and the Aqua Pigment in the Pearl Color mixed with a very small amount of water (to thin it out) to splatter some pearl shine all over my panel.  I removed my stencil and let it dry.  

Next I stamped and colored the Turkey from the stamp of the month with Copic Markers.  I wanted my Turkey to be more neutral so I focused on a brown color scheme.  I used my Scan and Cut to cut him out and then used some more Pearl Aqua Pigment to give his top hat band some shimmer.  

After stamping the sentiment on a scrap of white paper, I used the Slippery When Wet ink to blend over the sentiment.  I trimmed it down to a rectangle and popped it up on my card panel with some foam tape. I trimmed my card panel and attached it to my white A2 card base.  Finally, using some liquid glue, I attached my Turkey and some confetti pieces from my stash.


Copics Used:  Turkey Body: E89, E87
Feathers: E43, E42 and E44, E55, E53 
Eyes: B23, B24.  
Feet/Beak: YR15 
Waddle: R29
Hat: C7, C5, C3 
HatBand: V12, V15, V04

LIST OF PRODUCTS (AFFILIATED LINKS-helps to pay for my blog, youtube, instagram at no extra cost to you).


Sunday, September 27, 2020

STAMPtember Collaboration with Brutus Monroe


 Happy Monday.  Today is the release of the STAMPtember collaboration set between Simon Says Stamp and Brutus Monroe.  This is a fantastic set with three holiday wreath images, sentiments, and coordinating dies.  This special set is only available for a short time or until sold out, so do not delay if you want this set, go get it.   FYI: The dies for this set are HUGE and cut out the wreaths easily.  I highly recommend buy them before they sell out.  I made a card using each of the wreaths and their matching dies.


A-Haunting We Will Go

For my first card,  I stamped the Halloween wreath in Brutus Monroe Raven Detail Ink twice on alcohol friendly paper and used my Copic Markers to color in one full wreath and just the pumpkins, and the bat on the second wreath.  I used the coordinating die to cut out my fully colored wreath. Using my Brutus Monroe Fine Detail Scissors, I carefully cut around the pumpkins and bat on the second wreath and used a black marker on the edges to hide any imperfections. I popped up these elements with foam tape directly over their matching images on my colored wreath.  I used some purple ink to lightly ink blend a piece of white cardstock and stamped my sentiment near the bottom with the Raven Detail Ink.  I ran this panel through my Big Shot with a Swiss Dot Embossing folder and cut down the edge of the panel to 3.5 inches.  Using some purple scraps of paper to cover the top and bottom of my Slim Line Card Base, I layered my ink blended and embossed background in the center of my card base.  I then used some liquid glue to attach my wreath to the embossed panel. I added two small white strips of paper to the top and bottom of my focal panel.  Finally I used some Brutus Monroe Aqua Pigment in the Pearl color and a paint brush to the pumpkin faces, the witch's hat brim, the spider web, the bat's eyes and fangs to add some sparkle.


Thankful For You

My second card utilized the Fall wreath, which I stamped on some alcohol friendly paper with Brutus Monroe's Raven Detail Ink.  I also used my Misti to line up the wreath and partially stamp all four corners of my card panel.  I then colored all of the images in with a variety of Copic Markers.  I cut out the full wreath with the matching die and trimmed down the card panel slightly.  I placed my card panel in my splat box and used more Raven Detail Ink mixed with water to splatter the panel with black specks.  I also created splatters with the Pearl Aqua Pigment also by Brutus Monroe.  Using my Misti, I lined up my sentiment (using the full colored wreath for placement) and stamped it to be in the center of the full wreath with Raven detail Ink. I popped up my wreath with foam squares, and then glued the whole panel down to a Kraft A2 Card Base. Finally I took some Glitter Dust in the Gold from Thermoweb to spray over the top of the whole card to give some added sparkle.


The Gold Glitter Dust does not photograph well, but here is a closeup that shows some on the red leaf.


May Your Days Be Merry and Bright

For my third and final card today, I used some black and gray heavy weight cardstock (treated with my embossing bag) in my Misti to stamp the Christmas wreath with my Brutus Monroe Embossing Ink.  I covered the image on the gray paper with the Brutus Monroe Raven Detail Embossing Powder and the image on the black paper with some Ranger Silver Embossing Powder.  I heat set both panels, let the cool for a minute, and then trimmed out the wreaths with the matching die.  I lined up both wreaths on top of one another and using some purple tape to tape the wreaths together, I cut the wreaths in half with my paper trimmer.  I used some purple tape to attach the right black half of the wreath to the left gray half to create a full wreath. Using my Misti and my wreath for placement, I stamped the sentiment and heat set the same silver embossing powder.  I used foam adhesive to pop up my wreath on the center of my white card panel which measures 4" x 5.25."  I matted the panel on a 4.5" x 5.5" black mat and then attached the whole thing to a white A2 card base.  Finally for a pop of color,  I used some of the red pearls (from Brutus Monroe Flat Back Pearl Assorted set) to the center of the bows in the wreath and around my sentiment.


Here is a picture of all three cards together, I apologize for the shiny photo, it rained all day today and I was unable to get a better photo today due to such dark lighting in my house.

Which card is your favorite?  I just love this stamp set and can see using it every year to make some holiday cards.


Hugs and Kisses Challenge Card (Brutus Monroe)

 This month's CYOEchallenge on the Brutus Monore Fan Club Page is: Break out your sparkles and lets make some fun cards.  I started off...