Showing posts with label Fall. Show all posts

Sunday, September 26, 2021

STAMPtember 2021 Brutus Monroe Limited Edition Set


Today is the day for the Limited Edition Brutus Monroe #Stamptember set with Simon Says Stamp. This set is only availble in September and while supplies lasts over at Simon Says Stamp.


Apple Card: 

I started by stamping out the apple and sticking with Raven Detail ink on Brutus Monroe Perfect Blend Alcohol Paper. Next, I colored them in with Copic Markers.  Then, using my Scan and cut to Cut the images out and attach the stick to the back of my apple with a piece of washi tape.  For my card panel, I took a piece of Brutus Monroe Scarlet Cardstock and cut it down to 4.25" x 5.5."  Using my Misti, I stamped the caramel apple image all over the paper with Brutus Monroe Embossing Ink.  Then I covered the entire panel with Pearl Embossing Powder from Brutus Monroe and heat set it.  I cut down the panel to about 4" x 5.25" and attached it the front of my top folding A2 white card base.  To attach my colored image, I used some of Brutus Monroe's Easy Foam Tabs.  I stamped the sentiment with Simon Hurley Creates Bee Sting ink and used a sentiment strip die to cut it out.  Finally, I attached the sentiment to the front of my card and trimmed off any overhang.  


Snowman Card:

I started out stamping the snoman image on Brutus Monroe Perfect Blend Alcohol Paper with Raven Detail ink.  I used Copics to color in my image and then fussy cut it out.
Using an older Darice Embossing folder, I ran my white card panel through my Big Shot and trimmed it down to about 4" x 5.25."  I chose a piece of paper from the Brutus Monroe Playful Plaid pack and cut it down to A2 card front size.  Using a small piece of the same paper,  I cut an rectangle to mat behind my Snowman piece and attached it to my embossed white panel.  I stamped the sentiment from the set with Raven Detail ink in the top left corner above my image and then matted the panel to the plaid mat.  After I attached the matted panel to my A2 Card base, I used some glossy accents on the eyes, mouth and hat brim of my image for some shine.


Halloween Card:
I stated with a Precut Slim line panel from Brutus Monroe and placed it in my splat box.  I used some Cobweb Limited edition to spray the front of my panel.  Then I used  Tangerine Orange Chroma Mist, (removing the nozzle and using the tube) to splatter over the background.  Next, I used some Creamy Green and Pearl Aqua Pigments which I mixed with some water on an acrylic block, and splattered this over the entire panel with a paint brush.  I repeated this with Hunter mixed with Pearl Aqua Pigments.  To speed the drying, I heated the panel with my heat tool.  Then I used the Spooky Eyes Slim Line Stencil and  spread the Glow in the Dark Chroma glaze over the panel.  After removing and cleaning my tools, I set the panel aside to dry. While the panel dried, I stamped my images with Raven Detail ink on Perfect Blend Alcohol paper and colored them in with Copic Markers. Once my panel was dry, I cut it down to 3" x 8.25" and matted it on a piece of Raven Cardstock that measured 3.5" x 8.5."  I arranged the panel in my Misti and stamped the Spooky sentiment in Raven Detail Ink, using the mummy apples for placement.  I attached the Mummy Apples with liquid glue.  Then I adhered the entire panel to my Precut Slim line card base from Brutus Monroe.  Finally, I added some Glow in the Dark Chroma Glaze to the eyes of my images with a fine tip paint brush. 

Here is a close up of the Pearl Embossing Powder on my apple card:


If you have not tried the Glow in the Dark Chroma Glaze, you should get some right away, its amazing.  Here is a picture of the Back ground.  I did not charge the "glow" for long:


I included my affliated (with no cost to you) to all the products available in the Brutus Monroe store above.


However to purchase the STAMPtember stamp and die set for a limited time, while supplies last. Here is a link to the set at Simon Says Stamp: https://www.simonsaysstamp.com/product/brutus-monroe-stamptember-exclusive-stamp-and-die-set-sssd112486c?c=2553


Customers can also purchase the stamp set for a limited time, while supplies last. https://www.simonsaysstamp.com/product/waffle-flower-stamptember-exclusive-stamp-set-sss202410c?c=2553

Sunday, September 12, 2021

Trio of Halloween Slimline Cards with Brutus Monroe


Today I am up on the Brutus Monroe Blog.  Fall is tied as my favorite season along with winter (shocking I know).  However I love Halloween, my daughter was born in October and fittingly could celebrate Halloween all year round.  I always tried to make Halloween special for her and I love making her Halloween cards.

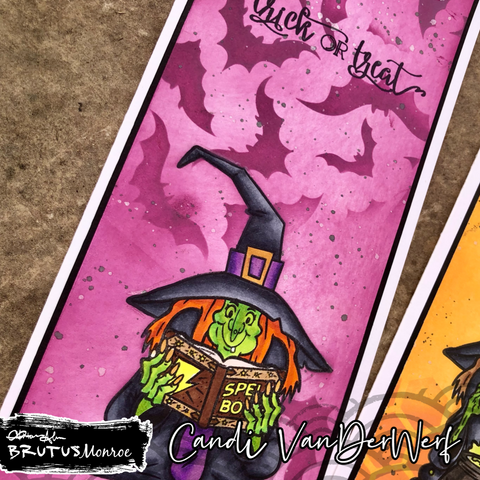
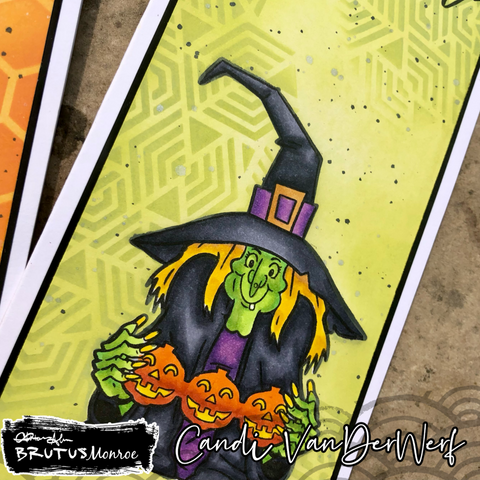
Today I have three cards for you featuring the witches from the Crafty Witch and Witches Brew Stamp sets.  All three cards were made the same but with different stamps, inks and stencils.

To start, I cut down three heavy white cardstock to 8.5" x 7" panels, scored each at 3.5" to create my card bases.  Each 8.5" x 11" cardstock gives me one card base and a card panel.  The card panels measure 8.5" x 4" which I cut down to 8.5" x 3."  First I used Raven Detail ink to stamp the three witches on the bottom half of the card panels.  Then, I used Copic markers to color them.  

Before I inkblended my backgrounds, I created masks for each witch with Masking Paper (or you could use Post-it note paper).  I trimmed each mask down the middle of the outside edge of each stamp.  This gives me masks that are slightly smaller than my image, but yet still cover up the image completely.

Once I covered each colored image with their coordinating masks, I used Distressed inks to lightly ink each background.  Then I used the same ink and a stencil to heavily apply the pattern to a few areas around the panel.
For the Spell Book witch, I used Seedless Preserves and the Batty Stencil.
For the Pumpkin witch, I used Twisted Citron and the Hidden Temple Stencil.
For the Cauldron witch, I used Carved Pumpkin and the Honeycomb Stencil.

Next, keeping the masks in place, I place the three panels in my splat box so I could add some splatter.  For the Black Splatter, I used Raven detail reinker and a tiny bit of water to thin it out on an acrylic block and a paint brush to flick it over the card panels.  For the Shimmer splatter, I removed the pump/sprayer from the Pearl Shimmer Mist and used the plastic tube and lightly shook it over the card panels.

Once the panels dried, (it took about 15 mins) I placed each panel in my Original Misti and stamped the sentiments from Crafty Witch with Raven Detail ink towards the top of each panel.  Then I matted each panel on some Raven Cardstock that measured about 3.25" x 8.5" and then finally glued the panels to my white card bases.

Which card is your favorite?  Do you decorate for fall or  Halloween? Thank you for stopping by and have a great day.

Saturday, July 17, 2021

Oh My Gourd with Aqua Pigments from Brutus Monroe


Today I have another card featuring the Oh My Gourd! stamp set.  This time I water colored the image.  This image fills an A2 card so nicely.

I started by taking a piece of Aqua Pigment Paper.  Next, I placed some Creamy Orange Aqua Pigment on my Glass Media Mat, and
 smooshed the paper into it.  I smooshed more Orange on the paper until I was happy with the coverage.  I set the panel aside to dry overnight.  

Once the panel was dry, I lined up the pumpkin stamp in my Misti and stamped it with Raven Detail Ink. When placing my stamp,  I made sure the majority of the pumpkin would stamp over an orange section of the paper.  

Then I chose a variety of Aqua Pigments:  Red, Sparkle Yellow, Yellow Green and two limited Cider and Hunter and placed each of the aqua pigments in a well in my watercolor tray.  Using a paint brush, I started with the Sparkle Yellow and painted in my pumpkin, right over the already dry orange pigment. Next, I used the Red and painted it towards the bottom of the pumpkin.  I repeated with the Yellow, Red and a little Cider until I was happy with the color.  I used some Aqua Pigments that are no longer available, you can use what ever colors you want.  Just play around and experiment to get the colors you like.  (The Creamy Orange, Cider and Hunter are all unavailable right now, they may comeback someday but for now they are out of stock.) To acheive a creamy orange look you could combine some red and yellow with pearl, or an Orange with Pearl.


Then I used the Hunter at the bottom of the leaves,  the vine and stem.  I used the Sparkle Yellow for the tops of the leaves and blended it together with the Hunter using the Yellow Green Aqua Pigment.  For the flowers, I used Sparkle Yellow and some Pearl aqua Pigment.  I used my heat tool to dry my panel.  Then I used my Misti to stamp the sentiment from the Oh my Gourd set with Raven detail ink.  I used just a tiny bit of the Cider and Sparkle Yellow to add some splatter to my panel and then set that with my heat tool.

I chose a Rectangle foundation die to cut down my panel.  Then I used liquid glue to attach it to a piece of black card stock.  After trimming down the black card stock, I attached the whole thing to a Kraft A2 card base.


Friday, July 16, 2021

Oh My Gourd! I miss you, New Release from Brutus Monore

 Today, I am sharing a quick card using one of the newest Brutus Monroe stamps released yesterday called Oh My Gourd!  Fall is just around the corner, and this release is perfect for all your fall need. This sets features two sentiments and a fantastic pumpkin image that can fill up your A2 card front, however it also fits wonderfully on a slim line card.  You can also get the coordinating die to cut out the pumpkin!

I started with an 8.5" x 3" white card panel and lined it and the pumpkin stamp in my Misti.  Using Raven detail ink, I stamped the image a couple of times (which I always do with new stamps) to get a clean, dark, crisp image.  Next, I started coloring my image with Copic Markers.  Here is a list of the markers I used:

  • Pumpkin body: YR12, YR16, YR18
  • Leaves:  G46, G24, YG63,
  • Stem:     G46, G24, YG63, E33
  • Vines:    G46
  • Flowers: YR21, YR23, Y08

Once I was happy with my coloring, I decided I wanted more color on my panel.  I used a blending tool and some yellow ink from my stash to blend from the sides of my card panel.  I kept the blending heavier on the edges and just light color to white in the middle. For some interest, I splattered on some Bumbleebee Chroma Mist.  To do this, I took the nozzle out of the bottle and just lightly shook it to drip all over the front of the panel, being extra careful around my colored image.

While the Chroma Mist dried, I cut the I miss you sentiment from some dark green cardstock (from my scrapbin) and attached that the the panel with liquid glue. The miss you is from the Dotted Heart Cutting Die set.  I trimmed the missing down to miss and used the extra "i" to complete my sentiment.  Then I lined up the panel in my Misti again, and stamped the Oh My Gourd! sentiment in Raven Detail Ink about the die cut words.

Finally, I trimmed down my panel slightly on the top and bottom and attached it to my card base.  For my card base, I trimmed an 8.5" x 11" card base to 8.5" x 7," scored and folded at the 3.5".

Pop over to the Brutus Monroe Store and get your Fall stamps now!  For more of my creations, you can find me on Instagram here.

Wednesday, October 21, 2020

Brutus Monroe and Thermoweb Collaboration Day 3 (RAINGLOW FOIL!)

Happy Wednesday!  The week is half over already and the month has flown by.  How is it Halloween next week?  Today's card is a simple layout because I wanted to showcase the BEAUTIFUL FOIL from Brutus Monroe/Deco Foil on this card.  It is called Rainglow and you can purchase it here.  The photo does not do the foil justice.  It is Gorgeous!  The rainbow has a "billion" stars in it. 

I started the same as I did with Monday's card.  This time I used the Deco Foil Transfer Gel Duo with the Falling Leaves 6x9 Stencil on a Slim Line Precut Card Panel.  I let it dry and then I ran it through my laminator with the Rainglow foil.  I did trim my foiled panel down slightly and matted it on a piece of blue paper from my scrap bin.  After attaching the whole thing to my Slim Line Precut Card Base, (which I scored and folded at 3.5"), I used a matching blue scrap to stamp my sentiment.  I treated the scrap with my embossing bag and then stamped the Hello (from Super Sentimental) with the Brutus Monroe Embossing ink and covered it with my favorite white Embossing Powder - Alabaster.  After I heat set the sentiment and attached it to my card front.  I added some white flat back pearls next to my sentiment.

 I hope you have been enjoying the collaborations this week.  I have a couple more posts this week.  Come back tomorrow for another Christmas A2 card featuring more foil!


List of products and affiliated links when possible (which are at no additional cost to you, they just help to support my creative journey.)

Monday, October 5, 2020

Peek A Boo Card using Brutus Monroe Products

 Happy Monday!  This week the Brutus Monroe Design Team focused on making a Child Friendly project.  Today I made a peek a boo card using Jennifer McGuire's method.  You can watch how she assembled it here.  I am excited to send this card to my niece, and now I need to make a fun card for her brother too.

I used a variety of Brutus Monroe products and a couple of items from my stash to make this card.  The first thing I did was to stamp out a bunch of the pumpkins from Pumpkin Faces stamp set  (with Raven Detail Ink and my Misti) on alcohol marker friendly paper, Brutus Monroe's Perfect Blend Cardstock.  It blends Copic and inks beautifully.  Next, I cut all three of the card bases while following Jennifer's instructions.  The front piece is 4-1/4" x 8-1/4" scored at 2-3/4." The back piece is 4-1/4" x 5-3/4" scored at 5-1/2." The inside piece is 4-1/4" x 8-1/2" scored at 4-1/4." I then folded and re enforced each score line with a bone folder.

Next, I used fourth smallest Circle Foundation Die to cut out my circles in the front and folded inside piece making sure they would line up properly when assembled.  I cut out two pieces of patterned paper from the Pumpkin Spice Collection Paper Pad.  The polkadot piece covered the inside of my card and I had to cut out the circle to match as well.  The zigzag "stripe" piece is 2" wide and since it is on the front of my card and it overlapped my opening, I needed to cut a small piece out it to fit over the opening with the same circle die.

I used several Copic markers to color all of my pumpkins in a orange, white and green, fussy cut them out with my Brutus Monroe Scissors and used my memento marker to go over the edges of all my cut out images.  I also had stamped out one pumpkin separately and used the next size up of the Circle Foundation Dies to cut it out.  I also used that same die to cut a piece of orange paper (from my scrap paper bin).  For my card front I chose a brown piece of paper (also from my scrap bin) and ran it through my big shot with a leaf embossing folder.  Then, I cut out the portion that would cover my circle cut out and used liquid glue to attach it and my 2" patterned paper piece to my card base, lining up my circle openings. 

I lined up my stamped and colored pumpkins on the front of my card and once they were where I liked them, I glued them down with liquid glue.  Next, I chose the pumpkin I wanted to show on the peek a boo element, and using the Brutus Monroe Embossing Ink, I stamped a jack o lantern face on the pumpkin, sprinkled it with Raven Sparkle Embossing Powder and melted it with my heat tool.  I also colored the pumpkin (that I left on the die cut circle) with Copics and chose a green to color around the pumpkin.

I assembled the card via Jennifer's Instructions, (please click here if you want to see how). Her video also shows how to attached the pumpkin in the circle which is the image you see when you have the card closed.  I attached the smiling jack o lantern to the peek a boo piece.  Finally, I stamped my sentiment on a matching piece of brown card stock.  The sentiment came from Whistling Windmills and says "You make me smile" and attached it to the inside of my card.


Here is the inside peek a boo card with the Jack O Lantern face showing.


Here is a quick clip of how the card looks when closed and open.


Saturday, October 3, 2020

Happy World Cardmaking Day!


Today's card features several products from Brutus Monroe.  I LOVE HALLOWEEN.  My eldest was born in October and she could celebrate Halloween EVERY day.  Fall is one of my favorite time of year and one of the reason I feel blessed to grow up and live in the Midwest.  I mean:  colorful leaves, pumpkins, sweaters and jeans, coffee on a crispy or cool evening.  What is not to love and once it freezes....NO BUGS.  😂

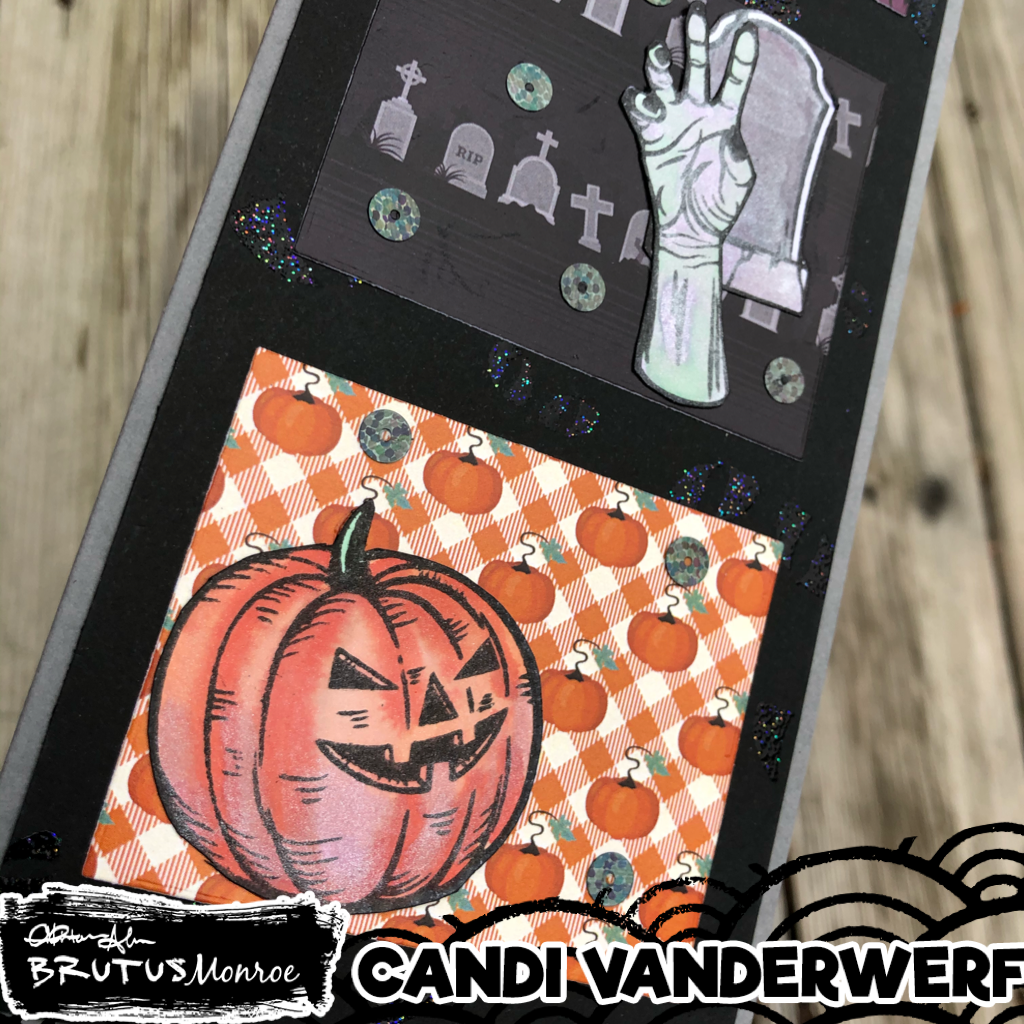
Anyhoo back to my card.  I made a slim line card.  I used the Trick or Treat stamp set and stamped out my images on alcohol friendly paper with Raven Detail Ink.  Then I used quite a few colors in the Aqua pigment line to paint my images.  (I'm sorry but I forgot to keep track which specific colors I used).  After they dried, I fussy cut them out (thank you very much Cassie for turning me into a fussy cutter - 😅)

I used some heavy weight black cardstock cut down to about 3.25" x 8.25", the Brutus Monroe embossing powder and a sponge dauber, I inked all over the Spooky Eyes slim line stencil.  I wanted some extra sparkle to my card, so I used the Raven Sparkle Embossing Powder and my heat tool to give my background a spooky look.  

Next using a rectangle die from my stash I cut down three pieces of patterned paper.  The bats and tombstones are from the 6X6 Haunted Mansion paper collection and the pumpkin paper is from the Pumpkin Spice 6x6 collection.  I spaced the three rectangles evenly across my Spooky Eyes background and then attached my images on top of each coordinating paper with liquid glue. (I only added glue to back of the bat's body so the wings are free and slightly curved up.) I scattered some black sequins across the front of my panels before attaching the whole thing to a heavyweight gray card base. I decided not to put a sentiment on the outside but only on the inside of my card (stamped with embossing ink for a watermark look).  I chose the Trick or Treat and has the witch hat, both from the same stamp set.


Here is a close up of the sparkle from the Raven Sparkle Embossing Powder and a little that is on the images from the Pearl Aqua pigment that I lightly covered all my images with.

Thanks for stopping by and Happy October!

Here is some direct links to the products I used on this card all from Brutus Monroe.  (These are affiliated links that do not have any extra cost to you.)


Sunday, September 27, 2020

STAMPtember Collaboration with Brutus Monroe


 Happy Monday.  Today is the release of the STAMPtember collaboration set between Simon Says Stamp and Brutus Monroe.  This is a fantastic set with three holiday wreath images, sentiments, and coordinating dies.  This special set is only available for a short time or until sold out, so do not delay if you want this set, go get it.   FYI: The dies for this set are HUGE and cut out the wreaths easily.  I highly recommend buy them before they sell out.  I made a card using each of the wreaths and their matching dies.


A-Haunting We Will Go

For my first card,  I stamped the Halloween wreath in Brutus Monroe Raven Detail Ink twice on alcohol friendly paper and used my Copic Markers to color in one full wreath and just the pumpkins, and the bat on the second wreath.  I used the coordinating die to cut out my fully colored wreath. Using my Brutus Monroe Fine Detail Scissors, I carefully cut around the pumpkins and bat on the second wreath and used a black marker on the edges to hide any imperfections. I popped up these elements with foam tape directly over their matching images on my colored wreath.  I used some purple ink to lightly ink blend a piece of white cardstock and stamped my sentiment near the bottom with the Raven Detail Ink.  I ran this panel through my Big Shot with a Swiss Dot Embossing folder and cut down the edge of the panel to 3.5 inches.  Using some purple scraps of paper to cover the top and bottom of my Slim Line Card Base, I layered my ink blended and embossed background in the center of my card base.  I then used some liquid glue to attach my wreath to the embossed panel. I added two small white strips of paper to the top and bottom of my focal panel.  Finally I used some Brutus Monroe Aqua Pigment in the Pearl color and a paint brush to the pumpkin faces, the witch's hat brim, the spider web, the bat's eyes and fangs to add some sparkle.


Thankful For You

My second card utilized the Fall wreath, which I stamped on some alcohol friendly paper with Brutus Monroe's Raven Detail Ink.  I also used my Misti to line up the wreath and partially stamp all four corners of my card panel.  I then colored all of the images in with a variety of Copic Markers.  I cut out the full wreath with the matching die and trimmed down the card panel slightly.  I placed my card panel in my splat box and used more Raven Detail Ink mixed with water to splatter the panel with black specks.  I also created splatters with the Pearl Aqua Pigment also by Brutus Monroe.  Using my Misti, I lined up my sentiment (using the full colored wreath for placement) and stamped it to be in the center of the full wreath with Raven detail Ink. I popped up my wreath with foam squares, and then glued the whole panel down to a Kraft A2 Card Base. Finally I took some Glitter Dust in the Gold from Thermoweb to spray over the top of the whole card to give some added sparkle.


The Gold Glitter Dust does not photograph well, but here is a closeup that shows some on the red leaf.


May Your Days Be Merry and Bright

For my third and final card today, I used some black and gray heavy weight cardstock (treated with my embossing bag) in my Misti to stamp the Christmas wreath with my Brutus Monroe Embossing Ink.  I covered the image on the gray paper with the Brutus Monroe Raven Detail Embossing Powder and the image on the black paper with some Ranger Silver Embossing Powder.  I heat set both panels, let the cool for a minute, and then trimmed out the wreaths with the matching die.  I lined up both wreaths on top of one another and using some purple tape to tape the wreaths together, I cut the wreaths in half with my paper trimmer.  I used some purple tape to attach the right black half of the wreath to the left gray half to create a full wreath. Using my Misti and my wreath for placement, I stamped the sentiment and heat set the same silver embossing powder.  I used foam adhesive to pop up my wreath on the center of my white card panel which measures 4" x 5.25."  I matted the panel on a 4.5" x 5.5" black mat and then attached the whole thing to a white A2 card base.  Finally for a pop of color,  I used some of the red pearls (from Brutus Monroe Flat Back Pearl Assorted set) to the center of the bows in the wreath and around my sentiment.


Here is a picture of all three cards together, I apologize for the shiny photo, it rained all day today and I was unable to get a better photo today due to such dark lighting in my house.

Which card is your favorite?  I just love this stamp set and can see using it every year to make some holiday cards.


Hugs and Kisses Challenge Card (Brutus Monroe)

 This month's CYOEchallenge on the Brutus Monore Fan Club Page is: Break out your sparkles and lets make some fun cards.  I started off...