Showing posts with label Christmas. Show all posts

Wednesday, November 9, 2022

Rainbow Swirl Stencil Christmas Card


Today I bringing you a Christmas Card featuring the Rainbow Spiral Stencil. I used 4 Simon Hurley Create. Inks.  Two Reds (Love Struck and Game Over) and two greens (Overzealous and Fake Plant).  I started with Love Struck and blended the first stripe.  After I wiped the excess ink off the stencil, I used the lines on the stencil to line up my spiral and then blended with Game Over. I wiped the stencil off again, relined it up with Overzealous and then repeated with Fake Plant.

Continuing to wipe off my stencil between inks, I completed the spiral alternating back and fourth between the red and green inks until my circle was complete.  Next I used some watered down Pearl Aqua Pigment and a paint brush to cover the entire blended area.  This gives the spiral lots of shimmer and shine.

I trimmed the panel to 4" x 5.25" with my paper cutter. Using my scissors, I trimmed out the spiral around the outside and used a circle die to cut out the center.  I adhered the Spiral to and A2 Top folding Card base, lining up the spiral edge with the right edge of my card base. 
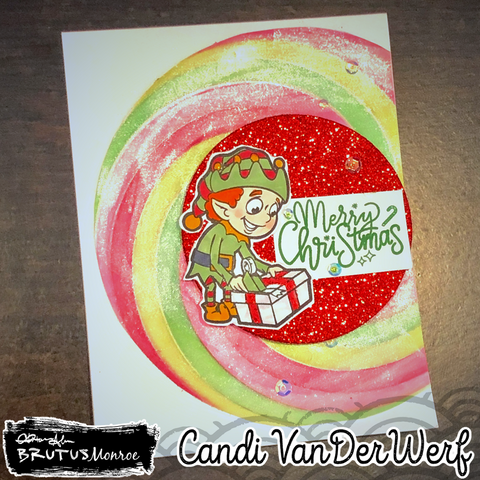
Next, I used another circle die to cut some Red Glitterstock for the center of my spiral.  I adhered this with some foam tape.  For a focal point, I stamped one of the elves from Crafty Elves with Raven Detail Ink on Perfect Blend Alcohol paper and colored him in with Copic markers.  After I fussy cut him out, I added some shimmer to the yellow on his outfit and to the red ribbon on the package (also with some watered down Pearl Aqua Pigment).

For my sentiment, I stamped the Merry Christmas from the Snowflake Swirl stamp set with Fake Plant and trimmed it down.  I adhered both my sentiment and elf to the center of the Glitterstock circle with liquid glue.

Finally, I added just a touch of more sparkle with some sequins from my stash.

Here is the video I made to go with this card:


Affiliate Links:

Rainbow Spiral Stencil: https://shrsl.com/3s8j2

Perfect Blend Paper: https://shrsl.com/3s8k8

Pearl Aqua Pigment: https://shrsl.com/3s8jt

Crafty Elves Stamps: https://shrsl.com/3s8jw

Crafty Elves Coordinating Dies: https://shrsl.com/3s8k4

Glitter Stock: https://shrsl.com/3s8k5

Circle Foundation Dies: https://shrsl.com/3s8lm

Raven Detail Ink: https://shrsl.com/3s8k9

Top Folding A2 Card Bases: https://shrsl.com/3s8ka

Simon Hurley Create. Love Struck Ink: https://shrsl.com/3s8kc

Simon Hurley Create. Game Over Ink: https://shrsl.com/3s8ke

Simon Hurley Create. Overzealous Ink: https://shrsl.com/3s8kg

Simon Hurley Create. Fake Plant Ink: https://shrsl.com/3s8kh

Copic Colors:

E000, R20 (Face and cheeks) Green: G28, YG63 Red: R37, R39 Gold: YR24 (belt buckle) Orange: YR09 (hair) Black: C6 (belt)


Friday, August 12, 2022

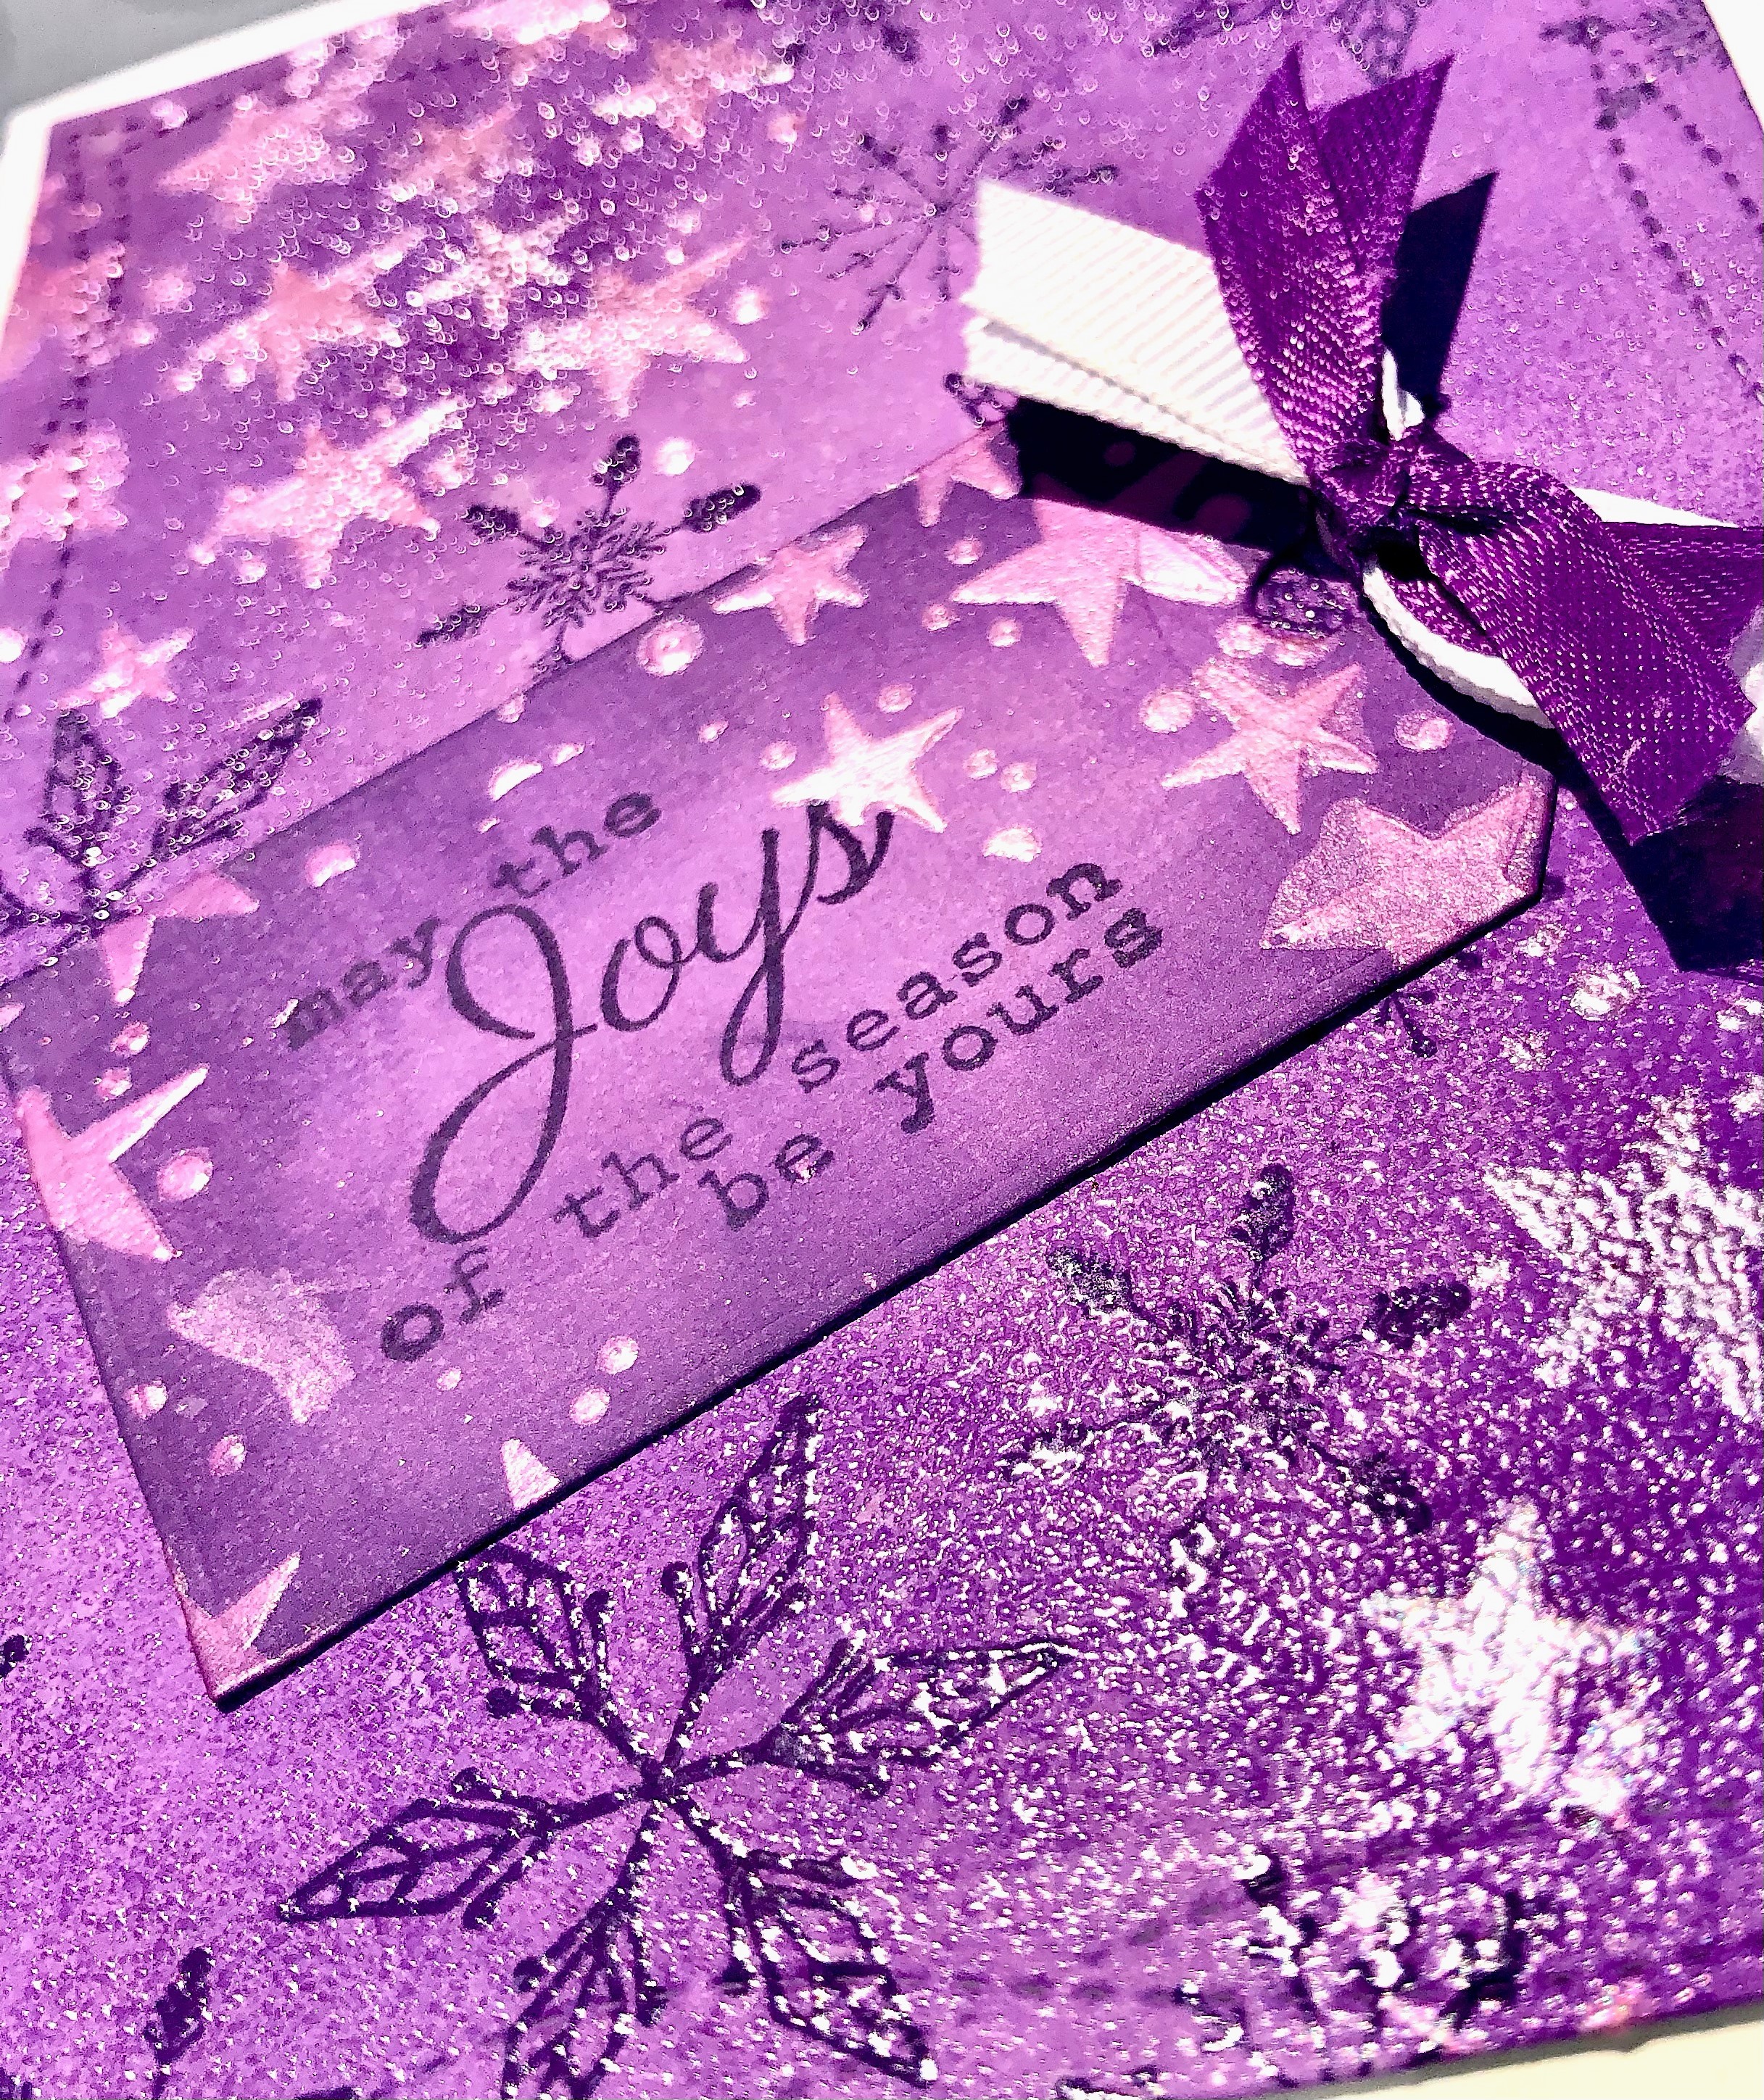
GIU Day 5 May the Joys of the Season by Yours

For my last day as a GIU girl, I had to make a Christmas Card.  Purple is my favorite color so I thought I would just play and see what happened.

I started with a piece of light purple paper from my stash and ink blended on Wilted Violet and Villainous Potion Oxide inks.  Next, I took the snowflakes from the Beauty of Life SMAK (11/19) kit and stamped them in Villainous Potion in a random pattern all over my card front.  Then I covered the snowflakes with Icicle Embossing Ink.  
Because oxide inks take a little bit to dry, the embossing ink stuck not only to the snowflakes but to portions of my panel.  I was okay with that as I heat set it, it made it feel like there was icy or frosty patches on my card.
Here you can see the shine on the snowflakes and on the frosty/icy patches on my card.

Then, I took a star stencil from my stash and in the upper and lower corners, I covered the stencil with Opal Chroma Glaze from Brutus Monroe and set my panel aside to dry.

Next, I took another piece of the light purple cardstock and cut it out with a tag die from my stash.  I  stamped the sentiment from Ember Girl in the Villainous Potion and ink blended the same two purple inks around the edges and once again used the Opal Chroma glaze and star stencil.

Once everything was dry, I cut the panel down with a double stitched rectangle from my stash and added the tag to the front. I chose a purple and white ribbon from my stash, tied them in a knot.  To add the ribbon to my card, I used a glue dot.  Then I attached the panel to my white A2 card base.

I hope you enjoyed my week showcasing some of the Unity Products.  Head over to Unity Stamp Co. Website and pick up some goodies for yourself.


Sunday, September 26, 2021

STAMPtember 2021 Brutus Monroe Limited Edition Set


Today is the day for the Limited Edition Brutus Monroe #Stamptember set with Simon Says Stamp. This set is only availble in September and while supplies lasts over at Simon Says Stamp.


Apple Card: 

I started by stamping out the apple and sticking with Raven Detail ink on Brutus Monroe Perfect Blend Alcohol Paper. Next, I colored them in with Copic Markers.  Then, using my Scan and cut to Cut the images out and attach the stick to the back of my apple with a piece of washi tape.  For my card panel, I took a piece of Brutus Monroe Scarlet Cardstock and cut it down to 4.25" x 5.5."  Using my Misti, I stamped the caramel apple image all over the paper with Brutus Monroe Embossing Ink.  Then I covered the entire panel with Pearl Embossing Powder from Brutus Monroe and heat set it.  I cut down the panel to about 4" x 5.25" and attached it the front of my top folding A2 white card base.  To attach my colored image, I used some of Brutus Monroe's Easy Foam Tabs.  I stamped the sentiment with Simon Hurley Creates Bee Sting ink and used a sentiment strip die to cut it out.  Finally, I attached the sentiment to the front of my card and trimmed off any overhang.  


Snowman Card:

I started out stamping the snoman image on Brutus Monroe Perfect Blend Alcohol Paper with Raven Detail ink.  I used Copics to color in my image and then fussy cut it out.
Using an older Darice Embossing folder, I ran my white card panel through my Big Shot and trimmed it down to about 4" x 5.25."  I chose a piece of paper from the Brutus Monroe Playful Plaid pack and cut it down to A2 card front size.  Using a small piece of the same paper,  I cut an rectangle to mat behind my Snowman piece and attached it to my embossed white panel.  I stamped the sentiment from the set with Raven Detail ink in the top left corner above my image and then matted the panel to the plaid mat.  After I attached the matted panel to my A2 Card base, I used some glossy accents on the eyes, mouth and hat brim of my image for some shine.


Halloween Card:
I stated with a Precut Slim line panel from Brutus Monroe and placed it in my splat box.  I used some Cobweb Limited edition to spray the front of my panel.  Then I used  Tangerine Orange Chroma Mist, (removing the nozzle and using the tube) to splatter over the background.  Next, I used some Creamy Green and Pearl Aqua Pigments which I mixed with some water on an acrylic block, and splattered this over the entire panel with a paint brush.  I repeated this with Hunter mixed with Pearl Aqua Pigments.  To speed the drying, I heated the panel with my heat tool.  Then I used the Spooky Eyes Slim Line Stencil and  spread the Glow in the Dark Chroma glaze over the panel.  After removing and cleaning my tools, I set the panel aside to dry. While the panel dried, I stamped my images with Raven Detail ink on Perfect Blend Alcohol paper and colored them in with Copic Markers. Once my panel was dry, I cut it down to 3" x 8.25" and matted it on a piece of Raven Cardstock that measured 3.5" x 8.5."  I arranged the panel in my Misti and stamped the Spooky sentiment in Raven Detail Ink, using the mummy apples for placement.  I attached the Mummy Apples with liquid glue.  Then I adhered the entire panel to my Precut Slim line card base from Brutus Monroe.  Finally, I added some Glow in the Dark Chroma Glaze to the eyes of my images with a fine tip paint brush. 

Here is a close up of the Pearl Embossing Powder on my apple card:


If you have not tried the Glow in the Dark Chroma Glaze, you should get some right away, its amazing.  Here is a picture of the Back ground.  I did not charge the "glow" for long:


I included my affliated (with no cost to you) to all the products available in the Brutus Monroe store above.


However to purchase the STAMPtember stamp and die set for a limited time, while supplies last. Here is a link to the set at Simon Says Stamp: https://www.simonsaysstamp.com/product/brutus-monroe-stamptember-exclusive-stamp-and-die-set-sssd112486c?c=2553


Customers can also purchase the stamp set for a limited time, while supplies last. https://www.simonsaysstamp.com/product/waffle-flower-stamptember-exclusive-stamp-set-sss202410c?c=2553

Friday, January 1, 2021

2020 Growing In Unity Week Post #5

Happy New Year!  Welcome to 2021!  Best of wishes for everyone this year!

For my last post I had to create a Slim Line Card.  I stamped out a variety of Angie Girls with Copic friendly ink and colored them in with a very limited Christmas Color pallet.  Next, I looked through my dies and found a rectangle and rectangle frame set to cut out the images and framed each one with a evergreen die cut frame.  I like how this looked because they look like snapshots and one of the Angie girls is holding a camera, so I imagine this is a fun day with the girls and we are getting three glimpses into their party. (I used girls from Ember Girl, Planner Gal: Merry Doe, Planner Gal Kit: Tell Me A Story.)


Next, I looked through my pile of patterned paper, (we all have a stash we never use right or is it just me?) to find a red plaid paper and cut it down to just shy of 3.5" x 8.5" panel.  I used the camera stamp from Free Your Dream May 2017 Kit of the month with black ink all over the panel, varying the image for interest.  

You know what comes next right, I used the half Doily stamp from the Happy Little Moment Smak Kit (July 2015) at the top and bottom of my panel using the same method as I mention earlier this week.  I used my Misti and a Ranger Blending Tool with a Circle Foam and Deco Foil Transfer Gel as ink on my stamp.  I also did this for the polka dot stamp (used at an angle on the top and bottom of my panel opposite of the doily). (Polka Dot stamp from Love Life As It Is set).

I set my panel aside to dry (about 30 mins or so).  In the meantime, I used the sentiment from Ember Girl with embossing ink on a piece of vellum and then heat set some Black Embossing Powder and cut out the sentiment with a circle die.


Once my background panel was dry, I cover the two doily image with Green Foil and the polkadots wtih Opal Foil (both from Deco Foil/Thermoweb) and then ran it through my laminator twice.  I peeled back the foil and Voila!  I attached my three Angie Girls at angles down my panel and glue the panel down to my white slim line cardbase.  I then affixed my sentiment.  Finally, for some more glitz, I used Diamond Stickles to all the accents on the Angie Girl images.

Do you have a favorite project from me this week? Do you have a favorite Angie Girl?  Let me know below.  

List of supplies


Monday, December 21, 2020

Brutus Monroe Stamp of the Month (December 2020)


Can you believe it's finally December 2020?  That means one last Stamp of the Month from Brutus Monroe. This month is an adorable Snowman!


My card this week's features a couple of stamp sets and lots of masking.  I started out by stamping the Snowman from the December Stamp of Month, the Christmas Tree and the Gift (two times) from the Good Tidings stamp set on Masking Paper.  I used my Brutus Monroe scissors to fussy cut all of the images out.

I started with the Snowman, and stamped him on my card panel with Brutus Monroe Raven Detail ink.  I covered the snowman with the mask and then stamped out the gift pile, masked and stamped it again.  I covered the second pile of gifts with a mask and then stamped out the Christmas tree.  I wanted the tree in the background with the presents in the front.  I wanted the Snowman in the very front.  (Stamping tip, always stamp the image you want in the front first.)  I did cover the tree with a mask as well because I planned on ink blending my background and wanted the images to stay white.  

For my background, I used some post-it notes to create some snowdrifts and attached those to the bottom of my card panel.  Then, I used a light, medium and dark blue Distress Oxide inks.  Using blending tools, I started with the lightest color just around my tree and towards the bottom of where the snow piles would be.  I then used the darkest ink around the top and sides of my panel leaving a little white space between it and the lightest blue. I blended my medium in between both light and dark.  To smooth out the colors and make them blend, I went back and forth between the colors until I was happy.  I added a small amount of black soot to the very edges to make it more of a night scene and blended it down with my dark blue ink.

Next, keeping my masks in place, I used some water in my spritzer to add water spots to my background.  I placed my panel in my splat box and using some White and Pearl Aqua Pigments (separately), with a tiny bit of water, I flicked the color on my panel all over.  I also used some shimmer spritz from my stash to add some more splatter as well.

Then, the moment of truth, peeling off my masks.  I used the tip of my pick tool to carefully help me lift the edges and pull back all of my masks.  My next step was to color all of my images with a variety of Copic markers.  I stayed with a limited color pallet, using a red, green, yellow, and grey color scheme.  Once finished, I used my Pearl Aqua pigment to add shimmer to the stars, presents, and the band of the snowman's hat.  

Before I added my panel to my card base or my sentiment, I put the whole panel back in my splat box and followed the same steps as above to add splatter to my card. (It is snowing so the tree, snowman and presents all need some snow too.)  Next I took the snowflakes from the December stamp of the month to an acrylic block and stamped them around the edge of my A2 white card base, just around the edges, with the medium blue Distress Oxide ink, making sure to rotate the snowflakes around to make a varied pattern. I used any leftover ink from my blending brush on just the very edge of the card base as well.

I trimmed down my card panel with a Rectangle die from my stash and attached it to the front of my card base.  Lastly, I used a foiled Merry Christmas sentiment that was leftover from another project and glued it to the top right corner of my card base.

Once again, listed below are aflliated links to the products I used that are available in the Brutus Monroe store, (As usual, there is no additional cost to you, however, I do receive a small compensation from these links which helps fund my page.)


Monday, December 14, 2020

Brutus Monroe Christmas Tag Project

 This week I made a set of Christmas Tags.  I pulled out some blue card stock from my stash and used a Stitched Tag die to cut our four tags.  


First, I stamped a To:/From: stamp on the back of all four tags using Raven Detail ink.  Then, I used all of the snowflakes from the new Snow Scenes stamp set with the Alabaster Pigment ink.  I set these aside to dry (pigment ink takes a little while to dry).  Next, I took this adorable snowman from the Stamp of the Month, with some Raven Detail ink and stamped it four times on the Perfect Blend Alcohol Paper.
I used a few Copic markers to color in the hat, band, and nose for the snowman.  I used my scan and cut to cut out all four Snowman leaving a 0.04 border. I used liquid glue to attach them to my dry tags and then used Diamond Stickles to add sparkle to the hat brim and puff ball.  Once the stickles dried, I lined up my tags in my Mini Misti to stamp the Sentiment from Jolly Snowman in the corner also using Raven Detail in.  

Next, I used some scrap white paper to cut out the smallest of the Simple Snowflake dies a dozen or so times.  Using some Pearl Aqua Pigment with just a small spritz of water, I painted all the snowman bodies and all of the die cut snowflakes.  (I love using the Pearl Aqua Pigment to give shimmer and shine to my projects.). Once the snowflakes dried (It only takes a min or so), I attached 3 each to the tags, cutting off any overhang around the edges.  I looked through my ribbon stash and found some sheer ribbon,  red and white, & blue and white bakers twine, cut  a few inches off and threaded them through the hole of my tags to finish off my project.


Here is a slo-mo video trying to show you the  shimmer from the Pearl Aqua Pigment, on the snowman and snowflakes.


Thanks for stopping by.  Do you make Christmas Tags?  Leave me a comment below.

As usual, I have affiliated links to everything in the Brutus Monroe Store. (Affiliated links are at no additional cost to you, I receive small compensation which helps support me.)


Monday, December 7, 2020

Brutus Monroe Die of the Month


Slim Line Card featuring the Die of the month

For my card today, I used the die of the month in a different way.  I cut the die out of some heavy weight card stock and then lined it up at the top of my Pre-cut Slim Line Card panel until I got the desired pattern I wanted.  I used some low tack tape to temporarily attach it to my card panel at the bottom of the die (which was the center of my card panel).  Using a blending tool and Clear Skies ink from Simon Hurley Creates, I blended the ink over the die cut which shows the negative pattern on my panel.  I then flipped my panel around and repeated the same steps.  I took the time to arrange the die cut so it would have almost (if not the same) pattern on the other side.

Next I quickly covered my panel in Icicle Embossing Powder and set it with my heat gun.  I have found that the Simon Hurley Create Inks stay wet just long enough to using embossing powder over them, however, I usually work quickly just in case.  I like the Icicle Embossing Powder, because it is a clear embossing powder and shows the ink color below and just enhances it a bit with shine.


I lined up my panel in my Original Misti, choosing the Seasons Greetings sentiment from the Snow Scenes stamp set, and stamped out my sentiment with the same Clear Skies ink.  I also covered this with the same Icicle embossing powder and heat set it. I cut down my card panel slightly and used a blue piece of card stock that I found in my stash that was just a shade darker than the ink.  After matting my panel on the front of the blue card stock, I then attached both panels to my Precut Slim Card Base that I scored and folded at 3.5"

I used the scraps of blue paper to cut out the Simple Snowflake dies and attached them to the front of my card.  Finally, for some more texture and dimension, I added some of the Flat Back Pearls to the center of each of the snowflake.


Close up of my card.  You can almost see the sparkle from the Embossing powder


Here is are links to each of the products that I used.  They can all be found in the Brutus Monroe store. (affiliated links are at no cost to you but do help support my creating and content on this page-Thank you)


Monday, November 30, 2020

Brutus Monroe A2 Gift Card box with 5 Cards


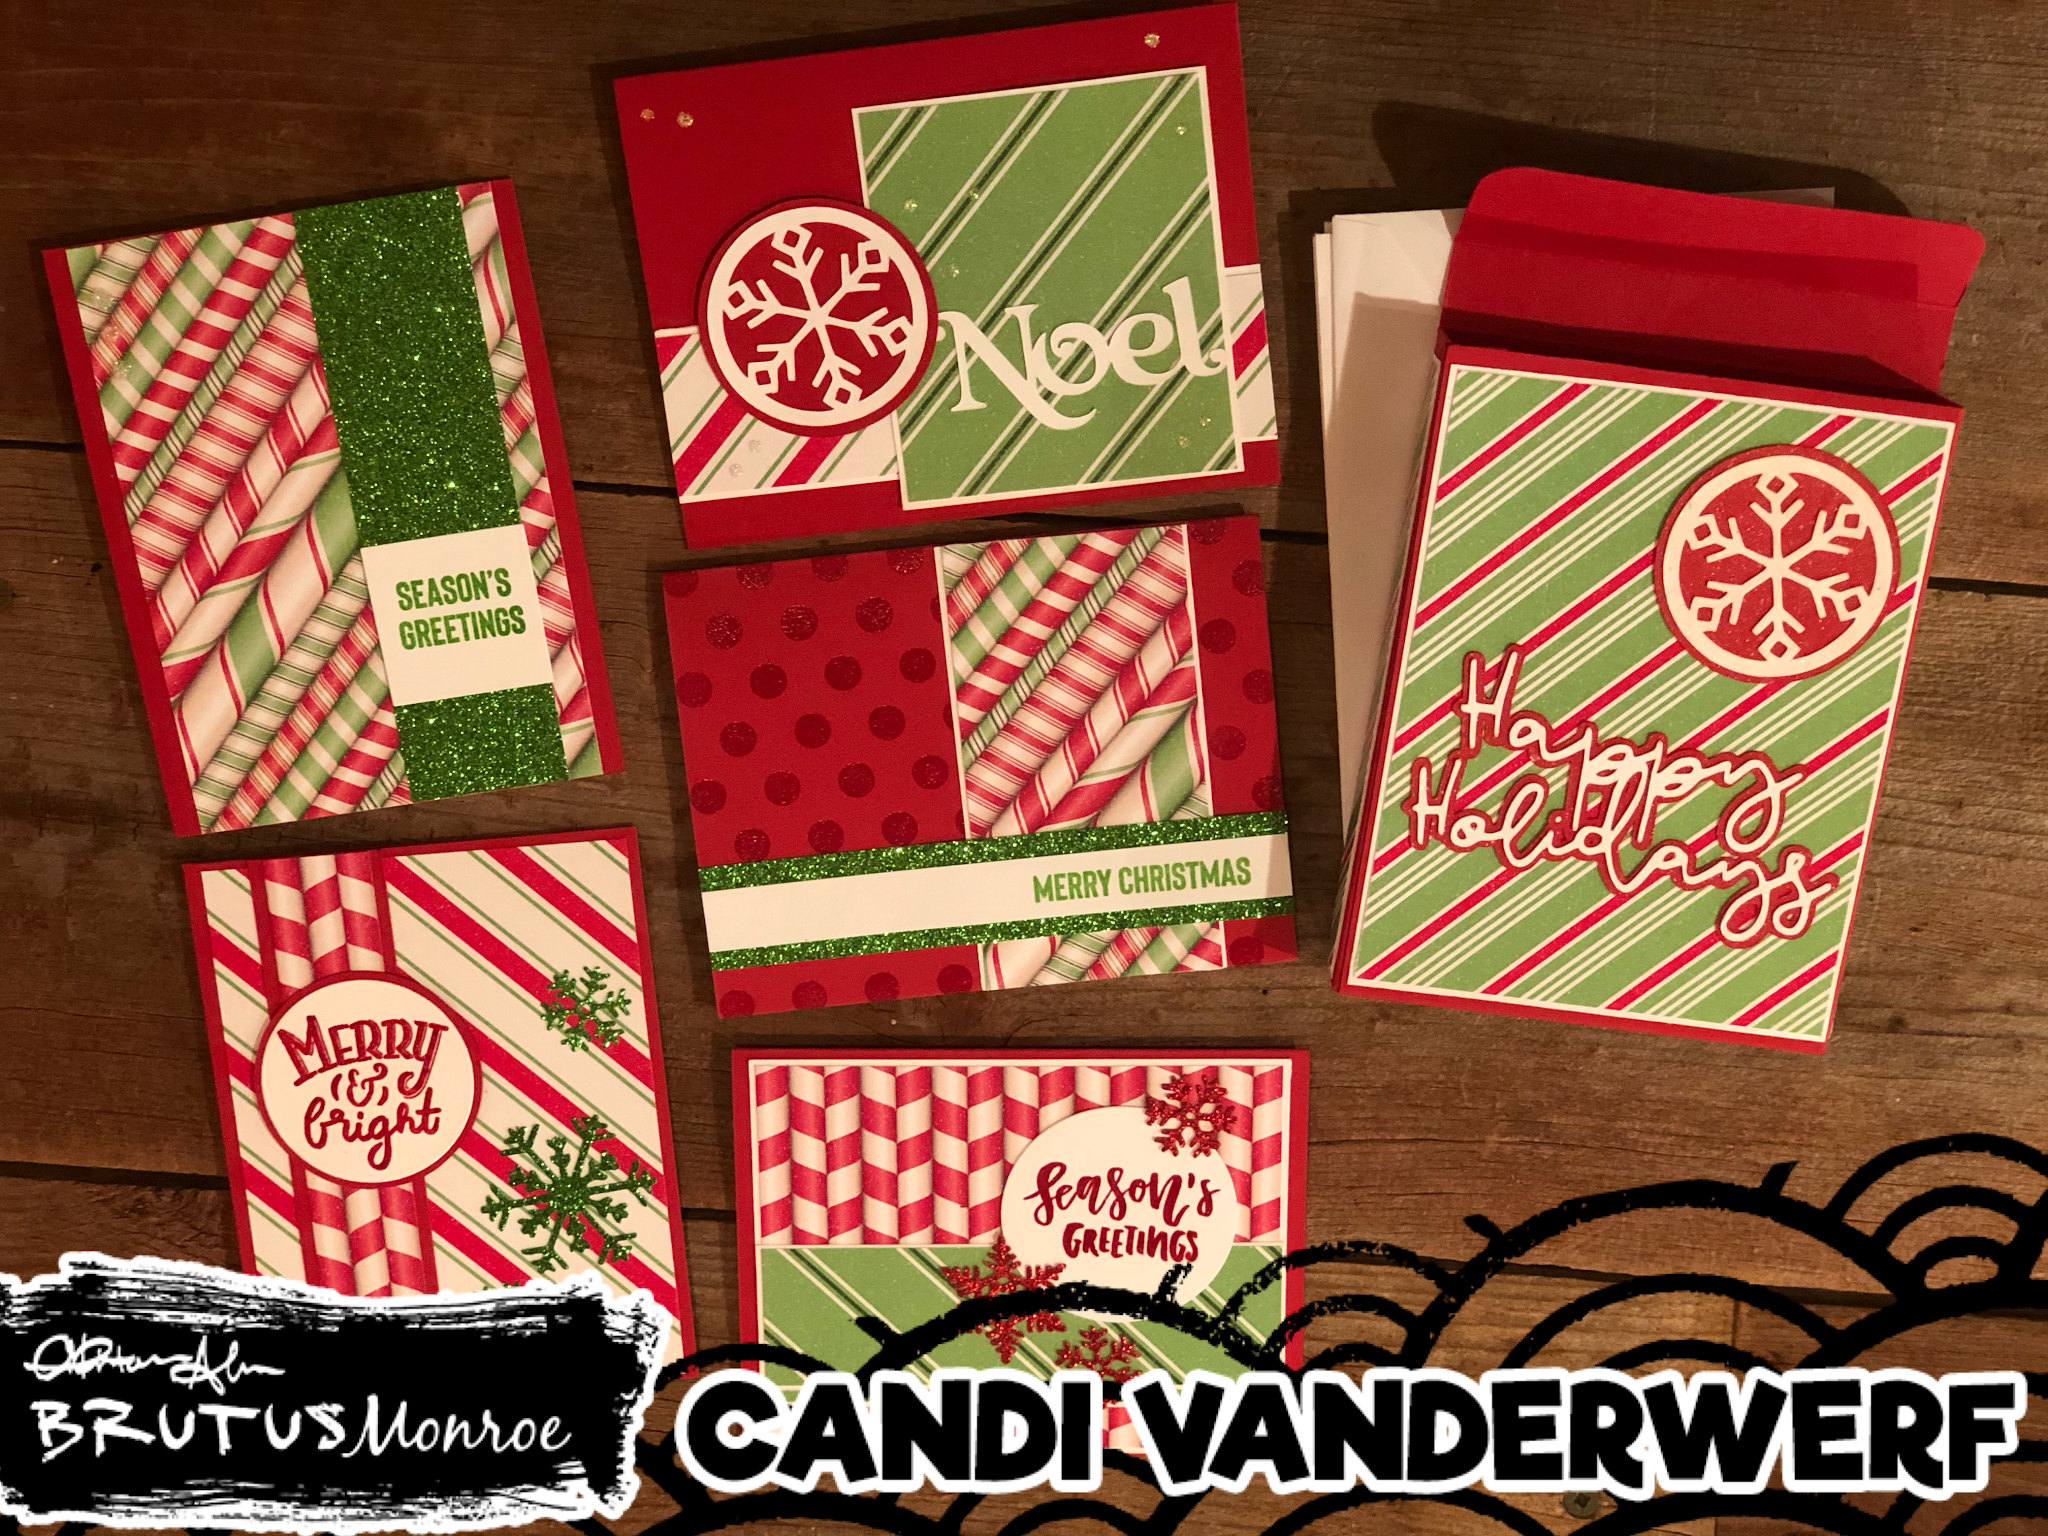
This week the design team is creating something "gifty" (something that coordinates with a pretty gift bag, tag, card or a gift itself.). I decided to use a template that was created by the lovely Gina K early this year during one of her live crafting nights to make an A2 gift box that holds 5 cards with envelopes.
My cards feature the Candy Stripe 6x6 Paper pad papers, some digital files from the Brutus Monroe Store and a variety of other products (stamps, dies, embossing powder, etc).
Here is the box with the cover and has the 5 cards and envelopes inside

All the patterned paper from these cards is from the Candy Stripe 6x6 pack and any white or glitter card stock came from my scrap bin.  All of my cards are an A2 card size and made from red heavy weight cardstock from my stash.

For my box I used the free template created by Gina K in a video.  I used the measurements from the template to cut my patterned paper for the front, back and sides.  I used white card stock from my scrap bin to mat the patterned paper before attaching it to my box,  I used my Scan and Cut to cut out the Happy Holidays Cut File and the Vixen-Snowflake Shaker Digital Cut file.  I attached the Vixen Snowflake Circle to a red circle (I used my scan and cut to make a circle mat that was just a bit bigger).  After attaching two of the Happy Holiday layers together (The file comes with three layers, however, I decided not to cut out the bottom shadow layer). Before attaching both cut outs to the front of my box, I put them in my splat box and sprayed them with some shimmer spray I had in my stash.

Card #1


I had the help of some card sketches to help me with a few of my cards.  For Card #1, I used the MFT Sketch #352, with measurements, that I got from this blog.  I matted the patterned paper on scrap white card stock about an 1/8th bigger for the mats.  I used the same Vixen Shaker Snowflake Digital Cut file and mat layer that I cut for the front of the box for this card.   The Noel sentiment was a free file in my Scan and cut.  To finish off my card, I used some Diamond Stickles in a random pattern across my card front for some glitz/sparkle.


Card #2

This card used MFT Sketch #286 and more of the Candy Stripe pattern paper. I used one of the middle foundation dies to cut a circle from some white scrap card stock.  I used the Season's Greeting sentiment from Falliday Silhouettes in a red ink from my stash.  However before I removed it from my Mini Misti, I cleaned my stamp and used my embossing buddy over the stamped image and restamped the sentiment over the top with the Brutus Monroe Embossing Ink.  I then covered the red/embossing ink with Icicle Embossing Powder and heat set it.  This gives me the color I want, but also a shine to my sentiment.  Next, I cut two and one of the second smallest of the small simple snowflakes dies from some of the red card stock that matched my card base.  However, I did not like how the snowflakes were lost on the card.  So I also cut them out of scrap red glitter card stock and adhered them over the top of the red snowflakes.

Card #3


Using Sketch #249 from Freshly Made Sketches, I cut and matted my patterned paper.  I found a piece of green glitter stock in my scrap bin that matched the green in the patterned paper.  Before I attached them to my card, I decided to find a background stamp for my card base.  I stamped the polkadot background with my Brutus Monroe Embossing Ink and again used the Icicle Embossing Powder and heat set it.  I attached my patterned paper to the base.  I used a piece of white scrap card stock to stamp my sentiment from Holiday Essentials Stamp set with Later Gator ink by Simon Hurley Creates and then covered the ink immediately with the Icicle Embossing Powder and heat set it. This gives the sentiment a shine.  I used liquid glue to attach it to the top of the glitter stock layer.

Card #4

I did not use a card sketch for my last two cards.  Both of these patterned papers were left overs from some cut cards tock from earlier so I used them just as they were.  I matted the smaller piece on some red scrap card stock and adhered both to my A2 red card base. I stamped the Merry & Bright Sentiment, from the Merry & Bright stamp set in Red ink, then Embossing Ink like I did before and covered it with Icicle Embossing Powder and set it for the that shine. The white and red circles were sitting on my desk so I am not sure exactly what size they are.  I used the same green glitter stock scrap from before to cut out more snowflakes and attached them to the finish off my card.

Card #5
I did the same for this card using leftover piece of the paper from previous cards.  I chose the Season's Greetings from the Holiday Essentials set and performed some stamp surgery, Jennifer McGuire style, so that my sentiment would stack on top of each other. (Don't worry I can put the stamp back in a line to stamp in the future.  I used the Later Gator with Embossing Ink and Icicle Embossing Powder over the top just like I did for all the other cards.  Then using a Square Foundation die, I cut down my sentiment and used liquid glue to affix it to the glitter layer.  For a final touch of bling, I used the same Diamond Stickles to add three dots to the upper left corner to balance out the white square.

Here is a close up of the cards inside the box

Here is an attempt to show the shimmer that I added to the cut outs on the front of the box.


Thanks for stopping by.  Which one is your favorite card?  Have you started making holiday card yet?  Leave me a comment below.

Products Listed below have affiliated links to the Brutus Monroe Shop.  (These links are at no additional costs to you.  Thank you for your support)


Sunday, September 27, 2020

STAMPtember Collaboration with Brutus Monroe


 Happy Monday.  Today is the release of the STAMPtember collaboration set between Simon Says Stamp and Brutus Monroe.  This is a fantastic set with three holiday wreath images, sentiments, and coordinating dies.  This special set is only available for a short time or until sold out, so do not delay if you want this set, go get it.   FYI: The dies for this set are HUGE and cut out the wreaths easily.  I highly recommend buy them before they sell out.  I made a card using each of the wreaths and their matching dies.


A-Haunting We Will Go

For my first card,  I stamped the Halloween wreath in Brutus Monroe Raven Detail Ink twice on alcohol friendly paper and used my Copic Markers to color in one full wreath and just the pumpkins, and the bat on the second wreath.  I used the coordinating die to cut out my fully colored wreath. Using my Brutus Monroe Fine Detail Scissors, I carefully cut around the pumpkins and bat on the second wreath and used a black marker on the edges to hide any imperfections. I popped up these elements with foam tape directly over their matching images on my colored wreath.  I used some purple ink to lightly ink blend a piece of white cardstock and stamped my sentiment near the bottom with the Raven Detail Ink.  I ran this panel through my Big Shot with a Swiss Dot Embossing folder and cut down the edge of the panel to 3.5 inches.  Using some purple scraps of paper to cover the top and bottom of my Slim Line Card Base, I layered my ink blended and embossed background in the center of my card base.  I then used some liquid glue to attach my wreath to the embossed panel. I added two small white strips of paper to the top and bottom of my focal panel.  Finally I used some Brutus Monroe Aqua Pigment in the Pearl color and a paint brush to the pumpkin faces, the witch's hat brim, the spider web, the bat's eyes and fangs to add some sparkle.


Thankful For You

My second card utilized the Fall wreath, which I stamped on some alcohol friendly paper with Brutus Monroe's Raven Detail Ink.  I also used my Misti to line up the wreath and partially stamp all four corners of my card panel.  I then colored all of the images in with a variety of Copic Markers.  I cut out the full wreath with the matching die and trimmed down the card panel slightly.  I placed my card panel in my splat box and used more Raven Detail Ink mixed with water to splatter the panel with black specks.  I also created splatters with the Pearl Aqua Pigment also by Brutus Monroe.  Using my Misti, I lined up my sentiment (using the full colored wreath for placement) and stamped it to be in the center of the full wreath with Raven detail Ink. I popped up my wreath with foam squares, and then glued the whole panel down to a Kraft A2 Card Base. Finally I took some Glitter Dust in the Gold from Thermoweb to spray over the top of the whole card to give some added sparkle.


The Gold Glitter Dust does not photograph well, but here is a closeup that shows some on the red leaf.


May Your Days Be Merry and Bright

For my third and final card today, I used some black and gray heavy weight cardstock (treated with my embossing bag) in my Misti to stamp the Christmas wreath with my Brutus Monroe Embossing Ink.  I covered the image on the gray paper with the Brutus Monroe Raven Detail Embossing Powder and the image on the black paper with some Ranger Silver Embossing Powder.  I heat set both panels, let the cool for a minute, and then trimmed out the wreaths with the matching die.  I lined up both wreaths on top of one another and using some purple tape to tape the wreaths together, I cut the wreaths in half with my paper trimmer.  I used some purple tape to attach the right black half of the wreath to the left gray half to create a full wreath. Using my Misti and my wreath for placement, I stamped the sentiment and heat set the same silver embossing powder.  I used foam adhesive to pop up my wreath on the center of my white card panel which measures 4" x 5.25."  I matted the panel on a 4.5" x 5.5" black mat and then attached the whole thing to a white A2 card base.  Finally for a pop of color,  I used some of the red pearls (from Brutus Monroe Flat Back Pearl Assorted set) to the center of the bows in the wreath and around my sentiment.


Here is a picture of all three cards together, I apologize for the shiny photo, it rained all day today and I was unable to get a better photo today due to such dark lighting in my house.

Which card is your favorite?  I just love this stamp set and can see using it every year to make some holiday cards.


Hugs and Kisses Challenge Card (Brutus Monroe)

 This month's CYOEchallenge on the Brutus Monore Fan Club Page is: Break out your sparkles and lets make some fun cards.  I started off...