Showing posts with label A2. Show all posts

Thursday, May 25, 2023

GIU Day 4

 I can't believe it is Day 4 already.  Today I stepped out of my comfort zone to bring you a water colored image.  Water coloring images is one of my goals to get better at and I am feeling a little more confident in it.


I LOVE ANGIE GIRLS.  They are some of my favorite stamps of all time.  Today I featured Hannah!

I stamped her on some watercolor paper and then heat set the image with Clear Embossing ink.  I am most comfortable when I have that "edge" to my images when I watercolor.  I took my time and did a variety of colors (I will list them below).

For the background around her, I flooded the background with water and then just dropped in my color,  letting it flow itself.  Once my panel was dry, I carefully tore around the edges so that I could get that distressed look.  (I debated about adding watercolor to those edges but in the end left them white.--Would you have painted them?)

I used a lot of liquid glue to attach it to my panel.  This panel is just painted with a mix of blue and shimmer paint.  After I added my sentiment, I out on a few gems for some added sparkle and matted it to my card base.

Do you water color at all?  Or does it terrify you like it does me?


List of Supplies (affiliate links will be noted):

Wednesday, November 9, 2022

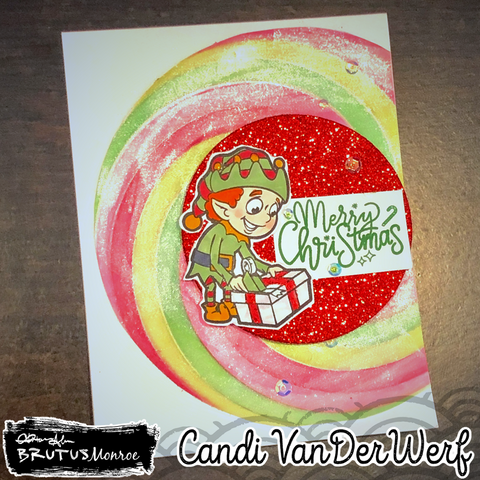
Rainbow Swirl Stencil Christmas Card


Today I bringing you a Christmas Card featuring the Rainbow Spiral Stencil. I used 4 Simon Hurley Create. Inks.  Two Reds (Love Struck and Game Over) and two greens (Overzealous and Fake Plant).  I started with Love Struck and blended the first stripe.  After I wiped the excess ink off the stencil, I used the lines on the stencil to line up my spiral and then blended with Game Over. I wiped the stencil off again, relined it up with Overzealous and then repeated with Fake Plant.

Continuing to wipe off my stencil between inks, I completed the spiral alternating back and fourth between the red and green inks until my circle was complete.  Next I used some watered down Pearl Aqua Pigment and a paint brush to cover the entire blended area.  This gives the spiral lots of shimmer and shine.

I trimmed the panel to 4" x 5.25" with my paper cutter. Using my scissors, I trimmed out the spiral around the outside and used a circle die to cut out the center.  I adhered the Spiral to and A2 Top folding Card base, lining up the spiral edge with the right edge of my card base. 

Next, I used another circle die to cut some Red Glitterstock for the center of my spiral.  I adhered this with some foam tape.  For a focal point, I stamped one of the elves from Crafty Elves with Raven Detail Ink on Perfect Blend Alcohol paper and colored him in with Copic markers.  After I fussy cut him out, I added some shimmer to the yellow on his outfit and to the red ribbon on the package (also with some watered down Pearl Aqua Pigment).

For my sentiment, I stamped the Merry Christmas from the Snowflake Swirl stamp set with Fake Plant and trimmed it down.  I adhered both my sentiment and elf to the center of the Glitterstock circle with liquid glue.

Finally, I added just a touch of more sparkle with some sequins from my stash.

Here is the video I made to go with this card:


Affiliate Links:

Rainbow Spiral Stencil: https://shrsl.com/3s8j2

Perfect Blend Paper: https://shrsl.com/3s8k8

Pearl Aqua Pigment: https://shrsl.com/3s8jt

Crafty Elves Stamps: https://shrsl.com/3s8jw

Crafty Elves Coordinating Dies: https://shrsl.com/3s8k4

Glitter Stock: https://shrsl.com/3s8k5

Circle Foundation Dies: https://shrsl.com/3s8lm

Raven Detail Ink: https://shrsl.com/3s8k9

Top Folding A2 Card Bases: https://shrsl.com/3s8ka

Simon Hurley Create. Love Struck Ink: https://shrsl.com/3s8kc

Simon Hurley Create. Game Over Ink: https://shrsl.com/3s8ke

Simon Hurley Create. Overzealous Ink: https://shrsl.com/3s8kg

Simon Hurley Create. Fake Plant Ink: https://shrsl.com/3s8kh

Copic Colors:

E000, R20 (Face and cheeks) Green: G28, YG63 Red: R37, R39 Gold: YR24 (belt buckle) Orange: YR09 (hair) Black: C6 (belt)


Wednesday, August 10, 2022

Brutus Monroe You Brighten My Day Rainbow Card

 Brighten My Day Card

I love foiling and today I thought I would share a card that had a focal panel with some of Brutus Monroe Toner Mixable sheets.  I started by foiling my Rainbow panel from the Really Radiant Toner Mixables pack with some Deco Foil Transfer Sheets in Rainbow. Then, I cut the panel and a black mat down with a stitched frame from my stash and adhered them together.

Next, I stamped out my sentiment form the Dogwood Spring Stamp set with Distress Oxide Villainous Potion ink and covered it with Icicle Embossing Powder.  After heat setting, I used the coordinating die to cut it out and matted it on a black frame cut from a stitched die from my stash.  

For some interest, I cut some vellum with the leaves from the Fabulous Florals Die set (3 times) and sprayed them with some shimmer spray to add some shine.  I also sprayed the back of leaves with some Pixie Spray to add adhesive to the back and layered them on the front of my foiled panel.  I used liquid glue to attach my matted sentiment over the ends of my leaves so help keep them in place.  Finally, I adhered the entire thing to a white A2 card base.

Thanks for stopping by and brightening my day.  ðŸ˜†  All of the above links are affiliate links to the Brutus Monroe store. These add no cost to you, however they do help me bring you content.

Monday, August 8, 2022

GIU Week Thanks rainbow card


For my first card this week showcasing Unity Stamp Company products, I wanted to go with an almost one layer and a more simpler card.

I started by placing the Allure border background in my Misti and inked up parts of the stamp with Simon Hurley Creates Shooting Star and stamping it down on my white A2 card panel.  Next, I inked up the image with Bee Sting (also by SHC), overlapping some of the yellow areas.  I repeated this with the SHC Clear Skies ink.  By using these three inks, I can create a rainbow on my background.  I like to use Simon Hurley Inks because the blend well and they also stay "wet" long enough for me to cover the entire image with Embossing Powder.  Here, I used Icicle Embossing Powder from Brutus Monroe and heat set it to give my background a shiny finish.


Next, I used some Deco Foil-Unity Adhesive Transfers for my sentiment.  I cut the Thanks from Sentiments 1 and following the packaging instructions adhered that to the center of my panel.  I covered the transfer with some rainbow foil from my stash (a left over piece from another project).  For the sub sentiment, I stamped For All You Do (from my stash) with Raven Detail Ink from Brutus Monroe.

After I cut down my panel to 4" x 5.25," I adhere it to the front of my Black A2 Card base, including a white blank panel on the inside for my message when sending.  To finish off my card, I used some liquid glue to attached a few iridescent gems around my sentiment.


Thanks for stopping by and I hope you like my projects this week.  Make sure to head over to the Unity {show & tell} Facebook page to leave a comment for a chance to win some Unity products! 


Here are some affiliated links for other products I used, which is no extra cost to you but helps me bring content to you if you would like to purchase some of these items.  (Links above are just direct links to the products and not affiliated).

Wednesday, June 15, 2022

You're My Favorite Dad (Brutus Monroe June 2022 Stencil of the month)


Since Father's Day is this weekend, I thought I would show you the card I made for my dad.  Sometimes its hard to know what to use for a masculine card and my go-to is usually a brown and a blue color.

I started with the June 2022 Stencil of the month Groovy Grid.  Using my Stick and Stamp Mat and coordinating Blending Buddy, I placed my 4.25" x 5.25" white card panel in the middle, with the stencil on top.  I used my blending tools to add Simon Hurley Creates Grrr! and Clear Skies inks in a random panel over the stencil.

Then I cut the panel and a brown mat with some stitched rectangle dies from my stash.  I cut the dad from the center of my brown mat (since it will be covered by my panel).  

Next I cut out two of the smaller and one of the larger leaves from the Fabulous Florals set and ink blended some Clear Skies ink over them. I just used what was left on my brushes and did a light coat so that some of the white cardstock showed through as well.

For my companion sentiment, I stamped the You're my Favorite (from Super Sentimental) in Clear Skies in and cut it out with a stitched die from my stash.  To soften the white of the circle, I lightly blended some of the leftover Grrr! ink from my brush around the edges and along the edges of my dad letters (cut from an alphabet set in my stash).

After I matted the card panel and mat to my Precut A2 Card base, I used the Dad letters to line up my circle sentiment and leaves.  Finally, I added my DAD over the top of the leaves and just overlapping the bottom of my companion sentiment a bit.

Here is a look at my card one more time:

Thanks for joining me today.  Have a fabulous rest of the week and remember to create something everyday!  


Thursday, November 11, 2021

I can be Anything! featuring Brutus Monroe's Nov ATC Kit Unique Pets


Today I bring you a fun card featuring the stamp from the November ATC kit-Unique Pet.  I started by choosing a background from my stash that I made with Alcohol ink on Yupo paper.  After treating the front with my antistatic bag, I stamped the Chameleon with the Brutus Monroe Embossing ink and covered it with Raven Detail Embossing Powder.  I carefully heat set the powder, making sure to not get my heat tool too close to the paper (Yupo paper is plastic) and to continue to move my heat tool until all the powder was melted.  

For my back ground I used the Circle Tone stencil and blended Simon Hurley Creates Overzealous ink.  Before I removed my stencil, I spread Fallen Snow Glitter Glaze.  I removed the stencil and cleaned everything up.  While I left my panel to dry, I fussy cut out the Chameleon.  Then I found a light green piece of paper from my scrap bin and stamped the sentiment from the set with Raven Detail ink.  

I took the largest branch from the Birdhouse Builder Set and cut it out of wood grain paper. Once my panel was dry (about 30 mins) I used liquid glue to attach everything the the front of my panel.  Then I used some adhesive to attach the panel to my white A2 card base.

Saturday, July 17, 2021

Oh My Gourd with Aqua Pigments from Brutus Monroe


Today I have another card featuring the Oh My Gourd! stamp set.  This time I water colored the image.  This image fills an A2 card so nicely.

I started by taking a piece of Aqua Pigment Paper.  Next, I placed some Creamy Orange Aqua Pigment on my Glass Media Mat, and
 smooshed the paper into it.  I smooshed more Orange on the paper until I was happy with the coverage.  I set the panel aside to dry overnight.  

Once the panel was dry, I lined up the pumpkin stamp in my Misti and stamped it with Raven Detail Ink. When placing my stamp,  I made sure the majority of the pumpkin would stamp over an orange section of the paper.  

Then I chose a variety of Aqua Pigments:  Red, Sparkle Yellow, Yellow Green and two limited Cider and Hunter and placed each of the aqua pigments in a well in my watercolor tray.  Using a paint brush, I started with the Sparkle Yellow and painted in my pumpkin, right over the already dry orange pigment. Next, I used the Red and painted it towards the bottom of the pumpkin.  I repeated with the Yellow, Red and a little Cider until I was happy with the color.  I used some Aqua Pigments that are no longer available, you can use what ever colors you want.  Just play around and experiment to get the colors you like.  (The Creamy Orange, Cider and Hunter are all unavailable right now, they may comeback someday but for now they are out of stock.) To acheive a creamy orange look you could combine some red and yellow with pearl, or an Orange with Pearl.


Then I used the Hunter at the bottom of the leaves,  the vine and stem.  I used the Sparkle Yellow for the tops of the leaves and blended it together with the Hunter using the Yellow Green Aqua Pigment.  For the flowers, I used Sparkle Yellow and some Pearl aqua Pigment.  I used my heat tool to dry my panel.  Then I used my Misti to stamp the sentiment from the Oh my Gourd set with Raven detail ink.  I used just a tiny bit of the Cider and Sparkle Yellow to add some splatter to my panel and then set that with my heat tool.

I chose a Rectangle foundation die to cut down my panel.  Then I used liquid glue to attach it to a piece of black card stock.  After trimming down the black card stock, I attached the whole thing to a Kraft A2 card base.


Hugs and Kisses Challenge Card (Brutus Monroe)

 This month's CYOEchallenge on the Brutus Monore Fan Club Page is: Break out your sparkles and lets make some fun cards.  I started off...