Showing posts with label Embossing Powders. Show all posts

Friday, January 5, 2024

Hugs and Kisses Challenge Card (Brutus Monroe)

 This month's CYOEchallenge on the Brutus Monore Fan Club Page is:


Break out your sparkles and lets make some fun cards.  I started off the challenge this month with a live YouTube Video and made a Valentine Card. I will share the video at the bottom of this post

This card actually had many steps but it came together quite quickly.


First before I prepared my images (from the My Valentine stamp set) by stamping them on Aqua Pigment Paper and Heat Embossing Icicle Embossing Powder over the Raven Detail Ink.  To save time during the video, I also die cut them out ahead of time.  Next, I started my background.  I took a piece of Rouge Cardstock and one layer of the Zig Hearts Layering Stencil and spread Garnet Glitter Glaze over it.  Once this was dry, I was ready to craft live.

I took the second layer of the stencil and ink blended Simon Hurley Create Crown Me Ink and for the third and final layer, I used the Pearl Embossing Powder over Embossing ink.  Because the Simon Hurley Inks take a min or so to dry, the Crown Me also has some Pearl EP heat set, which changed the color a bit but gave it some shine.

For the envelope, I sprayed some moare Aqua Pigment Paper with Pink Glow and Ornamental Gold Chroma Mist and let it dry.  Then I stamped the large image from Valentine Tag Stamp set with Simon Hurley Game Over Ink.  (this 4x4 stamp can be lined up to repeat the pattern).  The Envelope die is from an older set call Mom's and Dad's Day, and it creates the score lines to fold up the envelope which I adhered with some liquid glue.

I colored the images with a variety of Aqua Pigments and then decided my envelope needed something to break up the background and make it stand out more.  I used the scalloped heart from the My Valentine Coordinating Die set and cut it from Potion Cardstock.  I cut the heart from the center of my mat that I would layer the Zig Pattern layer on.  This saves some cardstock as no one will see that I cut the center out fo the mat layer.

Finally, I stamped the sentiment from the same set in the Crown Me ink on a scrap of white cardstock.  After adhering everything together, I grabbed some gems for a little more Shimmer/Shine from the Buttons Galore Jewelz Bright mix and then attached my matted panel to a Precut Prescored A2 Card Base.

I hope you join the Brutus Monroe Fan Club Page and enter into the montly contest.  The winner is chosen by random draw from the participants.  You can enter up to two (2) projects and you must use at least one (1) Brutus Monroe Product.  Thank you for stopping by and have a great rest of your day!

Here is a ist of products I used on this card. (affiliate links, this is no cost to you, however, it does help me bring you content):


Friday, August 12, 2022

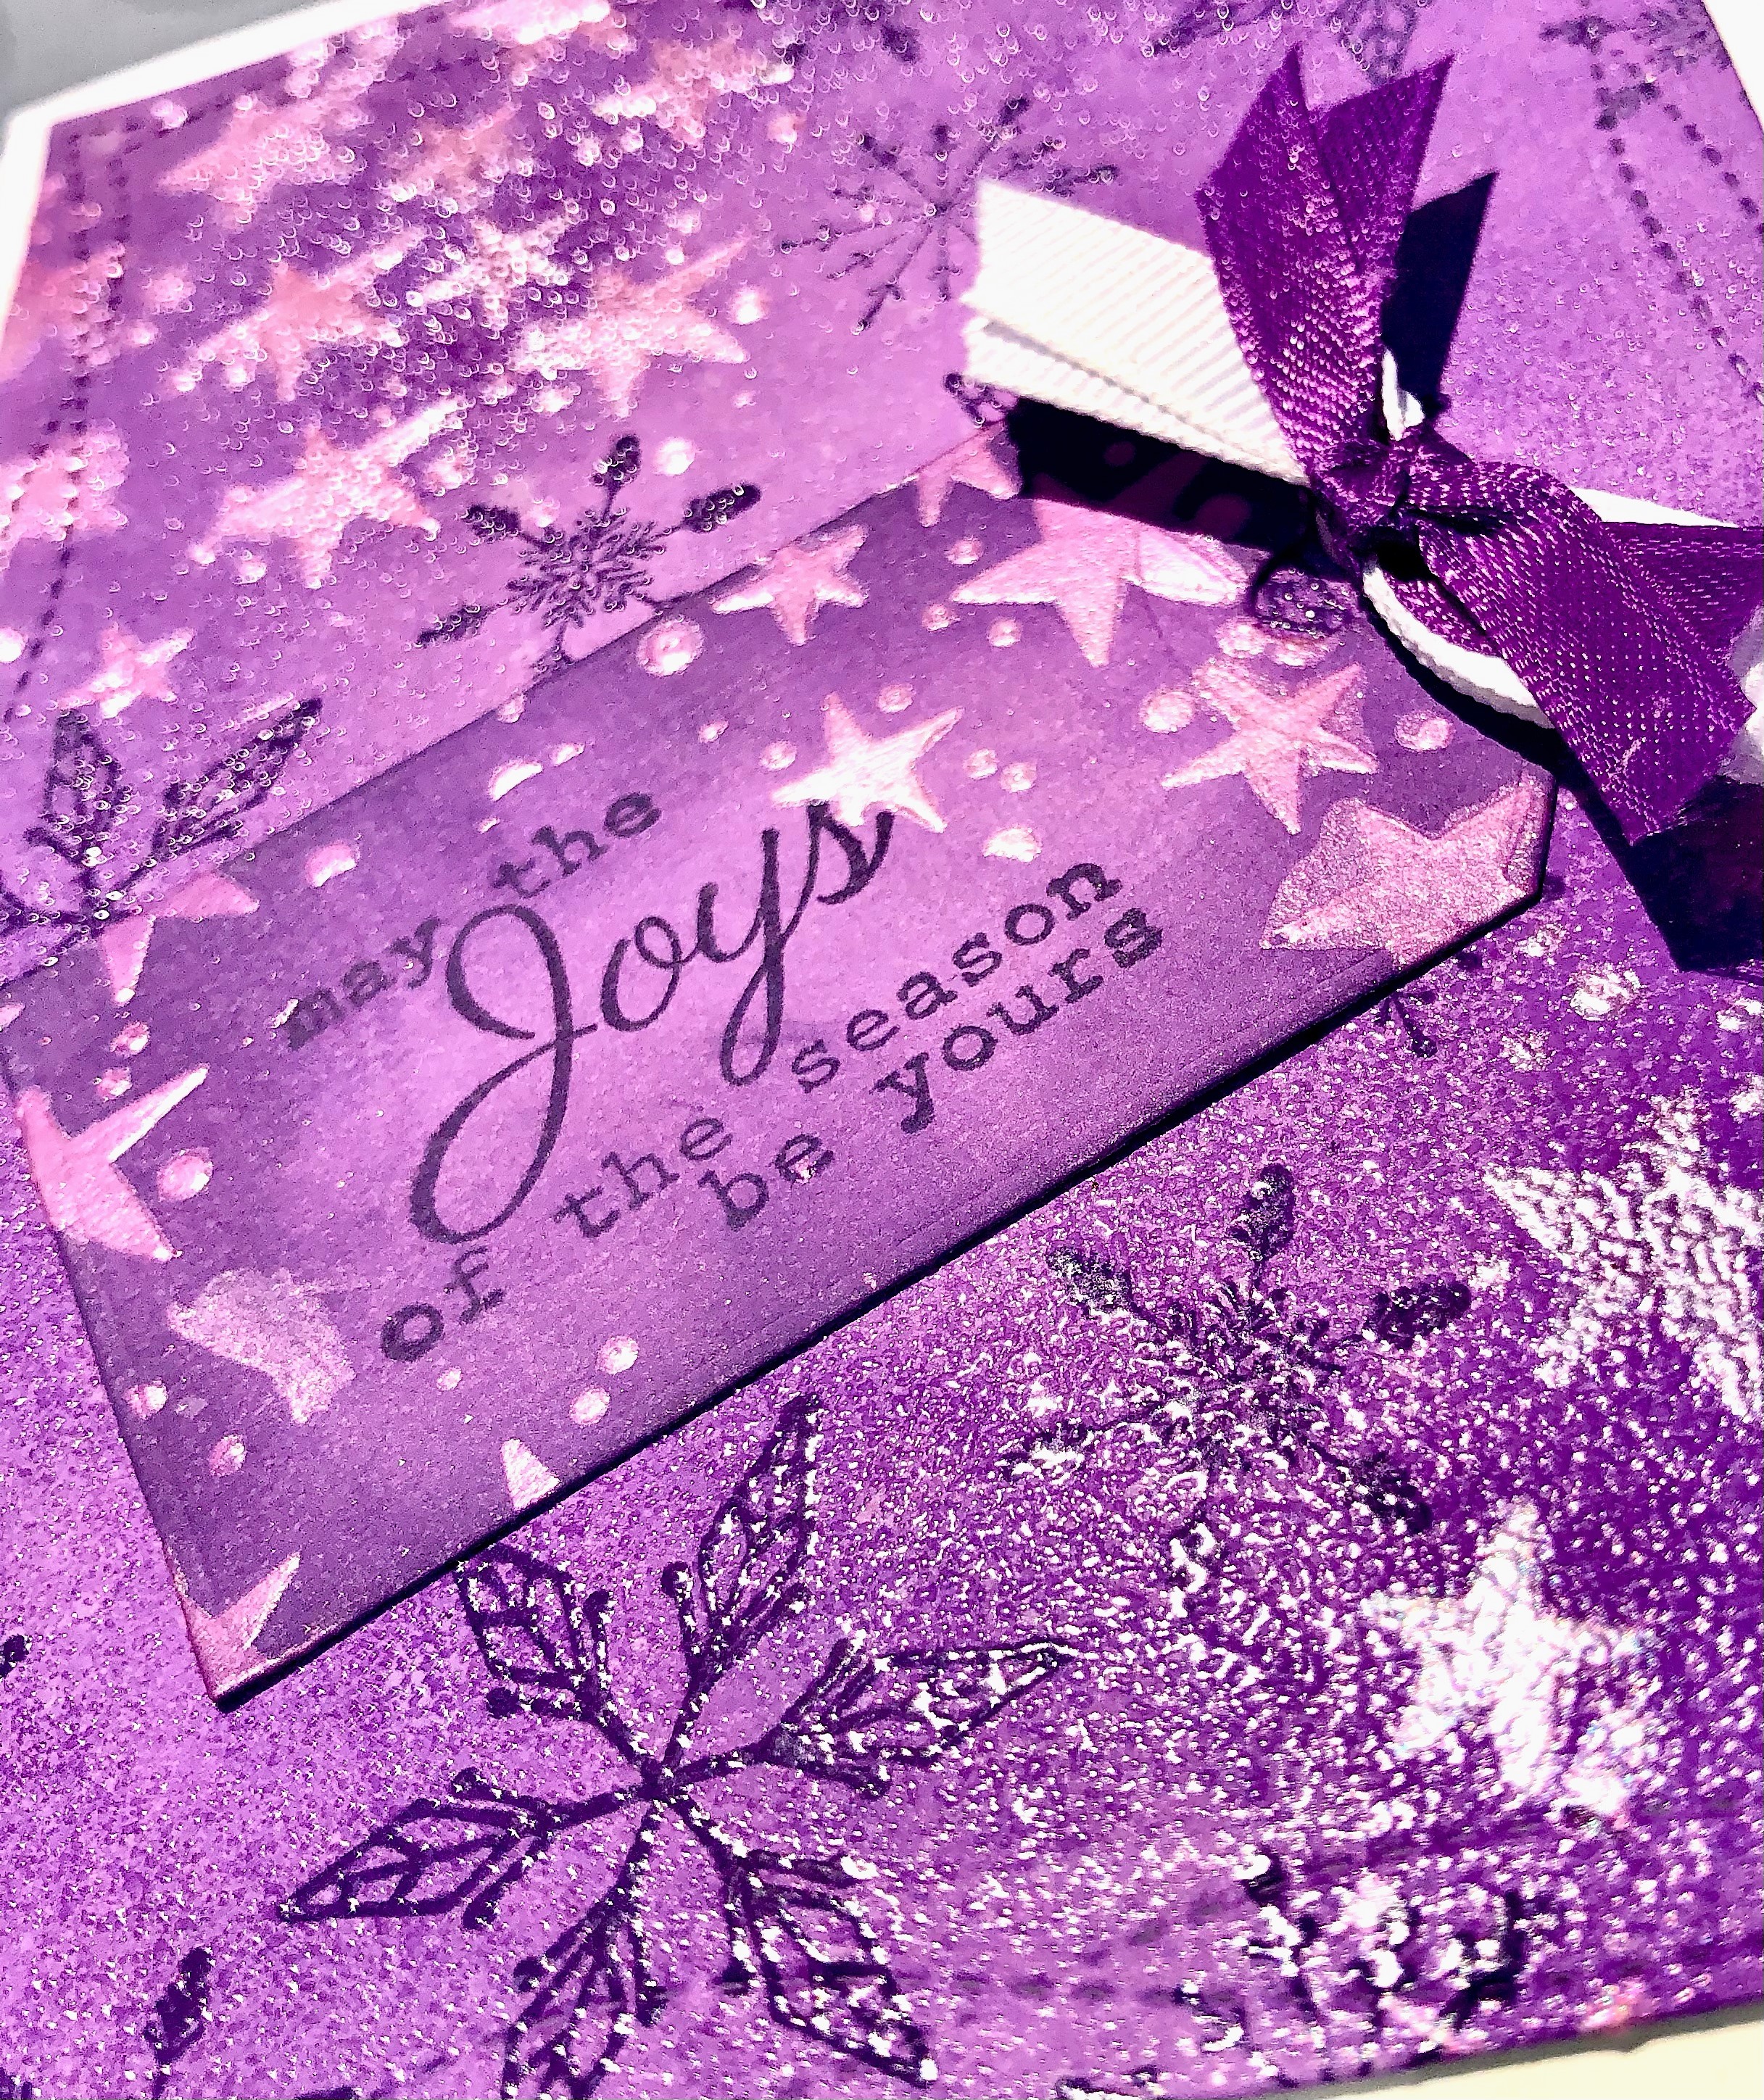
GIU Day 5 May the Joys of the Season by Yours

For my last day as a GIU girl, I had to make a Christmas Card.  Purple is my favorite color so I thought I would just play and see what happened.

I started with a piece of light purple paper from my stash and ink blended on Wilted Violet and Villainous Potion Oxide inks.  Next, I took the snowflakes from the Beauty of Life SMAK (11/19) kit and stamped them in Villainous Potion in a random pattern all over my card front.  Then I covered the snowflakes with Icicle Embossing Ink.  
Because oxide inks take a little bit to dry, the embossing ink stuck not only to the snowflakes but to portions of my panel.  I was okay with that as I heat set it, it made it feel like there was icy or frosty patches on my card.
Here you can see the shine on the snowflakes and on the frosty/icy patches on my card.

Then, I took a star stencil from my stash and in the upper and lower corners, I covered the stencil with Opal Chroma Glaze from Brutus Monroe and set my panel aside to dry.

Next, I took another piece of the light purple cardstock and cut it out with a tag die from my stash.  I  stamped the sentiment from Ember Girl in the Villainous Potion and ink blended the same two purple inks around the edges and once again used the Opal Chroma glaze and star stencil.

Once everything was dry, I cut the panel down with a double stitched rectangle from my stash and added the tag to the front. I chose a purple and white ribbon from my stash, tied them in a knot.  To add the ribbon to my card, I used a glue dot.  Then I attached the panel to my white A2 card base.

I hope you enjoyed my week showcasing some of the Unity Products.  Head over to Unity Stamp Co. Website and pick up some goodies for yourself.


Wednesday, August 10, 2022

Brutus Monroe You Brighten My Day Rainbow Card

 Brighten My Day Card

I love foiling and today I thought I would share a card that had a focal panel with some of Brutus Monroe Toner Mixable sheets.  I started by foiling my Rainbow panel from the Really Radiant Toner Mixables pack with some Deco Foil Transfer Sheets in Rainbow. Then, I cut the panel and a black mat down with a stitched frame from my stash and adhered them together.

Next, I stamped out my sentiment form the Dogwood Spring Stamp set with Distress Oxide Villainous Potion ink and covered it with Icicle Embossing Powder.  After heat setting, I used the coordinating die to cut it out and matted it on a black frame cut from a stitched die from my stash.  

For some interest, I cut some vellum with the leaves from the Fabulous Florals Die set (3 times) and sprayed them with some shimmer spray to add some shine.  I also sprayed the back of leaves with some Pixie Spray to add adhesive to the back and layered them on the front of my foiled panel.  I used liquid glue to attach my matted sentiment over the ends of my leaves so help keep them in place.  Finally, I adhered the entire thing to a white A2 card base.

Thanks for stopping by and brightening my day.  ðŸ˜†  All of the above links are affiliate links to the Brutus Monroe store. These add no cost to you, however they do help me bring you content.
Wednesday, October 20, 2021

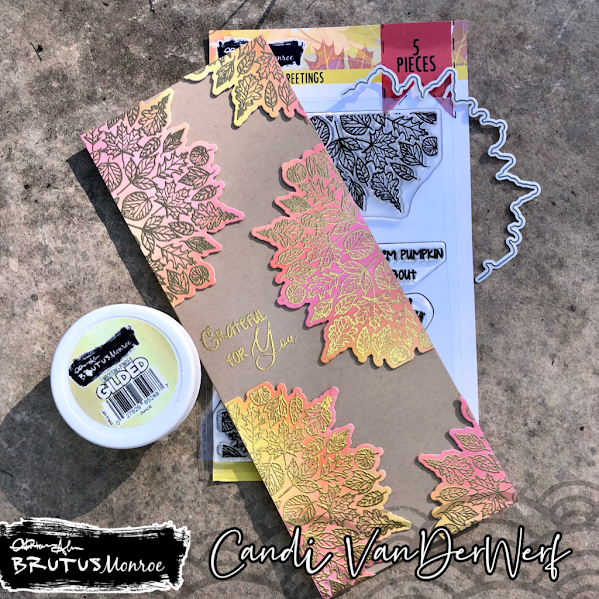
Brutus Monroe Grateful For You Slim Line Card


I started by taking Bee Sting, Sike! and Slippery When Wet inks from Simon Hurley Creates and blended up a couple of white card panels.  Then I used my antistatic bag to treat the front of the panels, lined them up (individually) in my Original Misti and stamped both of the leaf images from Grateful Greetings with Brutus Monroe Embossing Ink.  I covered the ink with Gilded Embossing Powder and heat set it.  (I repeated this until I had 6 embossed images--I only needed 5).


Next I cut out each of the Embossed panels with the coordinating die, and trimmed the end off with my paper trimmer.  I also cut out 10 pieces of the die cut with Kraft paper.  I stacked two of each die cut together with liquid glue and attached one of my Inkblended/Embossed images on top.  This creates dimension for the front of my card.  I created my card base from some Kraft Colored cardstock.  I cut the 8.5" x 11" cardstock down to 8.5" x 7" and scored at 3.."  This creates a slim line card base that measures 8.5" x 3."


I chose my sentiment from the stamp set and used my die cuts for placement and then stamped it in Embossing Ink.  I also covered it with Gilded Embossing Powder and heat set it.  Then I used liquid glue to attach one of my Embossed Die cuts opposite of my sentiment.  Then I placed two of the Embossed Die cuts to the left side of my card base.  For my last two pieces, I attached them at an angle on the right side of my cardbase in each corner.  Finally, I used my paper trimmer to cut off an overhanging piece of die cuts.

Here are (affliated) links to the products used in the Brutus Monroe Store-as always affilated links do not cost you anything extra, they just help me bring you new content.)


Sunday, October 17, 2021

Brutus Monroe Spooky Kids (6 cards)


Today I have 6 cards to share with you from the Spooky Kids Stamps and Coordinating Die set from Brutus Monroe.  Each card also features a different stencil and glaze also from Brutus Monroe. 


VAMPIRE

I started with Raven Cover Cardstock cut down to 4.25" x 5.5". I used some low tack tape to attach the Batty Stencil to my cardstock.  Using a silicone spatula, I spread some of the Night Sky Velveteen Glaze in the upper corner of the stencil and covered just part of it.  I only wanted a small pattern of the bats for this card.  I set the panel aside to dry.  Once it was dry I used the second largest Rectangle Foundation die to cut it out.  I used another Rectangle die from my stash to cut out a mat layer from Scarlet Cover Cardstock.  I used my embossing bag to treat the Scarlet cardstock and stamped the sentiment from Spooky Sentiments with Brutus Monroe Embossing Ink, in the center.  I covered the sticky ink with Raven Embossing Powder and heat set it.  I used a banner die from my stash to cut out the sentiment.   (Using the middle of the mat paper for my sentiment saves on paper and once I mat the Black card panel on the top, no one will ever know that I cut out a piece from the Scarlet mat.)  I stamped the Vampire from the Spooky Kids stamp set with Raven Detail ink on some Perfect Blend Alcohol Paper.  Then I colored him in with a variety of Copic markers and cut him out with the Coordinating Die.  I used liquid glue to put my card panel together with the Image, sentiment and mat.  My cardbase is made from Raven Cardstock and is standard A2 size.  For the inside of the card, I placed another piece of Scarlet cardstock, and stamped a Happy Halloween sentiment with Raven detail ink.


GHOST
I started with Raven Cover Cardstock cut down to 4.25" x 5.5". I used some low tack tape to attach the Hoiden Stencil to my cardstock. I carefully covered just the stencil with Glow in the Dark Chromas Glaze, making sure not to go outside the edges of the stencil (this is a circular stencil). I set this panel aside to dry.  Once it was dry I cut it with the second largest Rectangle Fondation Die and my mat was cut with a large Rectangle die from my stash and a green piece of paper from my scrap bin.  I used my powder tool on the green mat and stamped the sentiment from Spooky kids with Brutus Monroe Embossing ink.  After covering with Raven Embossing Powder, I heat set it and cut it out with a rectangle die.  I stamped the Ghost from Spooky Kids with Raven Detail ink on Perfect Blend Alcohol Paper and colored him in with Copic markers. After I used the coordinating die to cut him out, I used liquid glue to attach my sentiment and image to the front of my panel.  Then I attached the panel to the green amat.  To finish my card,  I chose a white A2 Card base and used liquid glue to attach my matted panel.


ZOMBIE
 I started with Raven Cover Cardstock cut down to 4.25" x 5.5". I used some low tack tape to attach the Slim Line Ripple Stencil to my cardstock at an angle. I covered the edges of my stencil with low tack tape to protect the card panel. Using a Silicone spatula, I spread some Lima Bean Velveteen Glaze across the entire stencil.  (My mind saw this stencil as a brain pattern, which I thought would fit nicely with the zombie.) While the panel was drying, I stamped my image with Raven Detail ink on some Perfect Blend Alcohol Paper,colored it in with Copics, and cut it out with its coordinating die.  Next, I cut down a green piece of paper with a rectangle die from my stash.  I treated the paper with my embossing bag and after stamping my sentiment from Spooky Sentiments with Brutus Monroe Embossing Ink, I covered it with Raven Embossing powder, heat set it and cut it out with a die from my stash.  Once my panel was dry, I used the second largest of the Rectangle Foundation dies to cut it out and mat it on my Green piece.  I used liquid glue to attach my zombie and sentiment to the front of my stenciled panel.  I attached the entire thing to a Raven A2 card base.  Inside I included another piece of green paper with a Happy Halloween Sentiment stamped on it.


WITCH
Taking a piece of white cardstock I attached the Random Dots Stencil with low tack tape.  I took some Marmalade and Amethyst Glitter Glaze and spread each color on a different side.  Then I carefully combined the colors in the middle.  I set the panel aside to dry and worked on my image.  The Spooky Kids witch was stamped on Perfect Blend Alcohol paper with Raven Detail ink and colored in with Copic markers.  I used the Coordinating die to cut her out.  Next, I looked through my scrap bin and found a light purple piece of patterned paper and cut it out with a rectangle die from my stash.  I cut a circle out of the center of the purple panel.  After treating the circle with my embossing bag, I stamped the sentiment from the set with Embossing Ink and covered it with Alabaster Embossing powder.  After heat setting it, I attached it to the front of my card panel along with my colored witch with liquid glue.  Then I glued the panel to my purple mat and then glued the whole thing to the front of my landscaped A2 white card base.


FRANKIE
I started with Raven Cover Cardstock cut down to 4.25" x 5.5". I used some low tack tape to attach the Slim Line Pathway Stencil to my cardstock. I covered the right edge of my card panel with low tack tape to protect it from my glaze.  I used a silicone spatula to spread the Purple Galaxy Glaze over the stencil.  Once I removed the stencil, I sprinkled some Fallen Snow Glitter over parts of the wet glaze for some sparkle and set the panel aside to dry. Next, I stamped the zombie image on some Perfect Blend Alcohol Paper with Raven Detail ink, I colored it in with Copic markers and cut it out with the coordinating die.  Using a scrap piece of purple paper cut down with a Rectangle die from my stash, I stamped my sentiment from the set with Embossing ink.  I sprinkled it with Alabaster Embossing Powder and heat set it.  Then I used a rectangle die to cut it out of the center of my mat.  Once.my Galaxy glaze panel was dry, I used the second largest Rectangle Foundation die to trim it down and attach it to my purple mat.  I used liquid glue to attach my sentiment and Frankie to the front of my panel.  Then I attached the entire thing to a white A2 card base.


PUMPKIN
I started with a piece of white cardstock cut down to 4.25" x 5.5". I used some low tack tape to attach the Kramer Stencil to my cardstock.  I used a silicone spatula to spread some Lima Bean Velveteen Glaze over the entire panel and then set it aside to dry.  One it was dry, I cut it out with the second largest Rectangle Foundation die.  I matted the panel on a piece of orange with white polkadot paper from my scrap bin.  This patterned paper was cut down to a mat side with another rectangle die from my stash.  Before I attached the panel to the patterned paper, I cut out a rectangle from the center with a die from my stash.  I treated this rectangle with my antistatic bag and stamped my sentiment with Brutus Monroe Embossing Ink.  I covered the ink with Raven Embossing Powder and heat set it.  I attached the Pumpkin girl and sentiment to the front of my matted Velveteen panel with liquid glue.  Then I attached the entire thing to my white A2 card base.


List of Products Used (available in the Brutus Monroe Store):  Affliated links are not at any additional cost to you, however, they help support me to bring you new content.

Sunday, August 1, 2021

Haunted House Slim Line Card with Brutus Monroe


Starting with a 8.5" x 3.5" white card panel, I placed the Simple Blends Circle stencil in the middle of my panel.  Using a blending tool, I inked the center of the stencil with Squeezed Lemonade Distress Oxide Ink and the outer part with Mustard Seed Distress Oxide Ink. Once I was happy with the blend, I removed the stencil and covered my inked Circle with the Negative from the Simple Blends Circle Stencil.  I lightly blended the edges with Antique Linen and Squeezed Lemonade Distress Oxide Inks to create a halo effect around my Moon.

Next I blended Stormy Sly and Blueprint Sketch Distress Inks to create a dark night sky.  To increase the effect, I blended a little Black Soot Distress Ink around the edge of the panel to deepen the darkness.  Next, I lightly misted the background with water and Pearl Chroma Mist to create "stars" in the sky.

While I let my ink dry into the paper, I stamped out the house from Beware Blvd on Perfect Blend Alcohol Paper with Raved Detail ink.  I let the ink dry for about a minute and then colored it in with a variety of Grey Copic Markers. I used W9, W7, W5, W3 on the house and chimney.  For the Room I used C7, C5, and C3.
For the eyes I used YR23 and W1 for the windows.  Then I used my scissors to fussy cut it out.  To clean up any edges, I used my Memento Black marker to go around the edges. I used Y06 to color in the space between the house and the pipe to match my moon.

Once my background panel was dry, I used my antistatic powder bag over the front of my panel and placed it in my Misti.  I lined up the tree from the Crafty Witch stamp set and stamped it several times with Embossing Ink.  I covered the sticky ink with Raven Sparkle Embossing Powder and set it with my heat tool.  I repeated this with the other side of my panel.

I used liquid glue to attach my haunted house to the middle of my panel.  For my sentiment I used the Enter if you Dare stamp from Beware Blvd and stamped it on vellum with Embossing ink.  I covered it with Raven Sparkle Embossing Powder and heat set it.  I cut it out with a Circle Foundation Die and used my finger to smear some liquid glue on the back to attach it to the right of my Haunted House.  Finally, I cut my panel down about 1/8" and matted it on black cardstock and then onto a 8.5" x 3.5" white cardbase.


Sunday, June 6, 2021

Stencils two ways using inks and chroma glaze


Both of my cards using similar supplies.

First, I started by taking a pre-cut slim line card base and used some washi tape to hold the Slimline Umbrella Stencil in place. I used a blending brush with Marsala Surface Ink,  I repeated this with the 6x6 Umbrella Stencil and an white card panel measuring 4.5" x 5.5."  Before I removed my stencil, I used a palette knife to spread some Pearl Chroma Glaze over the top of both blended panels and stencils.  I used a small layer, spreading in only one direction and not worrying if it covered the entire blended area.  I carefully removed the stencils, set the panels aside to dry and took the stencils to the sink to wash.


Next, I stamped two of the images from the Mother's Day stamp set with Raven detail ink on Perfect Blend Alcohol Paper. I smooshed some Marsala, Grass Stain, and Maple Surface Ink on my glass mat.  Using a water brush, I picked up the ink and painted the flowers with Marsala, the Grass Stain in the leaves and stems, and the Maple for the center of the big flower and the branch. Then I used my Brutus Monroe scissors, to fussy cut out both flowered images.  \

Once my card panels were dry (I usually leave them overnight), I used the Slim line and 2nd largest Rectangle foundation dies to cut them down slightly.  Then, I decided I wanted to mat my panels before I put them on my card base. I cut down some Marsala Card stock.  For my slim line card, I cut the card stock to slightly smaller than 3.5" x 8.5" and for my A2 panel to 4.25" x 5.25."


I used a piece of scrap Marsala cut to 9/16" x 8-7/8," and stamped the Thinking of You sentiment from the stamp set with Brutus Monroe Embossing Ink. I covered it with Alabaster Embossing Powder and heat set it.  I did the same thing for the Thank you sentiment and cut it out with Circle Foundation die.


Next, I attached my panels to my mats and my white card bases.  For my slim line card, I attached the sentiment strip to the panel first and then my image, using liquid glue.  For the A2 Card I attached the image first and then my sentiment also using liquid glue.  For a finishing touch, I used some clear glaze from my stash to add drops to the center of the flowers on my slim line card.
Here is a close up of the shine from the Chroma glaze and the liquid pearls I added to the center of the flowers.


Here is a list of product used with affliate links to the Brutus Monroe Store:


rectangle Foundation dies: BRU1203
Circle Foundation Dies:  BRU1197
Marsala Cardstock: BRU5308
Perfect Blend Alcohol Paper: BRU4013
Precut Slim Line Panel: BRU5164
Mothers Day Stamp Set: Available in Kit
Pearl Chroma Glaze: BRU0114
Alabaster Embossing Powder: BRU2470
Raven Detail Ink:  BRU2543
Embossing Ink: BRU2081
Umbrella Stencil Slim Line: BRU5090
Umbrella Stencil 6x6: BRU5083


Monday, April 5, 2021

Maker Forte Release One Layer Flower/Birthday Card


My card today is a very fun and simple one layer card.  Starting with an A2 white card base, scored, folded and placed in my Original Misti.  I love the flower image from the Beautiful Night Garden Stamp (designed by Alex Syberia).  I choose an Orange and Redish/Pink ink to spot ink up this image. Spot inking, is what I call inking my stamp several times, overlapping colors. Actually, I like to repeat this step until I am happy with the mix and saturation of the two colors. 

Next, I removed the card from my Misti. Using the same Redish/Pink ink, I stamped the Red rubber Splatter 2 background stamp, I over the entire background.  However, I did not use an acrylic block or my Misti, which gave a more organic and imperfect look the the splatter look.

For a focal image, I chose the new Flower Cluster stamp (designed by Varada Sharma), placed it and my card base back in my Misti.  First, I treated the card base with an anti-static tool. Then, I stamped the Flower Cluster and my Sentiment (chosen from Alex Syberia's Flower Background with Sentiment Set) with the Color Hive Clear Embossing Glue Ink Pad. Thirdly, I covered them both with a Black Embossing Powder from my stash.  Finally, I heat set the embossing powder and my card was finished.

I hope you enjoyed my first Maker Forte post and card as a member of the Design team.  Below is a list of items I used that you can purchase in the Maker Forte store.  (all are affilated links with no additional cost to you.)

Thursday, March 25, 2021

Brutus Monroe & Dare 2B Artzy Collaboration Project


When looking at the Dare 2 Be Artzy website to decide what sets I wanted to work with I just HAD to have the ReWrite the Stars set.  I love musicals and The Greatest Showman but one of my all time favorite songs is Pink's Million Dreams.  

To start my project I took a A2 card Panel and rubbed my antistatic bag all over it.  I took the Aerialist stamp and the stars and stamped them all over using the Brutus Monroe Embossing ink, and covered them with the Brutus Monroe Alabaster Embossing powder.  After I heat set the powder, I used a blending brush to cover the panel in Gubby and Game Over ink by Simon Hurley Creates.  I love how the two colors mix to create the orange.  I had the idea that these colors represent the big top of the circus.

Next I took the Hills Stencil and the Poppy Glitter Paste both from Brutus Monroe to cover part of the card front, being careful to not go over the edges of the stencil.  I set the card panel aside to dry.  Next I stamped the Sentiment from the Rewrite the Stars set and stamped it in the Game Over ink and covered it with the Alabaster Sparkle Embossing Powder.  After I heat set it, I noticed I did not have the entire sentiment covered, but I liked the two toned look.  I used my blending brush to ink the sentiment panel with Guppy Ink.  I used a couple of stitched dies from my stash to cut out the sentiment and the dry card panel.

Finally I used liquid glue to attach the sentiment to my card panel and my card panel to my white A2 Card base.


Products used:

Saturday, March 20, 2021

Collaboration with Crafty Meraki


Today's post is a Collaboration between Brutus Monore and Crafty Meraki.  I was lucky enough to receive the You are Incredible stamp set from Crafty Meraki to work with.  I will be honest I do not use flowers and water coloring images very often because I am not comfortable with it yet.  However, I decided to step out of my comfort zone and go for it.  I started by stamping the large floral image from the stamp set onto watercolor paper with Brutus Monroe Embossing Ink, covering the sticky ink with Gilded Sparkle Embossing Powder (also from Brutus Monroe), and heat set it. 

I chose three colors of Brutus Monroe Aqua Pigments.  I used the Creamy Green and Yellow Green for the leaves and the Coral for the flowers.  My first step was to lightly paint all of the images and let it bleed over the sides of the image to give it a loose or messy watercoloring feel.  I let that dry and then proceeded to go in with another more detailed layer with the Creamy Green and Coral.  After that layer was dry, I added some of the Yellow Green to the leaves to deepen and give some shading.  I also added more Coral to the flower petals using some clean water to blend it out until I was happy with the colors and set it aside to dry completely.

Once dry, I put the panel in my splat box and covered the whole panel with splatters from all three colors.  I also grabbed the Gilded Aqua Pigment to add some gold splatters.  I decided to fussy cut out the entire image.  I tried several slimline card bases in a couple of colors and realizing I was out of cream cardstock, I chose a kraft base.  My card base measures 8.5 x 3.5.  

I wanted more shimmer and shine so I pulled out my Slim line stencils from Brutus Monore and flipped through them all to decide to use the Bamboo stencil.  I placed that down on my card base, taping the top and bottom of the stencil in place with low tack tape.  I generously applied the Brutus Monroe Embossing ink to the sides of the cardbase and through the stencil.  I then poured more Gilded Sparkle Embossing powder over the ink and heat set it.  I also did this to a scrap of kraft paper to the LOVE sentiment from the Crafty Meraki Stamp set.

I used foam tape to attach the floral panel to the front of my Gilded Stenciled base and liquid glue to attach some glitter sequins and my sentiment.

I hope you enjoyed my card.  Do you water color?  What techinque makes you uncomfortable?

Here is a list of products used that you can find in the Brutus Monroe Store:

Here is a link the the stamp set from Crafty Meraki:  You Are Incredible Stamp Set


Hugs and Kisses Challenge Card (Brutus Monroe)

 This month's CYOEchallenge on the Brutus Monore Fan Club Page is: Break out your sparkles and lets make some fun cards.  I started off...