Showing posts with label Oxide Inks. Show all posts

Wednesday, August 10, 2022

Brutus Monroe You Brighten My Day Rainbow Card

 Brighten My Day Card

I love foiling and today I thought I would share a card that had a focal panel with some of Brutus Monroe Toner Mixable sheets.  I started by foiling my Rainbow panel from the Really Radiant Toner Mixables pack with some Deco Foil Transfer Sheets in Rainbow. Then, I cut the panel and a black mat down with a stitched frame from my stash and adhered them together.

Next, I stamped out my sentiment form the Dogwood Spring Stamp set with Distress Oxide Villainous Potion ink and covered it with Icicle Embossing Powder.  After heat setting, I used the coordinating die to cut it out and matted it on a black frame cut from a stitched die from my stash.  

For some interest, I cut some vellum with the leaves from the Fabulous Florals Die set (3 times) and sprayed them with some shimmer spray to add some shine.  I also sprayed the back of leaves with some Pixie Spray to add adhesive to the back and layered them on the front of my foiled panel.  I used liquid glue to attach my matted sentiment over the ends of my leaves so help keep them in place.  Finally, I adhered the entire thing to a white A2 card base.

Thanks for stopping by and brightening my day.  ðŸ˜†  All of the above links are affiliate links to the Brutus Monroe store. These add no cost to you, however they do help me bring you content.

GIU Day 3 Mini Slim Halloween Card


For GIU Day 3 I have a Mini Slim Line card for you.  Mini Slims are one of my favorite to create.  I started by stamping the jack-o-lantern image from the Unity Stamp Co. Hallows' Eve Tree all over the front of my 3.5" x 6.25" panel with Black pigment ink.  I covered the Black Pigment Ink with Clear embossing powder to heat set it. 

Next, I used Carved Pumpkin Distress Oxide ink over the entire panel, and a little Black Soot Oxide ink over the edges.  Then I took a script stamp from the SMAK Kit Happy Little Moments (July 2015) and stamped it randomly over the entire panel with White Pigment Ink and set it aside for a bit to dry.

While I waited for the White ink to dry and fade back a bit.  I took some Orange Chroma Glaze from Brutus Monroe and spread it on a piece of packaging that I took out of the recycling and set it aside to dry as well.

Once the Chroma glaze was dry (about an hour depending on thickness), I used an older Spellbinders die to cut the pumpkin from it.    Next.  I cut my panel down to about 3" x 6" panel and wrapped a piece of black tulle around the bottom third of my panel using strong double stick tap to secure it to the back.  I took a smaller piece of tulle to tie a knot on the left and a glue dot to attach my pumpkin to the knot.  

Next, I layered the panel on a piece of black cardstock and then lined it up in my Misti to stamp my sentiment; using the same black pigment ink and clear embossing powder as my jack-o-lantern banner.  Finally, I attached the whole thing to my white card base that measures 3.25" x 6.25."


Sunday, September 12, 2021

Trio of Halloween Slimline Cards with Brutus Monroe


Today I am up on the Brutus Monroe Blog.  Fall is tied as my favorite season along with winter (shocking I know).  However I love Halloween, my daughter was born in October and fittingly could celebrate Halloween all year round.  I always tried to make Halloween special for her and I love making her Halloween cards.

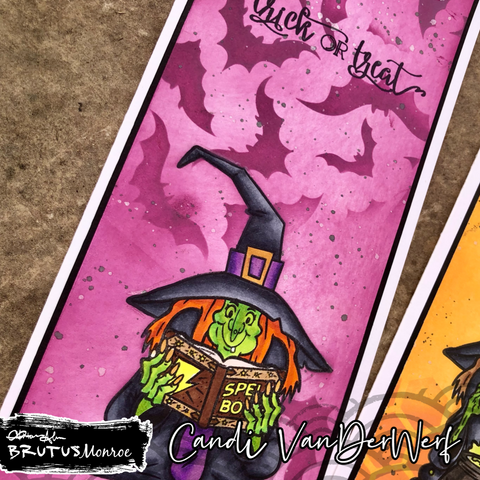
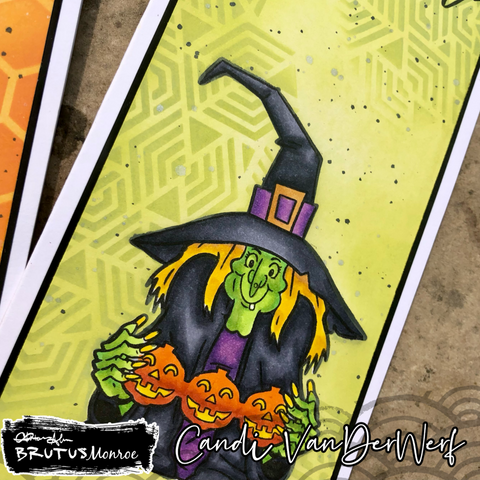
Today I have three cards for you featuring the witches from the Crafty Witch and Witches Brew Stamp sets.  All three cards were made the same but with different stamps, inks and stencils.

To start, I cut down three heavy white cardstock to 8.5" x 7" panels, scored each at 3.5" to create my card bases.  Each 8.5" x 11" cardstock gives me one card base and a card panel.  The card panels measure 8.5" x 4" which I cut down to 8.5" x 3."  First I used Raven Detail ink to stamp the three witches on the bottom half of the card panels.  Then, I used Copic markers to color them.  

Before I inkblended my backgrounds, I created masks for each witch with Masking Paper (or you could use Post-it note paper).  I trimmed each mask down the middle of the outside edge of each stamp.  This gives me masks that are slightly smaller than my image, but yet still cover up the image completely.

Once I covered each colored image with their coordinating masks, I used Distressed inks to lightly ink each background.  Then I used the same ink and a stencil to heavily apply the pattern to a few areas around the panel.
For the Spell Book witch, I used Seedless Preserves and the Batty Stencil.
For the Pumpkin witch, I used Twisted Citron and the Hidden Temple Stencil.
For the Cauldron witch, I used Carved Pumpkin and the Honeycomb Stencil.

Next, keeping the masks in place, I place the three panels in my splat box so I could add some splatter.  For the Black Splatter, I used Raven detail reinker and a tiny bit of water to thin it out on an acrylic block and a paint brush to flick it over the card panels.  For the Shimmer splatter, I removed the pump/sprayer from the Pearl Shimmer Mist and used the plastic tube and lightly shook it over the card panels.

Once the panels dried, (it took about 15 mins) I placed each panel in my Original Misti and stamped the sentiments from Crafty Witch with Raven Detail ink towards the top of each panel.  Then I matted each panel on some Raven Cardstock that measured about 3.25" x 8.5" and then finally glued the panels to my white card bases.

Which card is your favorite?  Do you decorate for fall or  Halloween? Thank you for stopping by and have a great day.

Monday, April 19, 2021

You're a Rainbow in a Stormy Sky - Slim Line Card

Today's post is a Slim Line card for you today featuring one of the newest stamp sets released from Brutus Monroe.  As soon as I saw Balloon Ride, I knew I had to have it.  The balloons are awesome.  The sentiments and accent stamps are just perfect for many designs and card themes.  


The Sentiment "You're a rainbow in a stormy sky" made me instantly think of a rainbow of hot air balloons. I started by stamping out all the balloons on Alcohol Perfect Blend paper with Raven Detail ink; and coloring them in with Copic Markers. The colors I used were RV02, RV04, RV06 (pink), R27, R29, R46 (red), YR04, YR07, YR09 (orange), Y08, Y15, Y17, Y19 (yellow), YG67, G24, G46 (green), B21, B23, B24, B37 (blue), BV02, V17, V25 (purple), E57 (brown)

Next, I used my Scan and Cut to cut out my images and then used my Scissors to trim any imperfections left from the machine.  For my card panel, I used one of the Precut Slim Line Panels, a cloud stencil from my stash, a blender brush along with Stormy Sky, and Blueprint sketch Oxide inks.  I rotated my stencil around to create my sky; using Stormy Sky at the top and Blueprint Sketch at the bottom.  To finish off the sky, I lightly used the leftover ink on my blending brush to soften the harsh white clouds.

I lined up my balloons on my panel in Rainbow order in my Original Misti, to help me figure out where I wanted my sentiment.  I stamped it and a few of the bird stamps around my balloons with Raven Detail Ink.  Using liquid glue to affix my balloons and then my card panel to a precut Slim Line Card Base to finish off my card.

Here's is a list of links to products that you can find in the Brutus Monroe Store:

Monday, March 29, 2021

Hedgehog Hollow March Subscriptin Box

I have recently had the honor of being added the the Marker Forte/Hedgehog Hollow Design Team.  I received my first kit in the mail and I was so excited to this because it is FAIRIES!  There are three stamp sets, a stencil that comes with the negative, and 3 glitters.  This is my first post and design for the team. 

First, I took on of the white slim line panels (that came with the kit), treated with my antistatic bag and stamped the Fairy Swinging on the moon with a yellow pigment ink on at the top and the make a wish sentiment towards the bottom.  Next, I covered them both with a clear embossing powder from my stash and heat set them.

Using a blending tool, I ink blended Broken China, Blueprint Sketch and Black Soot Distress Oxides over the background.  I concentrated the lightest color (broken china) around the moon and sentiment.  I took a clean towel to carefully wipe off the embossing areas.  Next, I took the Fairy on the Moon stencil and layed it over the top of my Embossed fairy and a cloth over the bottom of my card panel. I used a shimmer spray from my stash and sprayed over the stencil.  I love how the shimmer spray left the silhouette of the stencil.

Here is a close up of the shimmer from spraying the stencil

Lastely, I took a stencil and glow in the dark glitter paste from my stash and created a starry background over the top.  Once dry, I used liquid glue to attach it to a yellow mat and then to my white Slim Line Cardbase.  My typical Slim Line cards measure 3.5" x 8.5."

I did get a photo of the glow in the dark paste, though the photos is upside down.

For a final touch, I used a small star die from my stash and cut out 7 stars to attach around my card.

I hope you enjoyed my card and will stop back again.

You can find the subscription link to the HedgeHog Hollow box is here.  Sometimes you can buy a one off box if there is any left.

Monday, November 23, 2020

November 2020 Die of the Month from Brutus Monroe. (2 cards)

 Be Happy Be Bright Be You Card


For my first card using some of the dies from the Brutus Monroe November Die of the Month, I cut out the two large flower dies five (5) times from some scrap white cardstock.  Using pixie spray to temporarily affix them to my white card panel (which measures 8.5" x 3.5").  I chose Worn Lipstick and Squeezed Lemonade from the Distress Oxide Inks and blended them over the top of my cardpanel and flower die cuts, blending the two colors wherever they met.  Before, removing the flowers, I used some shimmer spray from my stash to give some shine to my card.  I carefully peeled off the die cut flowers and saved them from my second card.  I used liquid glue to attach the card panel to my White Slim Line Card Base.  I took a small scrap of white cardstock and stamped the Be Happy, Be Bright, Be You Card from the Floral Frame Stamp set with the same pink oxide ink.  Finally to finish off my card I used some yellow flat back pearls to my sentiment strip.


Thanks Card
This next card was very quick and easy.  I used liquid glue to attach all the die cut flowers used from my Slim Line Card project (Be Happy Be Bright Be You Card) and arranged them around my white A2 Card base.  I flipped the cardbase over and cut off any overhanging pieces, filling in small holes if needed to my card front.  I looked through my scrap bin for some matching pink and yellow cardstock.  I cut down a 4.25" x .5"(about) piece of yellow cardstock and attached that to the top half of my card.  I used a Thanks die from my stash and cut it out of both the pink and a white scrap of cardstock. I sprayed the Thanks with the same shimmer spritz from my stash to have the pink sparkle like the flowers. Next, I glued the pink Thanks to the white, offsetting them slightly to leave a small shadow of white showing.  I attached this to the yellow strip to finish my card.


If you would like to buy this fantastic set of Dies this month, here is my affiliated link to the November 2020 product. (Affiliated link is at no additional cost to you, however I receive a small percentage to help fund my crafting.)


Hugs and Kisses Challenge Card (Brutus Monroe)

 This month's CYOEchallenge on the Brutus Monore Fan Club Page is: Break out your sparkles and lets make some fun cards.  I started off...