Sunday, August 8, 2021

Oh my Gourd & Glitter Glaze from Brutus Monroe


Start by cutting out an Orange cardstock A2 panel.  Using the Misti for placement, stamp the Pumpkin from Oh My Gourd in the bottom left corner of the panel with Raven Detail ink.  Using a green Copic marker, color in the leaves and vines of the image.  While the stamp is still in your Misti, stamp out the three squash blossoms on yellow cardstock scraps.   Next, stamp the pumpkin image on masking paper and fussy cut out.

Arrange the mask over the pumpkin image.  Using the Batty Stencil, place toward the top of the panel, covering up any bats that you do not want to use with low tack tape.  Using a palette knife, carefully smooth over Raven Glitter Glaze over the three bats desired.  Remove stencil and mask carefully.  Set the panel aside to dry. Quickly clean up the palette knife and any glaze on the stencil.

Once the panel is dry, arrange the Spooky eyes stencil on the background, covering unwanted eyes with low tack tape.  Using a palette knife, smooth Key Lime Glitter Glaze over eyes.  Remove and clean stencil, letting the panel dry. Continue these steps until you have the desired number of eyes in the background. Remember to dry between steps when placing the stencil in a new area.


Once the panel is completely dry, line up the Happiest Halloween stamp (or sentiment of choice) in the open space and use the Misti to stamp it in Raven Detail ink.  Using a blending tool, lightly blend some Raven Detail ink around the edges of the panel.

Fussy cut out the yellow squash blossoms and use liquid glue to attach over the image. To make the "cinderella pumpkin," place some Pearl Aqua Pigment on a glass mat and use a small paintbrush to paint the pumpkin.  Once the panel is fully dry, cut it down slightly and mat it on a black mat measuring 4.25" x 5."  Finally, attach the matted panel to a white A2 card base.

Sunday, August 1, 2021

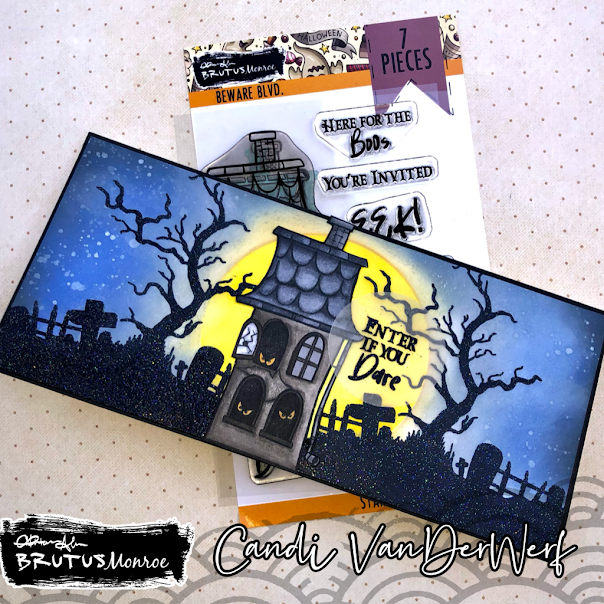
Haunted House Slim Line Card with Brutus Monroe


Starting with a 8.5" x 3.5" white card panel, I placed the Simple Blends Circle stencil in the middle of my panel.  Using a blending tool, I inked the center of the stencil with Squeezed Lemonade Distress Oxide Ink and the outer part with Mustard Seed Distress Oxide Ink. Once I was happy with the blend, I removed the stencil and covered my inked Circle with the Negative from the Simple Blends Circle Stencil.  I lightly blended the edges with Antique Linen and Squeezed Lemonade Distress Oxide Inks to create a halo effect around my Moon.

Next I blended Stormy Sly and Blueprint Sketch Distress Inks to create a dark night sky.  To increase the effect, I blended a little Black Soot Distress Ink around the edge of the panel to deepen the darkness.  Next, I lightly misted the background with water and Pearl Chroma Mist to create "stars" in the sky.

While I let my ink dry into the paper, I stamped out the house from Beware Blvd on Perfect Blend Alcohol Paper with Raved Detail ink.  I let the ink dry for about a minute and then colored it in with a variety of Grey Copic Markers. I used W9, W7, W5, W3 on the house and chimney.  For the Room I used C7, C5, and C3.
For the eyes I used YR23 and W1 for the windows.  Then I used my scissors to fussy cut it out.  To clean up any edges, I used my Memento Black marker to go around the edges. I used Y06 to color in the space between the house and the pipe to match my moon.

Once my background panel was dry, I used my antistatic powder bag over the front of my panel and placed it in my Misti.  I lined up the tree from the Crafty Witch stamp set and stamped it several times with Embossing Ink.  I covered the sticky ink with Raven Sparkle Embossing Powder and set it with my heat tool.  I repeated this with the other side of my panel.

I used liquid glue to attach my haunted house to the middle of my panel.  For my sentiment I used the Enter if you Dare stamp from Beware Blvd and stamped it on vellum with Embossing ink.  I covered it with Raven Sparkle Embossing Powder and heat set it.  I cut it out with a Circle Foundation Die and used my finger to smear some liquid glue on the back to attach it to the right of my Haunted House.  Finally, I cut my panel down about 1/8" and matted it on black cardstock and then onto a 8.5" x 3.5" white cardbase.


Hugs and Kisses Challenge Card (Brutus Monroe)

 This month's CYOEchallenge on the Brutus Monore Fan Club Page is: Break out your sparkles and lets make some fun cards.  I started off...