Thursday, December 31, 2020

2020 Growing In Unity Week Post #4

I can't believe the week is almost over (and 2020).  I am going to end 2020 with another card featuring Diana Girl (from the Angie girls by Angie Blom).


I stared by stamping with a black Copic friendly ink and coloring up Diana with Copic Markers in the Red, Blue and Gold theme.  I used a grey marker on the bottom to ground her.  Next, I used my scan and cut to cut her out.  I used a straight blade to carefully cut a slit inside her legs and then my super pointy fussy cutting scissors to finish removing the white uncolored cardstock.

Next taking an A2 white card panel, I used a blue and red ink from my stash to ink blend a very loose background.  I didnt blend the colors together much or concentrate on making a very smooth blend as I was leaving some white to show through and I knew I would be using a background stamp as well.

I lined up my blended card panel and the Hit the Brick background stamp (a Unity Stamp Co and Brutus Monroe Collaboration) in my Mini Misti.  I first stamped the background with some black ink.  Then I wiped of my stamp and using a Ranger blending tool and foam circle, I added Deco Foil Transfergel to the stamp.  I applied the gel to the foam circle with my finger and carefully pounced the stamp over the entire background stamp, adding more transfer gel to the foam as needed.  I stamped the background and when I lifted the Misti lid the panel stuck to my stamp, (this is fine, I ran my fingers over the backside to make sure the transfer gel attached the the panel).  I carefully removed the panel and set it aside to dry. (about 30-60 mins)  Next I took a small paintbrush and carefully brushed the 
parts of my Diana stamp that I wanted to be gold (belt, necklace, tiara, boots, cuffs) and set that aside to dry.  I very quick cleaned my stamp, paintbrush and even my foam circle with some water to remove any leftover transfer gel.

I found a piece of red cardstock from my scratch paper and cut it down to just shy of 4.25" x 5.5" to be a mat for my colored panel.  I used a circle die that would fit around the sentiment from the Diana girl set and cut it out of the center of the red panel.  Using my powder bag to treat the circle, I stamped the sentiment with embossing ink (with the help of my mini Misti) and covered the sentiment in Gilded Embossing Powder from Brutus Monroe.  I set the sentiment wiht my heat tool.

Once my panel and Diana Girl were dry, I covered them with Deco Foil Gold Foil and ran them through my preheated laminator (twice).  I just love the reveal of peeling back the foil to see the final results.
I used liquid glue to attach my sentiment circle and Diana to my Brick Wall background and then that panel to my red mat.  After attaching everything to my card panel, I decided I wanted to enchance the stars on her costume.  I used a star border die from my stash to cut out the stars and attach them to the thigh and breast of Diana (where the black star stamped).  I also added a few of these white star around my sentiment.

Here is a close up of the foil, the picture does not do the shine justice. But oooh and look at the texture on the bricks.


What do you think?  Don't you just love it?  The inspiration for this card is my Aunt who is undergoing Chemotherapy this week. She is a wonderful woman and I admire her so much.  I plan on mailing this card to her right after the new year.

Supplies
Black Copic Friendly Ink
Copic Markers
Red and Blue Dye Inks with Blending Brushes
White and Red Cardstock
Embossing Ink
Gilded Embossing Powder -Brutus Monore
Deco Foil Transfer Gel
Deco Foil Gold Foil Sheets
Ranger Blending Tool and Circle Foam
Liquid Glue
Laminator
Scan and Cut/Scissors
Circle Die Cut
Big Shot Die Cutting Machine


Wednesday, December 30, 2020

2020 Growing in Unity Post #3

Today's card was a super fun one for me to create.  I started with an A2 white card panel and ink blended on some pink and grey inks.  Next, I took the script stamp from the (be fearless) June 2017 SMAK kit and inked with some Red ink and randomly stamped it over my background.  I also took the doily stamp fromt this kit and stamped it in a couple of place in a grey ink.


The next thing I did, I totally give credit to Whitney for showing this in a live this past week.  I used the hearts from ...don't give up and stamped them in grey ink along the top of my panel.  After cleaning off my stamp, I then using a ranger blending tool with a foam circle, I added Deco Foil Transfer Gel to the stamp in a pouncing motion and stamped it to my card panel.  I cleaned off the stamp well and repeated the process towards the bottom of my panel.  Two tips I have for this, use your finger to spread the Transfer Gel onto the foam circle and make sure you clean your stamps off right away.

I let the panel dry for a few minutes (the transfer gel does not take long for this techinique but the longer you let it set the better the results- I try to wait at least 30 mins).  While my panel was drying I cut out a variety of hearts from vellum and white scraps.  I also created my card base out of white cardstock and cut down a mat from grey card stock.

Next I stamped out the heart from Love Makes the World with Copic friendly Black ink and colored it in with a couple of Pink and Grey markers.  I used my Scan and Cut to cut it out.

Finally my panel was ready for the next step,  I used opal foil from Deco/Thermoweb and ran my panel through my laminator twice.  This was the first time I personally had tried this techinque and I love it so much I have been making many backgrounds with foil, stamps and transfer gel this week.

To complete my card, I glued the panel down to the mat and then to my card base.  I used liquid glue to attached the Copic colored heart image and many of the small die cut hearts.  For some dimension I used some foam squares to attached a few of the hearts.


Here is my attempt to show the shimmer, which does not photograph well.

I really love this techinque and thinkg this card turned out so fun.  I can't wait to send it to someone.

What techinque is new to you that you ahve recently used that you have fallen in love with?


Supplies:

Love Makes the World Stamp Set -Unity

...don't give up Stamp Set - Unity

(Be Fearless) June 2017 SMAK Kit- Unity

Black Copic Friendly Ink

Red and Grey Dye ink

Copic Markers in Pink and Grey

Opal Deco Foil Sheets

White, Grey and Vellum cardstock

Liquid Glue and Foam Squares

Laminator


Tuesday, December 29, 2020

2020 Growing In Unity Week Post #2

For my second Growing in Unity Week post, I focus again on an Angie Blom stamp, but this time I had to include the guys.  I used the Forrest Guy stamp set to create a birthday card for my guy.  His birthday is coming up and I thought this would be a perfect chance to be ahead in my card making for once.  

I started by stamping out "Forrest" in Copic friendly ink on an A2 card panel made from Neenah 110 lb cardstock.  I colored him in with Copic markers.  Next, I cut him down using some rectangle dies from Hero Arts.  I wanted the panel to be smaller so we could see the other panel I made.


My second panel was very fun to make.  I just took a green piece of cardstock from my scrap bin and cut it down to A2 card panel size.  I used the Vintage Burlap Background stamp in my Misit with Embossing Ink.  Next I usedBrutus Monroe Raven Sparkle Embossing Powder in a couple of spots on my background and carefully flipped over my panel to "throw" off the extra powder onto a scrap sheet of copy paper.  I did this careful "throw" technique because I wanted to used a second embossing powder on the rest of the background.  I chose a clear powder from Brutus Monore and followed the same steps as above.  Then I used my heat tool to set both embossing powders.  I like the two tone look that the embossing powders givee my background. (In hindsight, I would do the clear first and then the black, as there is always some leftover and I do not want to contaminate or waste any embossing powder.)

Here is a close up of the two different embossing powders.  The Raven Sparkle has a little glitter in it which is why its one of my favorite black Embossing Powders.


I also used the same ink and Raven Sparkle Embossing Powder for my sentiment on another piece of the same green cardstock and attached it to the front of my colored panel.

I glued both the background and colored panel down on an A2 Black Card Base.  For the inside of my card I messily stamped the same Vintage Burlap stamp in the corner of a white card panel with a light green ink and a sentiment for my honey with black ink.  

Thank you for stopping by and don't forget to leave a comment for a change to win some Unity goodies at the end of my week.

Do you struggle with Masculine cards like I do?  What is your favorite Unity stamp for masculine cards?


Supplies Used

Monday, December 28, 2020

2020 Growing in Unity Post #1


Happy Monday!  We have made it to the last week of the year.  I was lucky enough to be chosen to be the Growing in Unity Girl of the week.  I will be posting a project every day this week (M-F) using different Unity Stamp Company products.  Make sure to stop back every day and comment for a chance to win one of two prizes from Unity Stamp Co

I first heard of Unity during one of Angela and Whitney's lives on Facebook.  I thought they were so fun and engaging.  I then met them when I took a class at Junkiefest in 2019 not knowing that they were a company located in my home state of Minnesota.  I fell in love with their Angie Girl stamps and the obsession began.  Over the past two years, I have grown my Unity stamp collection which is primarily made up of  the faceless girls and background stamps.

Today's card is a very simple one that was inspired by my daughter, who lives over 1,000 miles away from me. The stamp I featured is the Wear Confidence stamp set by Angie Blom.  I started by stamping out our girl on some white cardstock with a Copic friendly ink and then colored her in with some teal as that is my daughters favorite color.  She has beautiful long brown hair that I also included in my coloring.  I fussy cut her out and then started on the rest of my card.

Close up to show the shimmer on the corset, which of course is super sparkly in person.


I decided to make a mini slim card.  I took a Neenah Classic Crest Solar White 110 lb cardstock, cut down to  7x6 inches and scored at 3.5 inches to make a 3.5x6" card Portrait card base.  I cut another piece of white cardstock down to 3.5x6" and used an oval die from my stash to cut out a window in the panel.  Then I ran the panel through my Big Shot using the Swiss Dots embossing folder.  (The panel is a little long, so I flipped it around and ran it partially through my machine again to finish the pattern, keeping just a very small space that did not emboss all the way.)

I used some Guppy Ink from Simon Hurley Creates and a blending brush to ink my card base just were it would show through the window.  I used a thank you sentiment (with a teal ink) from Brian guy in the small unembossed area on my Swiss Dot panel. If any dots where there, I used my bone folder to press them down and make the area smooth.  Next I glued the panel to my card base.  I used liquid glue to the back of my Copic colored girl and used my tweezers to slip it behind my embossed panel.  I stamped the sentiment from the stamp set inside my card in the same teal ink I used on the front of the card.

Finally, I added some clear wink of stella to the corset top and center of the yellow flowers of my colored image to give a little sparkle. This card fits in a standard letter envelope, which is one of the reasons I really like the mini slim size.

I love this card and it just reminds me so much of my girl.  I love how she is not afraid to wear what she wants and do her makeup as her mood fits her.  She has a saying she used in high school show choir and dance; "fake it to you make it!" and I think this saying just fits so well with that.  Be confident. no matter what you are wearing.  If you like it, then go for it.  I wish all of our young ladies and little girls could just have that embedded in their heads.  

What do you think of my project?  Do you have a favorite Angie Girl? If so, which one? (I have used one on 4 of my 5 projects this week)  

Thanks for stopping by and don't forget to come by tomorrow where I will share a fun birthday card I made for my honey's upcoming birthday!


Supplies Used:


Sunday, December 27, 2020

December 2020 Brutus Monroe Stencil of the Month

For my card project this week, I started by using the Stencil of the month and some Orange Chroma Glaze on a 5.5 X 4.25" white card panel.  Once it was dry, my card took off in a whole new direction.  I cut my panel down the white sections in the middle creating four sections.  I used the two "pentagon" shape pieces on my card panel and had two leftover triangle pieces for another project.  I glued the two pentagon shapes to the top and bottom of a piece of orange cardstock that I cut down to just shy of 3.5" x 8.5." I planned on making a slim line card and wanted a little bit of white showing around the edges of my panel. 

Next I took some 0.25" white strips and using my grid mat, I lined them up as straight as possible on my card panel and used liquid glue to attach them.  Next I took the hello and shadow dies that came with slim line panel dies during the Black Friday free gift with purchase and cut them out with coordinating cardstock.  I attached the hello letters to the shadow (using the negative to line them up properly).  I attached this at an angle to the center of my card panel and then affixed the whole thing to my white slim line card base.


For a little added dimension, I used some of the Flat Back Pearls in the Orange color to the portions of the stenciled panel and some in the white color to each of the skinny white strips at the top and bottom.

Products used (affliated links to the Brutus Monroe Store, which have no additional cost for you, I receive a small compensation from orders from these links to help create content.)

Monday, December 21, 2020

Brutus Monroe Stamp of the Month (December 2020)


Can you believe it's finally December 2020?  That means one last Stamp of the Month from Brutus Monroe. This month is an adorable Snowman!


My card this week's features a couple of stamp sets and lots of masking.  I started out by stamping the Snowman from the December Stamp of Month, the Christmas Tree and the Gift (two times) from the Good Tidings stamp set on Masking Paper.  I used my Brutus Monroe scissors to fussy cut all of the images out.

I started with the Snowman, and stamped him on my card panel with Brutus Monroe Raven Detail ink.  I covered the snowman with the mask and then stamped out the gift pile, masked and stamped it again.  I covered the second pile of gifts with a mask and then stamped out the Christmas tree.  I wanted the tree in the background with the presents in the front.  I wanted the Snowman in the very front.  (Stamping tip, always stamp the image you want in the front first.)  I did cover the tree with a mask as well because I planned on ink blending my background and wanted the images to stay white.  

For my background, I used some post-it notes to create some snowdrifts and attached those to the bottom of my card panel.  Then, I used a light, medium and dark blue Distress Oxide inks.  Using blending tools, I started with the lightest color just around my tree and towards the bottom of where the snow piles would be.  I then used the darkest ink around the top and sides of my panel leaving a little white space between it and the lightest blue. I blended my medium in between both light and dark.  To smooth out the colors and make them blend, I went back and forth between the colors until I was happy.  I added a small amount of black soot to the very edges to make it more of a night scene and blended it down with my dark blue ink.

Next, keeping my masks in place, I used some water in my spritzer to add water spots to my background.  I placed my panel in my splat box and using some White and Pearl Aqua Pigments (separately), with a tiny bit of water, I flicked the color on my panel all over.  I also used some shimmer spritz from my stash to add some more splatter as well.

Then, the moment of truth, peeling off my masks.  I used the tip of my pick tool to carefully help me lift the edges and pull back all of my masks.  My next step was to color all of my images with a variety of Copic markers.  I stayed with a limited color pallet, using a red, green, yellow, and grey color scheme.  Once finished, I used my Pearl Aqua pigment to add shimmer to the stars, presents, and the band of the snowman's hat.  

Before I added my panel to my card base or my sentiment, I put the whole panel back in my splat box and followed the same steps as above to add splatter to my card. (It is snowing so the tree, snowman and presents all need some snow too.)  Next I took the snowflakes from the December stamp of the month to an acrylic block and stamped them around the edge of my A2 white card base, just around the edges, with the medium blue Distress Oxide ink, making sure to rotate the snowflakes around to make a varied pattern. I used any leftover ink from my blending brush on just the very edge of the card base as well.

I trimmed down my card panel with a Rectangle die from my stash and attached it to the front of my card base.  Lastly, I used a foiled Merry Christmas sentiment that was leftover from another project and glued it to the top right corner of my card base.

Once again, listed below are aflliated links to the products I used that are available in the Brutus Monroe store, (As usual, there is no additional cost to you, however, I do receive a small compensation from these links which helps fund my page.)


Monday, December 14, 2020

Brutus Monroe Christmas Tag Project

 This week I made a set of Christmas Tags.  I pulled out some blue card stock from my stash and used a Stitched Tag die to cut our four tags.  


First, I stamped a To:/From: stamp on the back of all four tags using Raven Detail ink.  Then, I used all of the snowflakes from the new Snow Scenes stamp set with the Alabaster Pigment ink.  I set these aside to dry (pigment ink takes a little while to dry).  Next, I took this adorable snowman from the Stamp of the Month, with some Raven Detail ink and stamped it four times on the Perfect Blend Alcohol Paper.
I used a few Copic markers to color in the hat, band, and nose for the snowman.  I used my scan and cut to cut out all four Snowman leaving a 0.04 border. I used liquid glue to attach them to my dry tags and then used Diamond Stickles to add sparkle to the hat brim and puff ball.  Once the stickles dried, I lined up my tags in my Mini Misti to stamp the Sentiment from Jolly Snowman in the corner also using Raven Detail in.  

Next, I used some scrap white paper to cut out the smallest of the Simple Snowflake dies a dozen or so times.  Using some Pearl Aqua Pigment with just a small spritz of water, I painted all the snowman bodies and all of the die cut snowflakes.  (I love using the Pearl Aqua Pigment to give shimmer and shine to my projects.). Once the snowflakes dried (It only takes a min or so), I attached 3 each to the tags, cutting off any overhang around the edges.  I looked through my ribbon stash and found some sheer ribbon,  red and white, & blue and white bakers twine, cut  a few inches off and threaded them through the hole of my tags to finish off my project.


Here is a slo-mo video trying to show you the  shimmer from the Pearl Aqua Pigment, on the snowman and snowflakes.


Thanks for stopping by.  Do you make Christmas Tags?  Leave me a comment below.

As usual, I have affiliated links to everything in the Brutus Monroe Store. (Affiliated links are at no additional cost to you, I receive small compensation which helps support me.)


Wednesday, December 9, 2020

Roundimals Stamps and Dies From Brutus Monroe

 Have you seen the adorable new Roundimals stamps and die combos from Brutus Monroe?  So far there are four sets that have been released with plans for more animals added in the future.  I absolutely ADORE these animals and could not wait to color them up.


I decided to make a  quick notecard set featuring each Animal and pair them with a stencil, one ink color and one kind of embellishment.  These cards came together so quickly.  The longest part was choosing the Copic colors and apply the makers.  All of my cards are top folding A2 cards with white card bases.  The four animals were stamped with Raven detail ink on Perfect blend paper, colored with a variety of Copics and cut out with the coordinating dies.

Here is the full set of cards together in one photo


Onto how I made the individual cards.  The first is our adorable awesome Polly Pig.  I paired Polly with the Fallin Hearts Stencil and actually used Bee Sting Ink from Simon Hurley Creates.  I used a light hand with my blending tool to give the ink a lighter color and not such a dark "red" color.  I arranged the card in my Misti and stamped the sentiment from the set with the Bee Sting Ink as well. After I attached my piggie, I dug out some Pink Confetti Sequins that I received in the April Inspiration box early this year.  Do you just want to squeeze him? 


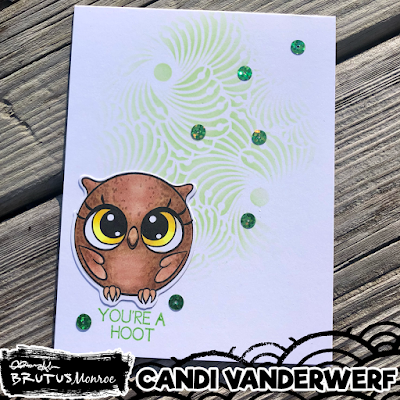
Next up is our Roundimal Owl-Hoot.  The eyelashes on this stamp.  So so cute! I pared Hoot with the Turbine stencil and Later Gator Ink from Simon Hurley Creates.  The turbine stencil is a past stencil of the month and one of my absolute favorites of all time.  Once again I used the same ink to stamp out the sentiment and found the Prism Sequins - Green to finish off my card.


Next up is the totally squishable Katie Koala.  I paired Katie with the Deco Flower Stencil and Grr! Ink (also from Simon Hurley Creates). After stamping the sentiment with the Grr! Ink and attaching the Koala, I used liquid glue to add some Prism Sequins - Gold for a final touch,


The final Roundimal that was released this time is a sweet Penny Penguin.  Penny had to be paired with High Tide stencil. I chose to use the Slippery When Wet ink from Simon Hurley Creates because when I was coloring my Penguin, I looked up some images on google.  I added a little yellow fir to the belly and sides of my penguins face.  Once again I used the same ink to stamp the sentiment and some of the Prism Sequins in Marigold.


Thank you for stopping by.  Which Roundimal is your favorite so far?  What animal do you hope to see as a Roundimal in the future?  Leave a comment below.


Here is a list of products that I used.  All of these products are available at the Brutus Monroe Store. (Affiliated links are at no additional cost to you, however they do help support content on my page.)


Tuesday, December 8, 2020

Snow Scenes Stamp and Die Combo From Brutus Monroe


Stamp and Die combo what??? yes, you read that right.  Now available at Brutus Monroe is the beautiful Snow Scenes Stamp and Die combo.  This stamp set is so beautiful.  It has three snowflakes that have a center with a different winter scene.  One is a peaceful river scene, one is the forest scene, and the other is cozy cabin scene.  The last snowflake has an open center that is perfect for a sentiment or pattern paper or one of the small snowflake stamps that also come with the set.  The dies match each of the large snowflakes and there is a circle die that cuts out the center of the snowflakes.  This stamp set is also available with the December Inspiration Box-Winter Winds, which you can order here.

When I received this set, I decided right away that I wanted to make a rainbow snowflake card.  I used the three scene snowflakes and stamped them out in rainbow order. First I took the Forest Scene and stamped it in Bee sting and Guppy Ink.  I quickly covered my inked images with Brutus Monroe Icicle Embossing Powder and heat set them.  I used Slipper When Wet and Later Gator Inks with the Cabin Snowflake set and repeated the same steps as above.  Finally I used Clear Skies and Triple Berry for the River scene and again heat set the Icicle embossing powder over the stamps images.

Here is a closeup so you can see the shine that the embossing powder gives the ink.

Using the coordinating dies, I quick cut out each of the snowflakes.  To cut the centers of my snowflakes, I decided to use a bigger die from the Circle Foundation die set than the one that came with stamp set only because I wanted to go on the outside of the circles to give them that definite border.  I popped up the centers with foam squares keeping to the rainbow order.

Next I pulled a precut slim line panel and used some low tack tape to attach the Simple Slim Line Stencil Dressing Screen.  This time I only used three inks: Bee Sting, Slippery When Wet and Clear Skies.  I used my blending tools to blend the inks to make a rainbow.  When I do this, I start with my lightest, in this case the Slippery When Wet yellow, and blended in the middle up toward the top and slightly towards the bottom.  Next, I used Bee Sting at the top and blended over the Slipper When Wet to create and orange color.  I also blended some Bee Sting at the very bottom.  Finally, I used Clear Skies in the remaining white portion of my panel and blended up over some of the yellow and down over the red at the bottom.I like using a three color blend to make my rainbows instead of using all six colors. I find the blend to be more cohesive and smooth when combined them to make the orange, green and purple.  Because the Dressing Screen stencil is smaller than a standard Slim Line Stencil, I made sure to blend the board at the top and bottom giving me that rainbow effect as well.  Before I removed my stencil I quickly sprayed the whole panel with a shimmer spray from my stash for some sparkle and shine.

I trimmed down my rainbow panel slightly and attached it to my card.  Now full disclosure, I meant to make a landscape card, however, I attached my panel backwards so the rainbow started with purple, so I had to adapt.  No worries I just flipped the card to portrait and moved on.  I attached the snowflakes from the top to the bottom with liquid glue in of course rainbow order.  Lastly, I put my whole card base in my Original Misti and stamped my sentiment from the set with Raven Detail in.

Thank you for stopping by.  Here is a list of affiliated links to the Brutus Monroe store for products that I used on this card. (Affiliated links are at no additional cost for you, they just help to support my content and blog.)


Monday, December 7, 2020

Brutus Monroe Die of the Month


Slim Line Card featuring the Die of the month

For my card today, I used the die of the month in a different way.  I cut the die out of some heavy weight card stock and then lined it up at the top of my Pre-cut Slim Line Card panel until I got the desired pattern I wanted.  I used some low tack tape to temporarily attach it to my card panel at the bottom of the die (which was the center of my card panel).  Using a blending tool and Clear Skies ink from Simon Hurley Creates, I blended the ink over the die cut which shows the negative pattern on my panel.  I then flipped my panel around and repeated the same steps.  I took the time to arrange the die cut so it would have almost (if not the same) pattern on the other side.

Next I quickly covered my panel in Icicle Embossing Powder and set it with my heat gun.  I have found that the Simon Hurley Create Inks stay wet just long enough to using embossing powder over them, however, I usually work quickly just in case.  I like the Icicle Embossing Powder, because it is a clear embossing powder and shows the ink color below and just enhances it a bit with shine.


I lined up my panel in my Original Misti, choosing the Seasons Greetings sentiment from the Snow Scenes stamp set, and stamped out my sentiment with the same Clear Skies ink.  I also covered this with the same Icicle embossing powder and heat set it. I cut down my card panel slightly and used a blue piece of card stock that I found in my stash that was just a shade darker than the ink.  After matting my panel on the front of the blue card stock, I then attached both panels to my Precut Slim Card Base that I scored and folded at 3.5"

I used the scraps of blue paper to cut out the Simple Snowflake dies and attached them to the front of my card.  Finally, for some more texture and dimension, I added some of the Flat Back Pearls to the center of each of the snowflake.


Close up of my card.  You can almost see the sparkle from the Embossing powder


Here is are links to each of the products that I used.  They can all be found in the Brutus Monroe store. (affiliated links are at no cost to you but do help support my creating and content on this page-Thank you)


Hugs and Kisses Challenge Card (Brutus Monroe)

 This month's CYOEchallenge on the Brutus Monore Fan Club Page is: Break out your sparkles and lets make some fun cards.  I started off...